
St. Patrick’s Day is right around the corner, and I don’t know about you, but I’m already feeling the excitement! This time of year has me craving festive nail designs that scream luck and joy. If you find yourself daydreaming about vibrant greens, sparkling golds, and intricate shamrocks adorning your fingertips, then this post is for you. The joy of celebrating this spirited holiday can be amplified with some eye-catching St. Patrick’s Day nails that let your creativity shine.
Whether you’re attending a lively parade, hosting a gathering, or simply looking to channel your inner leprechaun, stunning nail art can elevate your holiday spirit. I’ve pulled together 15 incredible nail designs that are not only festive but also easy to recreate, even if you’re new to nail art. With options ranging from classic greens to playful rainbows, you’ll find ideas that are chic, fun, and sure to bring a smile to your face. Get ready to feel lucky with these designs that will have everyone asking, “Where did you get your nails done?”
Key Takeaways
– Discover 15 unique and stunning St. Patrick’s Day nail designs, perfect for any festive occasion.
– Learn how to incorporate various themes like shamrocks, rainbows, and gold accents into your nail art.
– Find designs that cater to different skill levels, from beginners to nail art pros.
– Get inspired by creative combinations, such as ombre effects and plaid patterns, that bring the holiday spirit to life.
– Use this guide as a fun way to express your personality and celebrate St. Patrick’s Day in style!
1. Classic Green Ombre
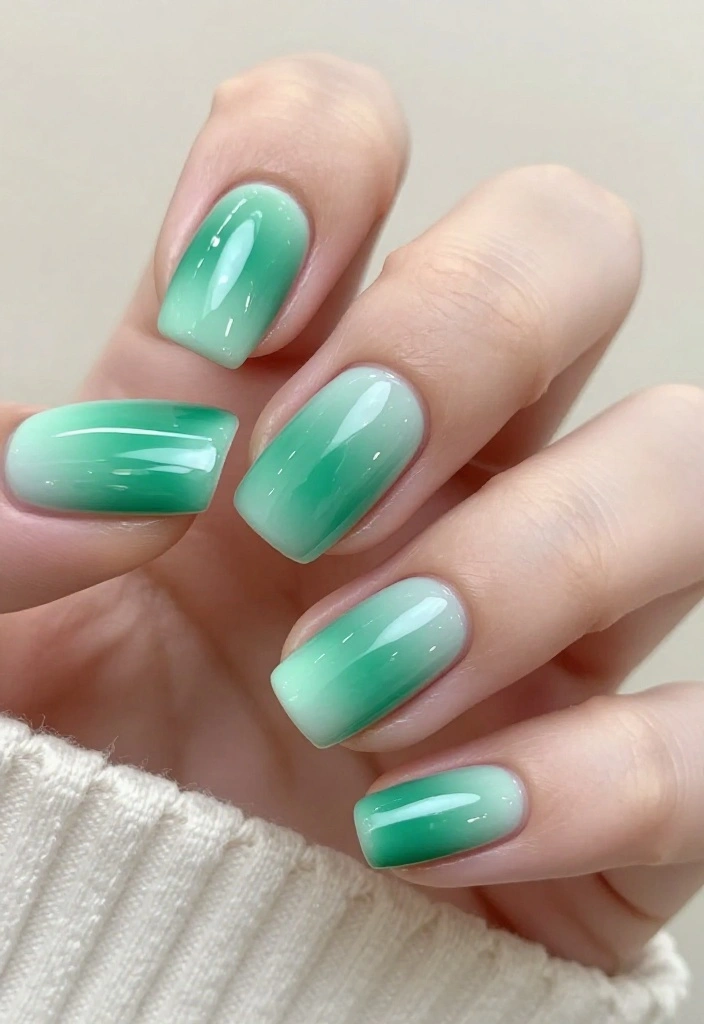
Kick off your St. Patrick’s Day celebrations with a classic green ombre design. This style transitions beautifully from a rich emerald at the base to a soft pastel green at the tips, capturing the essence of Ireland’s vibrant landscapes. Ombre nails offer a modern twist that can be both elegant and relaxed, making them perfect for any occasion.
To achieve this look, start with a protective base coat. Using a makeup sponge, dab on various shades of green, blending them gently at the tips for a seamless ombre effect. Finish with a glossy top coat to lock in the design and add a radiant shine.
– Tip: For a more vibrant ombre, use a white base coat underneath.
– Trick: Experiment with a range of green shades to discover your ideal gradient.
– Nail Art Tools: Makeup sponge, assorted green nail polishes, base coat, and top coat.
2. Glittery Gold Tips
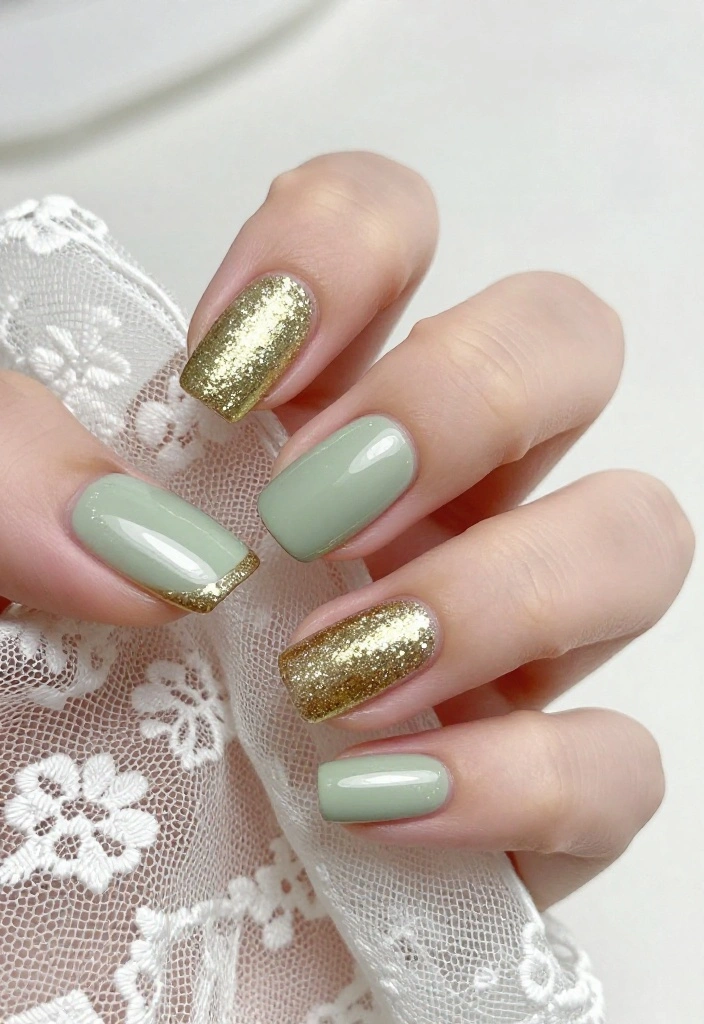
Sparkle your way through St. Patrick’s Day with glittery gold tips! This trendy take on the classic French manicure adds a festive flair while remaining chic. The combination of gold glitter against a nude or pale green base creates a stylish yet whimsical look.
Start by applying a nude or light green polish as your base. Once dry, carefully brush on gold glitter polish to the tips, allowing it to extend slightly down for a delicate sparkle. Seal it all in with a top coat for durability and shine.
– Tip: Fine glitter gives a more refined finish.
– Trick: Apply a sticky base coat before adding glitter for better adhesion.
– Nail Art Tools: Gold glitter polish, nude or light green base polish, top coat.
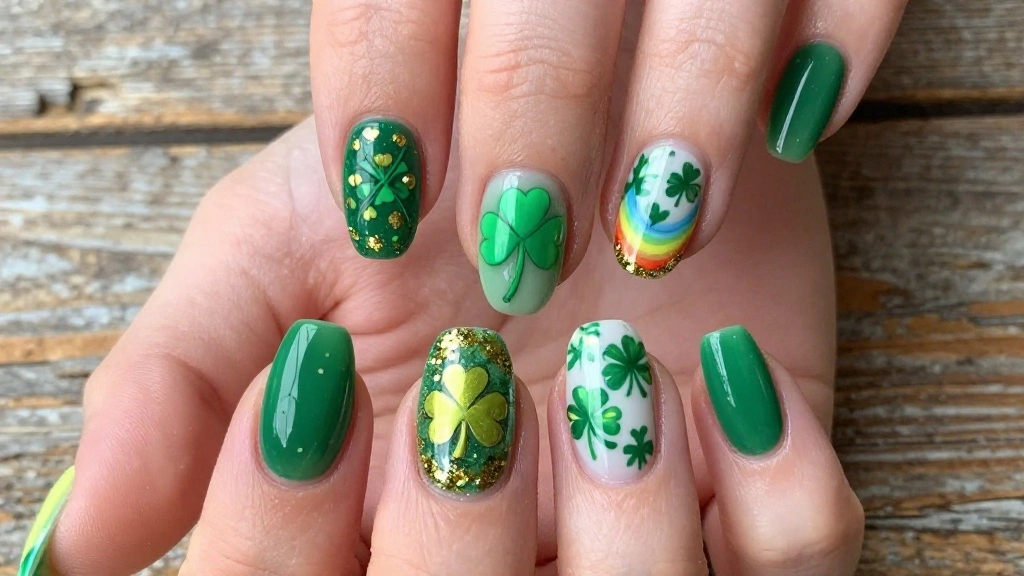
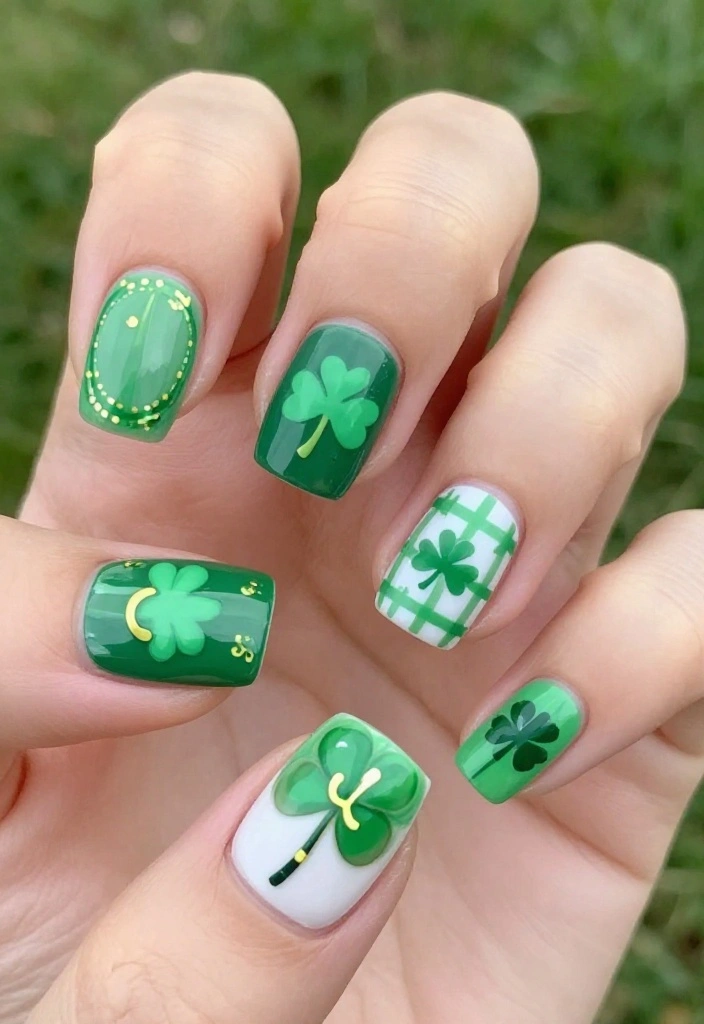
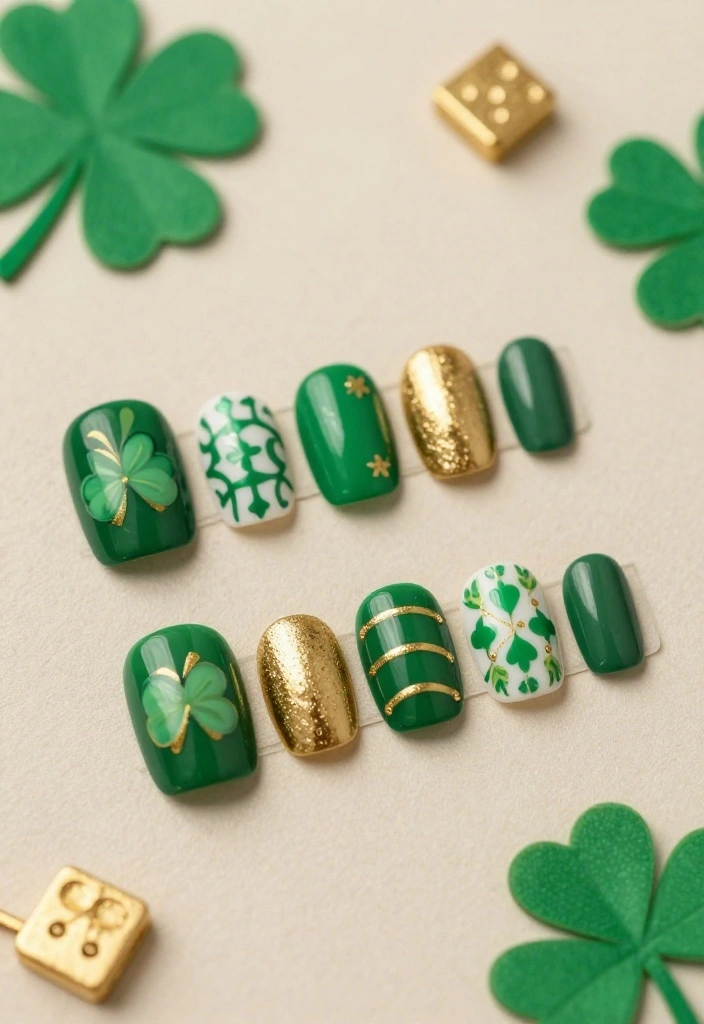
3. Shamrock Nail Art
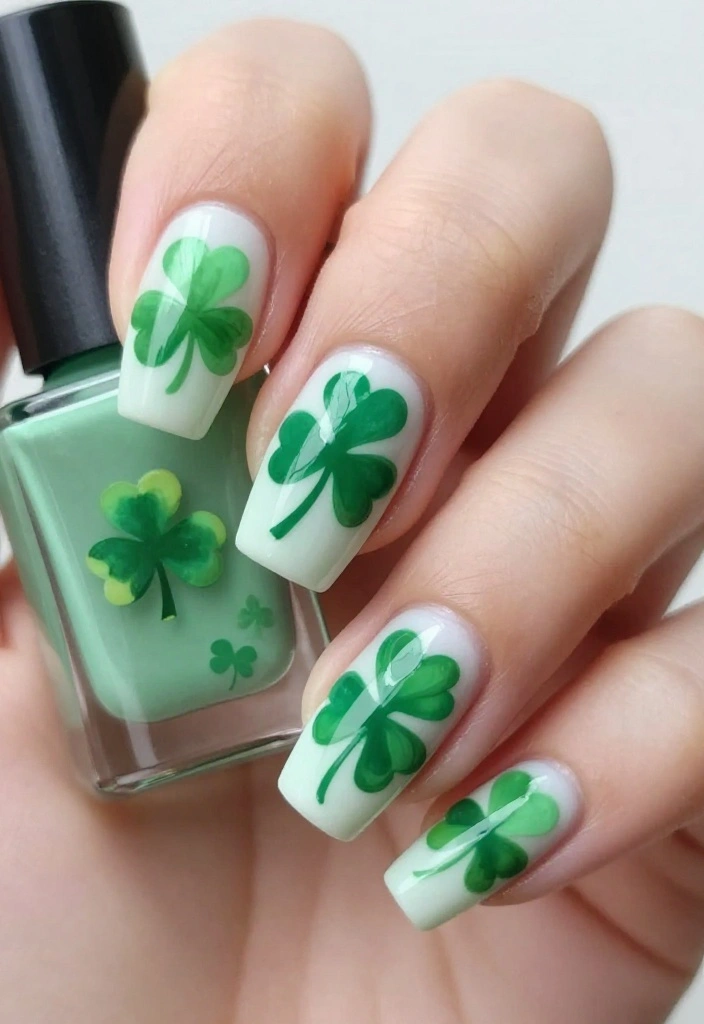
Embrace the spirit of St. Patrick’s Day with charming shamrock nail art! This playful design features tiny shamrocks that symbolize good luck and can be customized with various colors or set against a neutral backdrop.
Begin with a green or white base coat. Once dry, use a fine nail art brush or dotting tool to create small heart shapes, grouping them to form a shamrock. A tiny gold dot in the center can add a delightful pop of color. Seal everything with a top coat for a glossy finish.
– Tip: A toothpick works well for detailed designs.
– Trick: Practice your shamrock on paper before applying it to your nails.
– Nail Art Tools: Toothpick or dotting tool, green nail polish, base coat, and top coat.
4. Rainbow and Pot of Gold
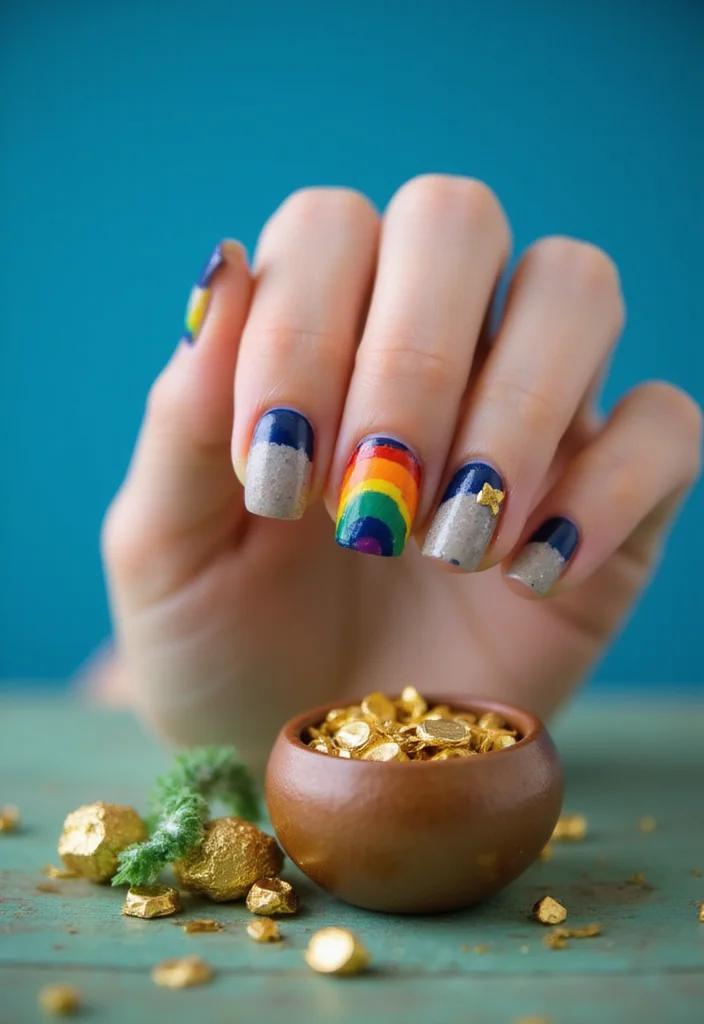
Infuse your nails with whimsy through a rainbow and pot of gold design! This cheerful nail art features a vibrant rainbow arching over a tiny pot of gold, embodying the magic of St. Patrick’s Day.
Start by painting your nails a bright blue to represent the sky, then use a dotting tool or fine brush to create the rainbow with vivid colors. For the pot of gold, paint a small black oval at the rainbow’s base and fill it with tiny yellow dots or glitter to mimic gold coins. Complete your look with a top coat for lasting durability.
– Tip: Nail striping tape can help you achieve clean lines for the rainbow.
– Trick: Apply multiple thin layers of polish for enhanced brightness.
– Nail Art Tools: Nail striping tape, dotting tool, assorted colored polishes, base coat, and top coat.
5. Celtic Knots
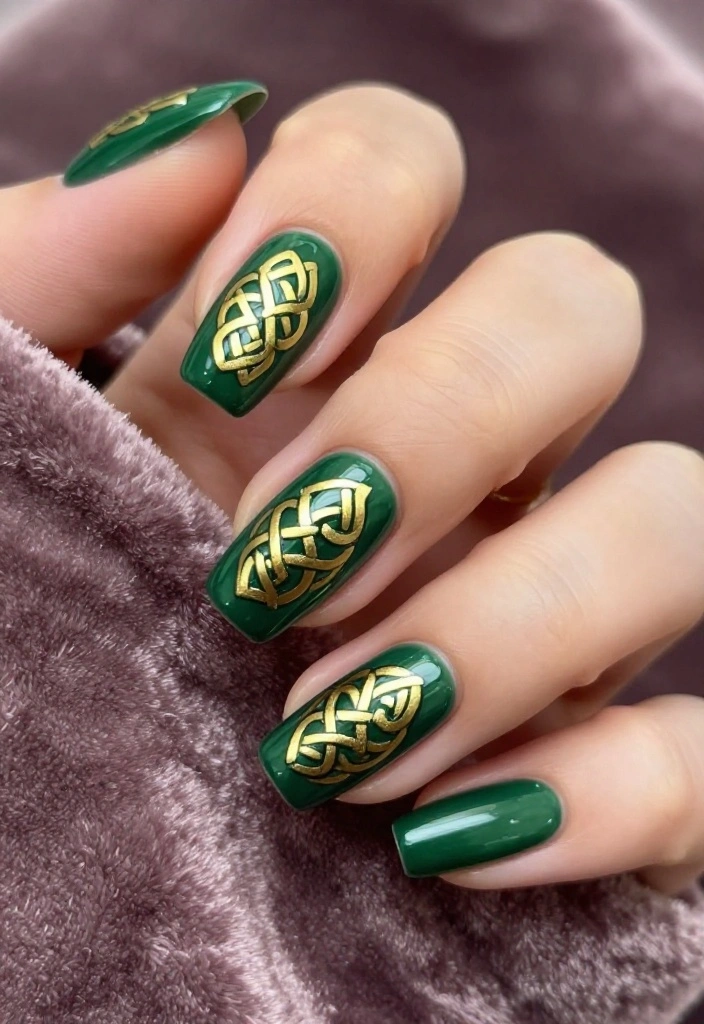
Opt for an elegant touch with Celtic knots on your St. Patrick’s Day nails. These intricate designs add a layer of sophistication and symbolize heritage.
Start with a solid base coat in green or white. Once dry, use a fine nail art brush to draw the detailed knot designs in a contrasting color like gold or black. Adding subtle glitter inside the knots can enhance the overall look. Finish with a top coat to ensure your art stays intact.
– Tip: Watch tutorial videos to refine your knot drawing skills.
– Trick: Use a light touch with the brush for finer lines.
– Nail Art Tools: Fine nail art brush, gold or black polish, glitter polish.
6. Lucky Charms
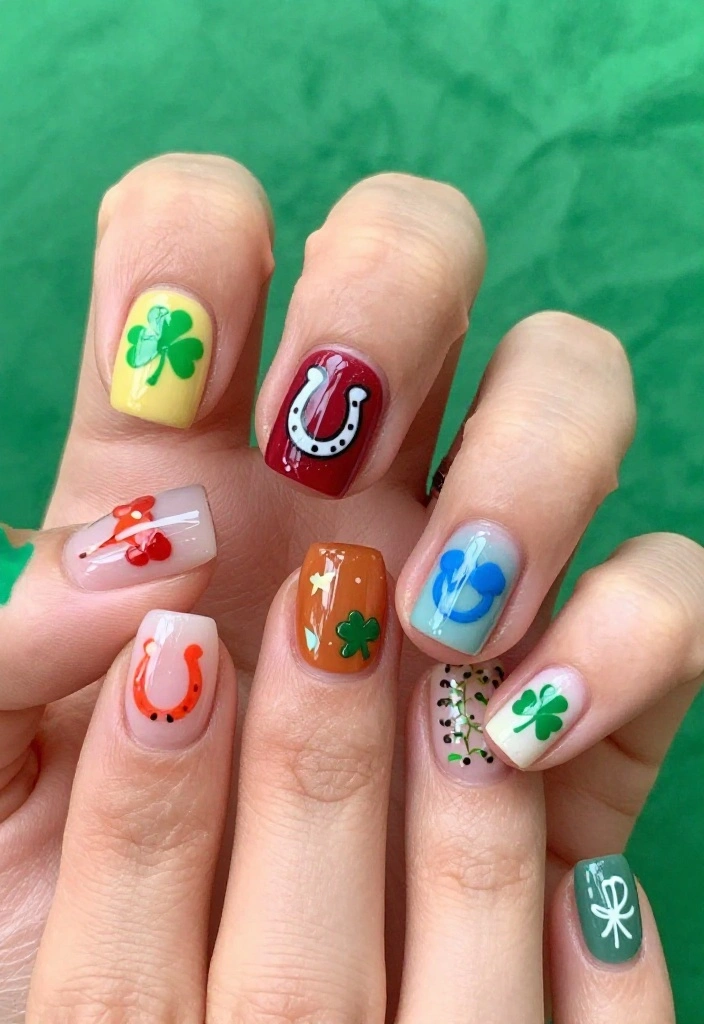
Personalize your St. Patrick’s Day nails with playful lucky charms! This design lets you incorporate symbols like horseshoes, clovers, and coins, adding a unique touch.
Start with a fresh base coat in green, white, or a light pastel shade. Once dry, paint your favorite lucky symbols on each nail or create an accent nail with a fun collage. For a 3D effect, add small rhinestones or metallic studs for a bling factor. Seal with a glossy top coat to keep the design vibrant.
– Tip: Use a dotting tool for precise detailing.
– Trick: Keep designs simple for easier application.
– Nail Art Tools: Dotting tool, metallic studs or rhinestones, colorful polishes, base coat, and top coat.
7. St. Paddy’s Plaid
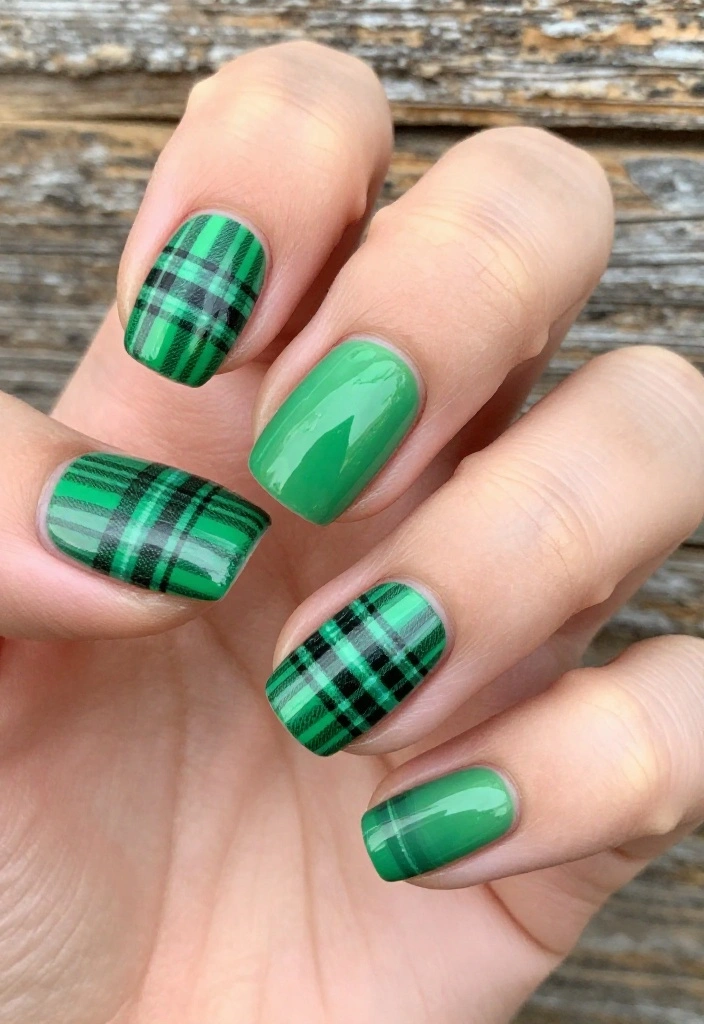
Add a stylish twist with a trendy plaid design inspired by traditional Irish patterns this St. Patrick’s Day. Plaid is versatile and allows for multiple shades of green to shine through your nail art.
Start with a base coat in a darker green shade. Once dry, use a thin brush or nail tape to create vertical and horizontal lines with alternating lighter shades of green and white. Layer these lines for a dimensional effect and finish with a top coat for a polished look.
– Tip: Nail tape helps achieve perfectly straight lines.
– Trick: Experiment with various color combinations for a unique plaid design.
– Nail Art Tools: Thin brush or nail tape, multiple green polishes, base coat, and top coat.
8. Emerald City Nails
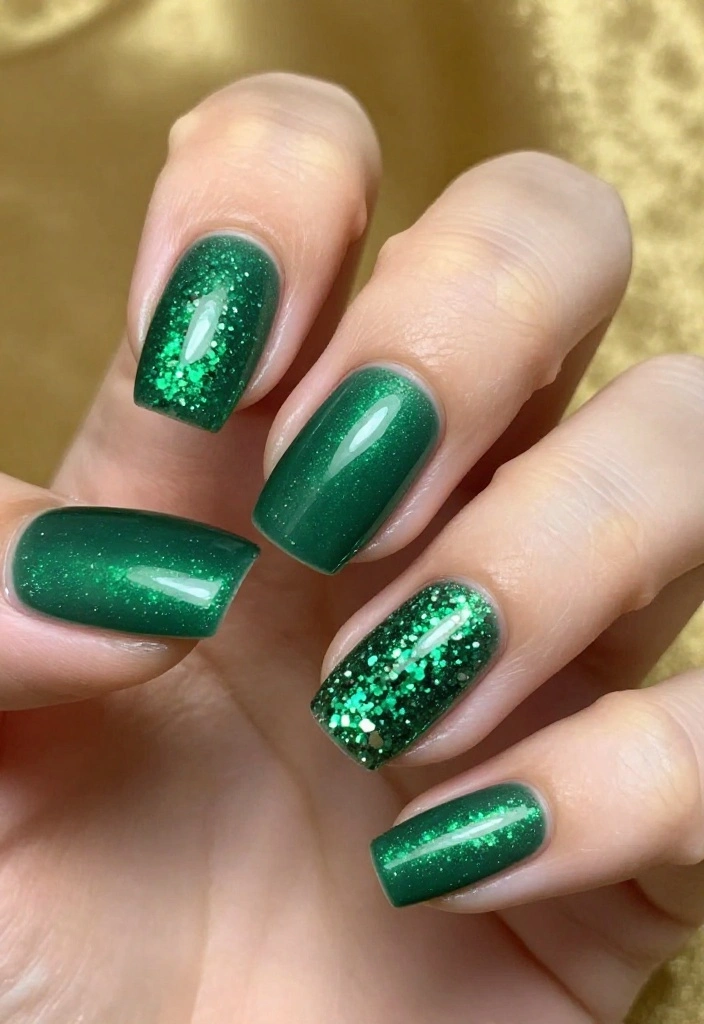
Make a bold statement with emerald city nails! This design showcases rich shades of green adorned with sparkly accents, embodying the enchantment of the Emerald City.
Begin with a dark green base coat, like emerald or forest green. Then, apply glitter polish for a gradient effect on one or two accent nails to catch the light. Consider adding rhinestones or glitter shaped like stars or gems to elevate the glam factor. Complete with a top coat for added protection.
– Tip: Build sparkle with thin layers of glitter polish.
– Trick: A matte top coat can give a trendy twist to the design.
– Nail Art Tools: Dark green polish, glitter polish, rhinestones, base coat, and top coat.
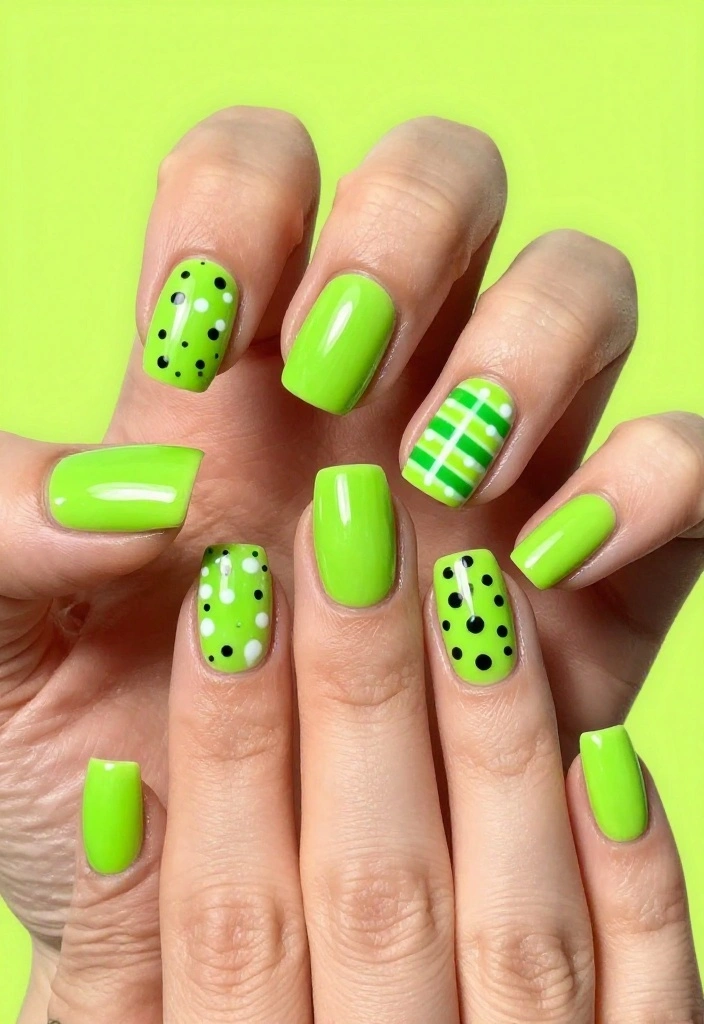
9. Polka Dots and Stripes
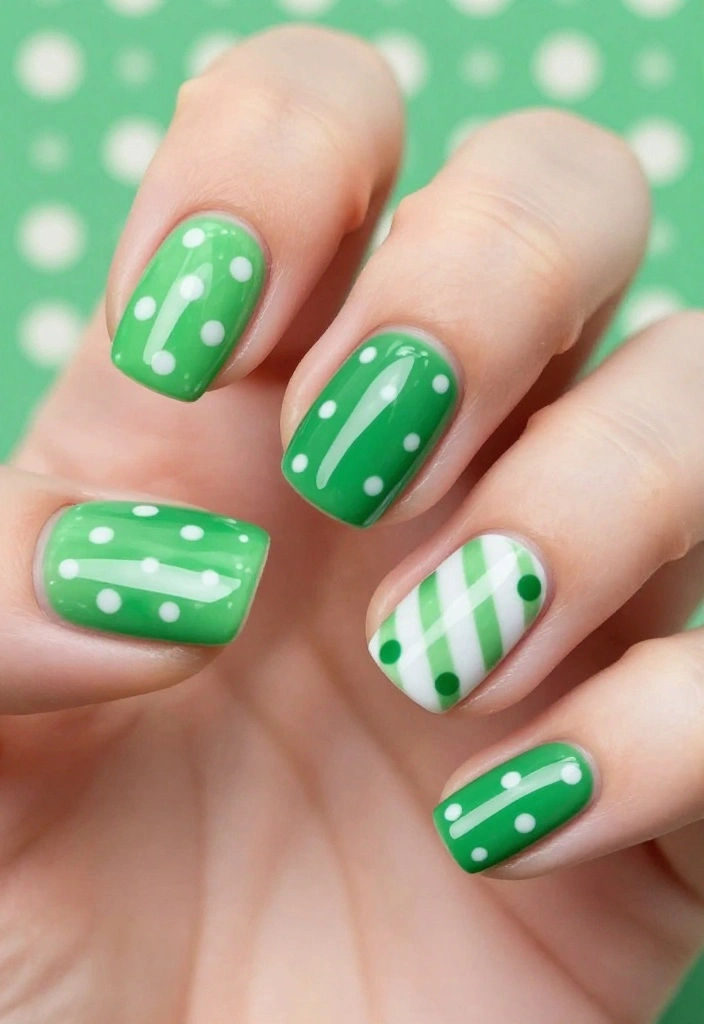
Embrace fun with a playful mix of polka dots and stripes for St. Patrick’s Day! This whimsical design allows you to express your creativity using shades of green, white, and even a hint of gold.
Choose a base color and paint your nails with either stripes or polka dots. You can alternate designs on each nail for added flair. A dotting tool works wonders for polka dots, while a striping brush or tape helps create clean lines for stripes. Seal with a glossy top coat for a finished look.
– Tip: Use contrasting colors for a bolder visual effect.
– Trick: Ensure your base coat is fully dry before adding designs to avoid smudging.
– Nail Art Tools: Dotting tool, striping brush, base coat, and top coat.
How To Choose The Right St. Patrick’s Day Nail Designs
Choosing the perfect St. Patrick’s Day nails can feel overwhelming, especially with so many options available. Follow these simple guidelines to find a design that suits your style and the festivities.
1. Consider Your Personal Style
Before you dive into the world of festive nail art, think about your usual nail style. Do you prefer simple and elegant designs, or are you more into bright and bold patterns? Choosing a design that aligns with your personal taste will help you feel more confident in your look. Look for inspiration from your current wardrobe or favorite accessories for a cohesive feel.
2. Assess the Occasion
St. Patrick’s Day celebrations can range from casual gatherings to formal parties. If you’re attending a more laid-back event, a simple shamrock or a classic green ombre may suffice. However, for a lively gathering, go for intricate designs like rainbow and pot of gold nail art. Keep in mind how the design will fit into the setting of your celebration.
3. Choose the Right Colors
Green is a must for St. Patrick’s Day nails, but don’t forget about complementary colors! Gold, white, and even black can create stunning contrasts. If you’re unsure, consider a multi-colored design that showcases the spirit of the day while also allowing you to express your creativity. Think about what colors make you feel lucky and confident.
4. Think About Nail Length and Shape
The length and shape of your nails can greatly affect how a design looks. Longer nails may provide more canvas for detailed designs, while shorter nails may be better suited for simpler patterns. Decide whether you want a coffin, almond, or square shape for a look that fits your style. Don’t hesitate to experiment with different shapes to see what works best for you.
5. Consider Your Skill Level
Some nail designs can be intricate and require advanced skills, while others are beginner-friendly. If you’re new to nail art, consider starting with simpler designs like polka dots or stripes. For those more experienced, you might want to tackle more detailed art like Celtic knots or water marbling. Remember, practice makes perfect, so choose a design that challenges you but is still manageable.
6. Budget and Nail Products
Lastly, consider your budget when choosing St. Patrick’s Day nails. Some designs may require specific tools or products, such as nail stickers, stamping plates, or special polishes. If you’re on a budget, stick to designs that need minimal extra materials. You can always get creative with what you have at home or visit a local nail salon for professional help.
Pro Tip: Don’t be afraid to mix and match different designs! You can create a unique set that showcases your personality and love for St. Patrick’s Day. Try combining a classic green base with glittery gold tips or shamrock accents to make your nails stand out.
By keeping these tips in mind, you can confidently choose nail designs that will make you feel lucky this St. Patrick’s Day. Whether you’re celebrating with friends or family, the right nail art can add a fun touch to your festive look!
10. Kiss Me, I’m Irish
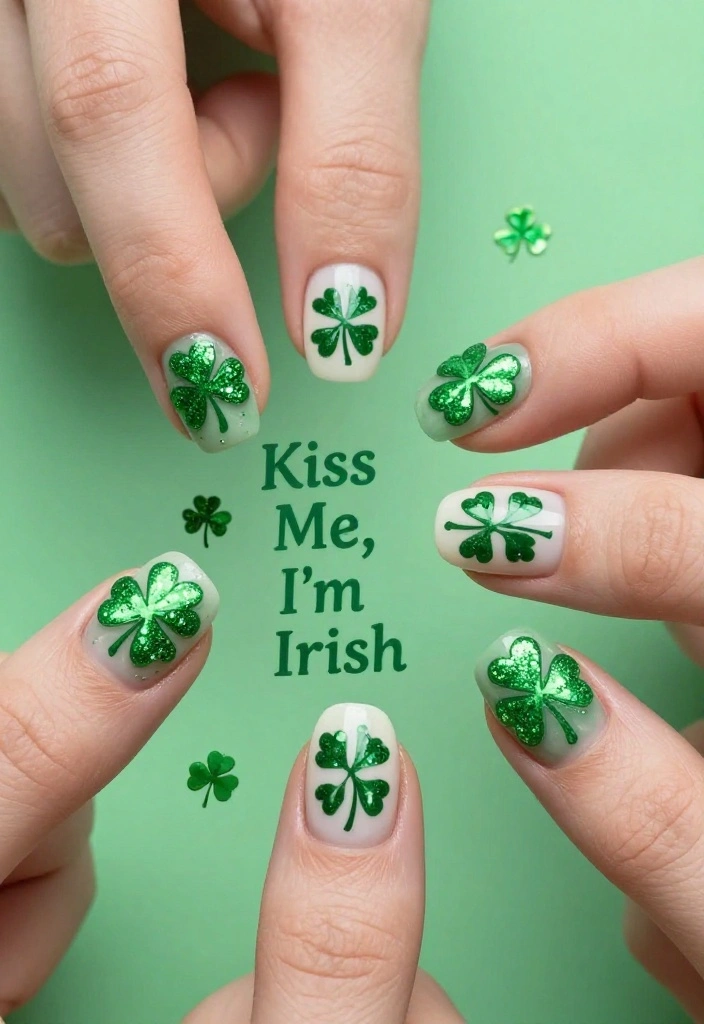
Add a playful twist to your St. Patrick’s Day nails with the slogan ‘Kiss Me, I’m Irish.’ This fun design lets you showcase your holiday spirit with a simple phrase or complement it with shamrocks and rainbows.
Start with a light green base coat, and once dry, use a fine brush or nail pen to write your phrase on an accent nail. Enhance the design with small shamrocks or glitter around the text for extra charm. Finish with a top coat to protect your nail art.
– Tip: Practice your lettering on paper before applying it to your nails.
– Trick: Use a clear polish over written designs to make them pop.
– Nail Art Tools: Nail pen or fine brush, base coat, and top coat.
11. St. Patrick’s Day Watermarbling
Feeling adventurous? Watermarbling can create stunning patterns for your St. Patrick’s Day nails! This technique blends colors into beautiful swirls, offering a unique artistic flair.
Start with a base coat and allow it to dry completely. Prepare a cup of water and drop your chosen nail polishes into it, swirling the colors gently with a toothpick. Dip your nails into the design for a mesmerizing marbled look. Finish with a clear top coat for protection.
– Tip: Use room temperature water for optimal results.
– Trick: Practice your dipping technique on paper before trying it on your nails.
– Nail Art Tools: Base coat, top coat, multiple polish colors, toothpick, and a cup of water.
12. Neon Green Fun
If you love to stand out, neon green nails are a bold choice for St. Patrick’s Day! This vibrant design is sure to catch everyone’s eye and embodies the holiday spirit.
Apply bright neon green polish to your nails. You can keep it simple or add fun designs like stripes or dots, or even create a matte finish for contrast. A glossy top coat will enhance the neon effect and keep your nails looking fresh.
– Tip: Pair neon green with black or white for a striking contrast.
– Trick: Use two coats of neon polish for maximum brightness.
– Nail Art Tools: Neon green polish, base coat, top coat, and a striping brush.
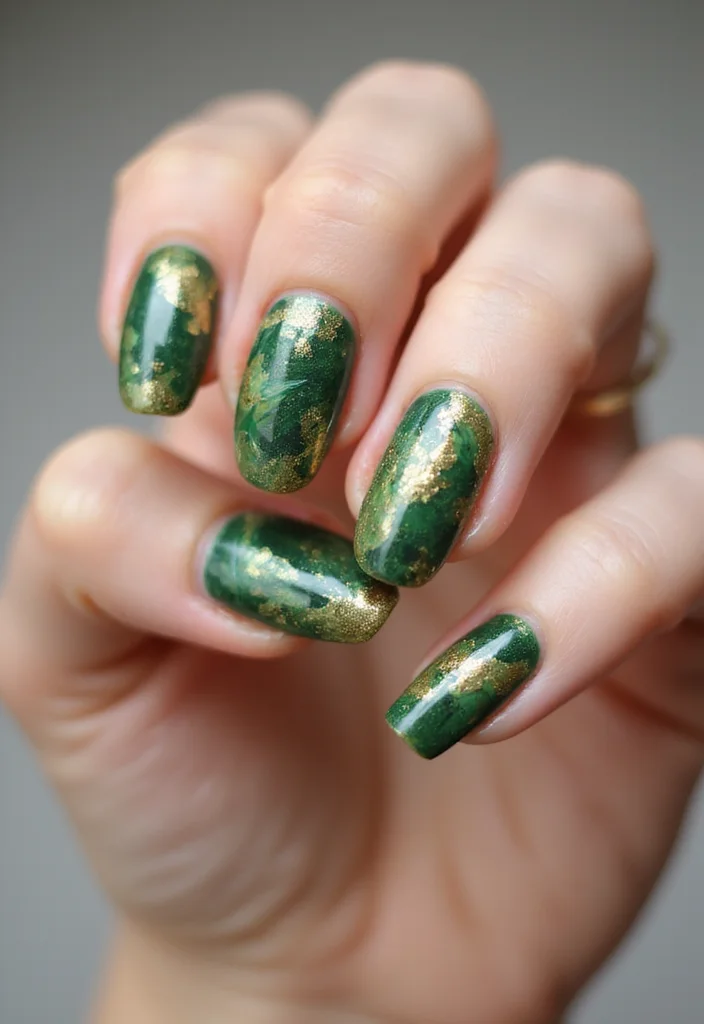
13. Gold Leaf Accents
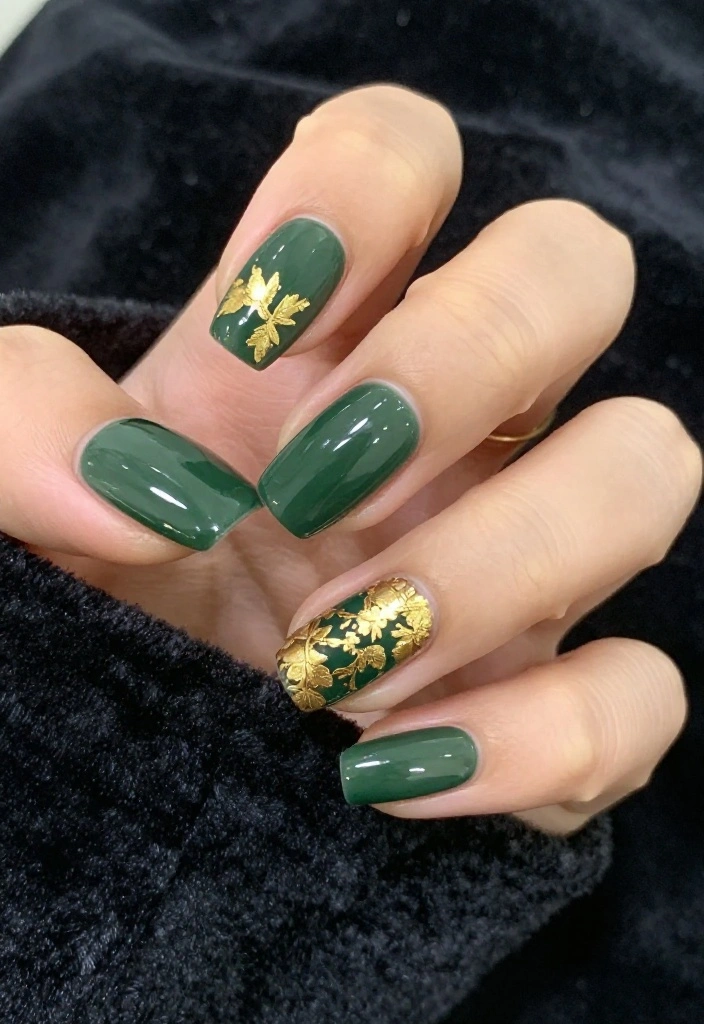
Elevate your St. Patrick’s Day nails with luxurious gold leaf accents! This trend adds glam and sophistication to any design.
Choose a solid green or white base to let the gold leaf shine. After your base coat dries, apply pieces of gold leaf in random or specific patterns on your nails. Seal with a glossy top coat to prevent flaking and enhance shine.
– Tip: Use tweezers for handling delicate gold leaf pieces.
– Trick: Apply a clear base coat before the gold leaf for better adherence.
– Nail Art Tools: Gold leaf, clear polish, base coat, and top coat.
14. Mix and Match
Express your creativity by mixing and matching different designs! Combine elements like shamrocks, stripes, and solid colors for a unique look that reflects your personal style.
Paint your nails in various colors and designs, choosing different styles for each nail. This technique allows you to incorporate all your favorite St. Patrick’s Day symbols into one cohesive ensemble. Seal everything with a top coat to preserve your artwork.
– Tip: Stick to a color palette for a harmonious look across your designs.
– Trick: Use accent nails to unify your mix-and-match theme.
– Nail Art Tools: Various polishes, base coat, top coat, and nail art brushes.
15. Heartfelt Irish Manicure
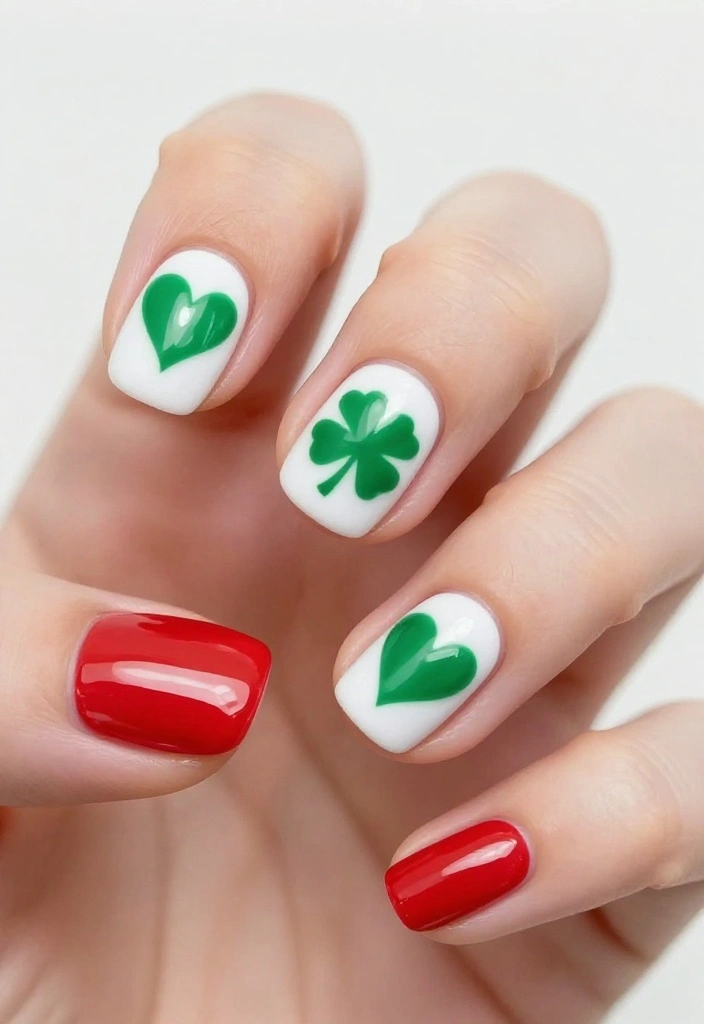
Show your love for Ireland with a heartfelt Irish-themed manicure. This design can feature intricate hearts, shamrocks, and even colors from the Irish flag, making a beautifully meaningful statement.
Begin with a white or light green base, and use a fine brush to paint red, white, and green hearts on your nails. Alternatively, create an accent nail featuring the Irish flag. Finish with a top coat to give your nails a lovely shine.
– Tip: Nail art pens make detailing in small spaces easier.
– Trick: Apply a matte top coat on some nails for a trendy contrast.
– Nail Art Tools: Nail art pens, base coat, top coat, and green, white, and red polishes.
Conclusion
With so many stunning St. Patrick’s Day nail designs to choose from, you’re bound to find a style that makes you feel lucky! Whether you prefer something elegant, playful, or bold, these festive nail art ideas have you covered for every celebration.
So grab your nail polish and let your creativity shine this St. Paddy’s Day! Remember to embrace the spirit of the holiday and have fun with your designs. Happy St. Patrick’s Day!
Note: We aim to provide accurate product links, but some may occasionally expire or become unavailable. If this happens, please search directly on Amazon for the product or a suitable alternative.
This post contains Amazon affiliate links, meaning we may earn a small commission if you purchase through our links, at no extra cost to you.
Frequently Asked Questions
What are the best St. Patrick’s Day nail designs for beginners to try at home?
St. Patrick’s Day nails can be both adorable and simple for beginners. Try a solid emerald green base with a tiny white shamrock painted with a fine brush, or add a single gold foil accent on the ring finger for a lucky pop. Other easy options include a white-and-green stripe design, or a soft rainbow gradient under a clear top coat to showcase the festive nail art.
Tips: use a thin brush and steady hand, let each layer dry fully, and finish with a strong top coat to prevent chipping. If you want a quicker route, opt for nail decals or stamps to achieve crisp festive nail art in minutes. And remember, these are all great ideas for St. Patrick’s Day nails.
What steps and supplies do I need for creating festive St. Patrick’s Day nail art?
Here’s a simple shopping list and process: gather base coat, top coat, two or three green shades (emerald, lime, or olive), white and gold polish or foil, a small detail brush or dotting tool, striping tape, and optional items like stamping plates or nail decals. You can also grab shamrock stickers for quick nail designs. Then prep nails, apply base coat, build color with thin layers, add decals or freehand details, seal with top coat. Let dry between steps for best results. For clean edges, use a little remover on a brush to tidy around the cuticle.
How can I make my St. Patrick’s Day nails last longer?
Maximize wear with proper prep and layering. Start with clean, dry nails and push back cuticles. Apply a quality base coat, then two thin coats of color with edge-capping, and seal with top coat. Reapply a thin top coat every 2-3 days and use gloves for dishes or cleaning to avoid chips. If you choose gel, follow curing times and avoid peeling. A proper hand moisturizer also helps with edge wear and dryness, keeping your St. Patrick’s Day nails looking fresh longer.
What color combinations or motifs work best for St. Patrick’s Day nails?
Classic combos like emerald green with crisp white and shimmering gold capture the holiday vibe. A black base with green accents or a pastel green with metallic gold foil can look chic too. Try a rainbow gradient under a shamrock accent, or a matte green finish with shiny gold details. Motifs that pop include shamrocks, pots of gold, rainbows, and lucky coins—perfect for celebrating with nail designs that feel festive.
Are there quick and easy ways to add festive flair to St. Patrick’s Day nails without spending hours on nail art?
Absolutely. Use festive nail art stickers, decals, or stamping plates for nail designs without the effort. Try one accent nail with a shamrock or mini rainbow, or opt for nail wraps for fast results. Finish with a top coat and you’ve got St. Patrick’s Day nails that look professional in minutes. If you’re truly pressed for time, decals plus a sheer green top coat can give you polished, festive festive nail art in no time.
Related Topics
St. Patrick's Day nails
nail designs
festive nail art
green nail art
easy nail designs
holiday nail ideas
glitter nails
beginner friendly
lucky charm nails
four-leaf clover nails
creative nail art
seasonal nail trends