
Are you craving a makeup look that turns heads? Smoky eyes have a magical way of enhancing your beauty and adding that perfect touch of drama to any look. They can be as subtle or bold as you like, making them perfect for all occasions—from a casual day out to a glamorous evening event. This post is packed with 14 stunning smoky eye tutorials that will turn you into a makeup pro. Trust me, you’ll want to dive in, especially for the jaw-dropping #6!
If you’re someone who loves makeup, whether you’re a beginner or a seasoned artist, this guide is just for you. You’ll find a variety of styles catered to different tastes and events. From classic looks to colorful twists, there’s something here for everyone. Each tutorial is thoughtfully designed to help you master the technique and create gorgeous smoky eyes that suit your personality, no matter the occasion.
In this post, you’ll gain invaluable skills that will elevate your makeup game. You’ll learn how to apply smoky eyes like a pro with easy-to-follow steps. Each tutorial is crafted to ensure you feel confident and capable in your makeup journey. So get ready to grab your brushes and create some magic on your eyelids!
Key Takeaways
– Discover 14 unique smoky eye tutorials, each designed for different styles and occasions, ensuring variety in your makeup repertoire.
– Learn the step-by-step techniques for each look, making it easy for you to replicate them at home.
– Embrace different color palettes, from classic black to trendy gemstones, allowing you to express your personal style.
– Get tips on blending techniques and product recommendations to achieve a flawless finish.
– Gain confidence in your makeup skills, transforming you into a go-to makeup guru among your friends.
1. Classic Smoky Eye Tutorial
A classic smoky eye is your go-to for a stunning, sophisticated look. Combining deep blacks and grays, this style is perfect for those elegant evenings or glamorous nights out. Start with a clean eyelid and a good primer to make sure your shadows stay vibrant all night long. Begin by applying a rich dark gray to the outer corner and blend it towards the center, then deepen the outer V with black shadow. Finish with a lighter shade on the inner lid to make your eyes pop even more.
To elevate your look, add a hint of highlighter on the brow bone for a polished finish. Consider experimenting with different shades to find what works best for you.
Key steps to master the classic smoky eye:
– Apply eyeshadow primer for longevity
– Blend dark gray into the outer corner
– Deepen with black shadow in the outer V
– Brighten inner lid with a lighter shade
– Finish with eyeliner and mascara
This timeless look enhances your natural beauty and adds an air of elegance. You’ll feel confident and ready for any occasion in just a few minutes.
2. Brown Smoky Eye for Daytime
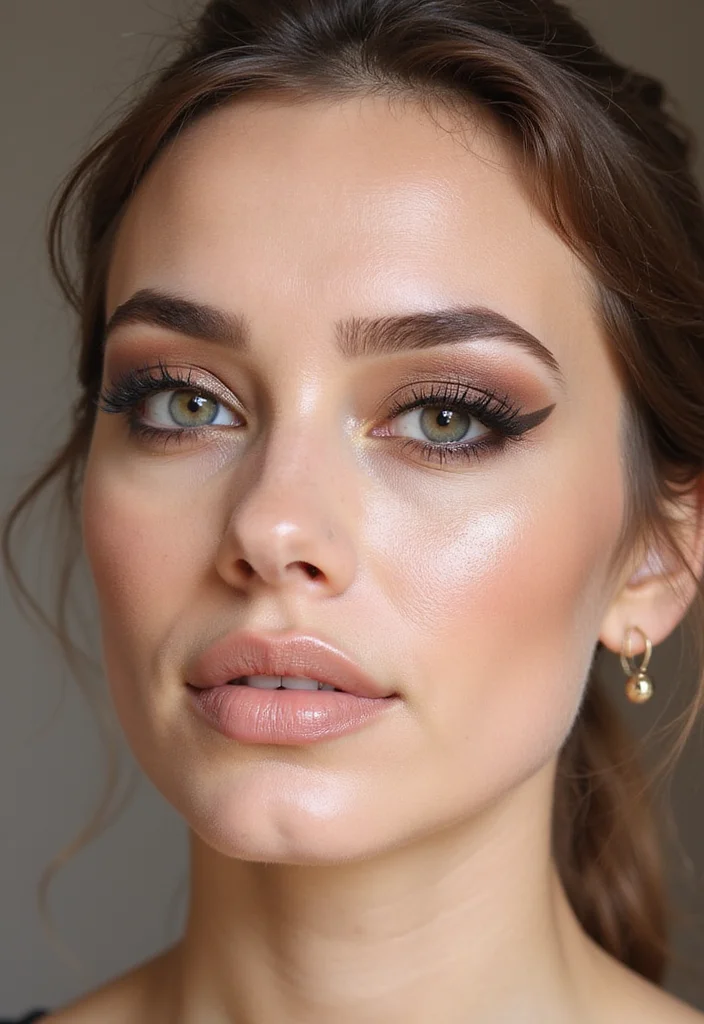
A brown smoky eye is an excellent choice for a soft, everyday look. This style is perfect for the office or casual outings, providing just the right amount of definition without being too heavy. Start with a neutral base eyeshadow and softly layer medium brown on the outer corners. Use deep brown or taupe in the crease to add depth, and complete the look with a gentle highlight on the brow bone.
Pair your brown smoky eye with a nude lip for a chic, effortless vibe. This look is versatile enough to transition from day to night with a few simple tweaks.
Here’s how to create your daytime brown smoky eye:
– Begin with a neutral base eyeshadow
– Apply medium brown to the outer corners
– Use dark brown in the crease for definition
– Highlight the brow bone with a soft shimmer
– Finish with mascara for a polished touch
This soft approach enhances your features while keeping the overall look fresh and approachable. You’ll love how easy it is to achieve and maintain throughout your busy day.
3. Colorful Smoky Eye
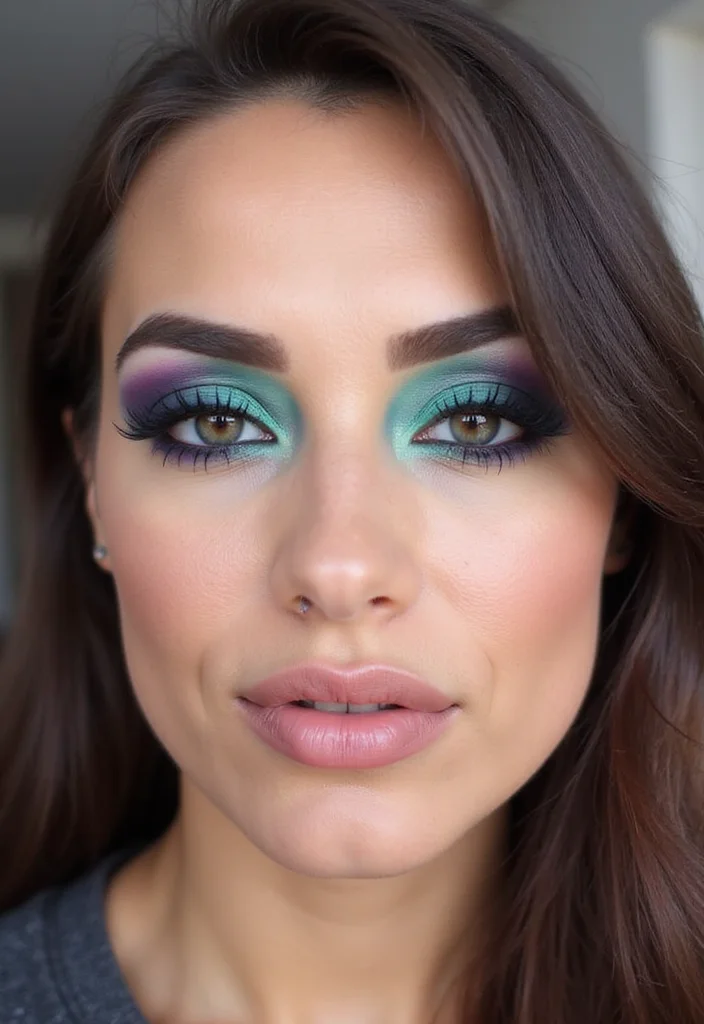
Ready to shake things up? A colorful smoky eye is a fabulous way to showcase your personality and creativity. Choose vibrant shades like teal, purple, or even orange to make a bold statement. Start with a white or light eyeshadow base to help those colors really pop. Apply your chosen color across the lid, blend a darker shade into the crease, and finish with a striking eyeliner.
This playful look is ideal for festivals or nights out with friends. Don’t be afraid to mix and match your colors for a unique twist.
Get started with your colorful smoky eye:
– Use a primer to ensure color vibrancy
– Apply a bright shade over the lid
– Blend darker color into the crease
– Finish with eyeliner and mascara
This exciting look allows for endless creativity and fun. You’ll turn heads and feel fabulous all night long!
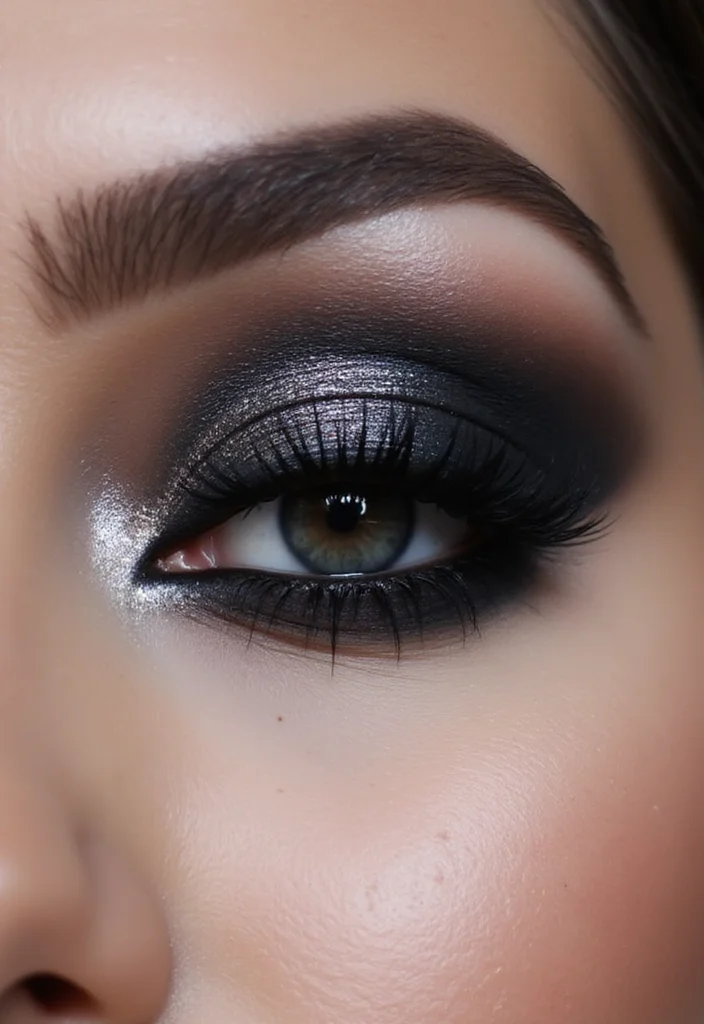
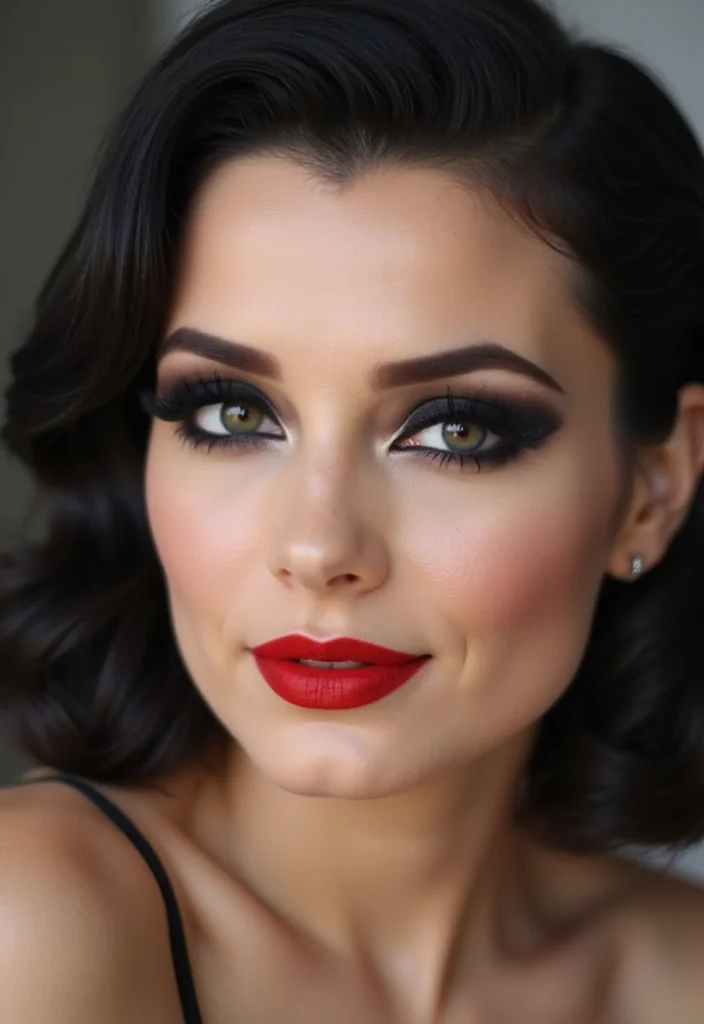
4. Silver and Black Glam Smoky Eye
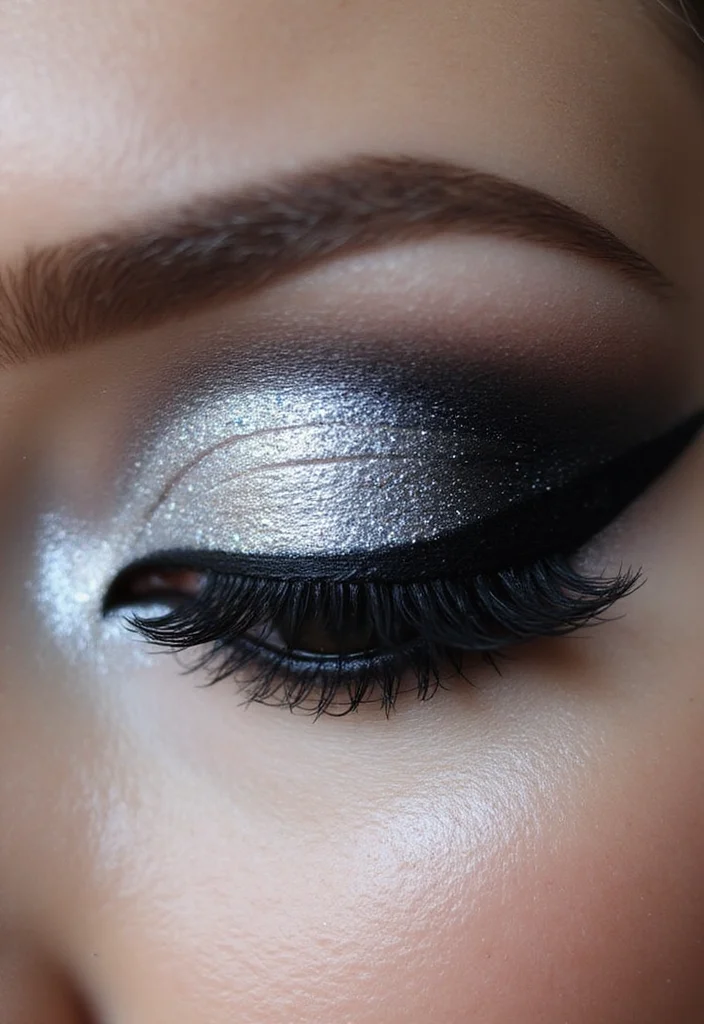
If you’re aiming for high glamour, the silver and black smoky eye is the perfect choice! This striking look is ideal for evening events or parties, radiating sophistication and allure. Start with a shimmering silver base on the lid and gradually blend black into the outer corner. Make sure to blend well to avoid any harsh lines.
For that extra sparkle, consider adding a touch of glitter. Pair this look with a nude or soft pink lip for a balanced finish.
Here’s how to create this glamorous look:
– Apply silver eyeshadow all over the lid
– Blend black shadow into the outer corner
– Add glitter for a dazzling effect
– Line your eyes and complete with mascara
This captivating style will leave a lasting impression. You’ll feel like a star, ready to shine at any event.
Silver and Black Glam Smoky Eye
Editor’s Choice


📹 Related Video: Night Out Makeup Tutorial | Black & Silver Smokey Eye
5. Soft Pink Smoky Eye
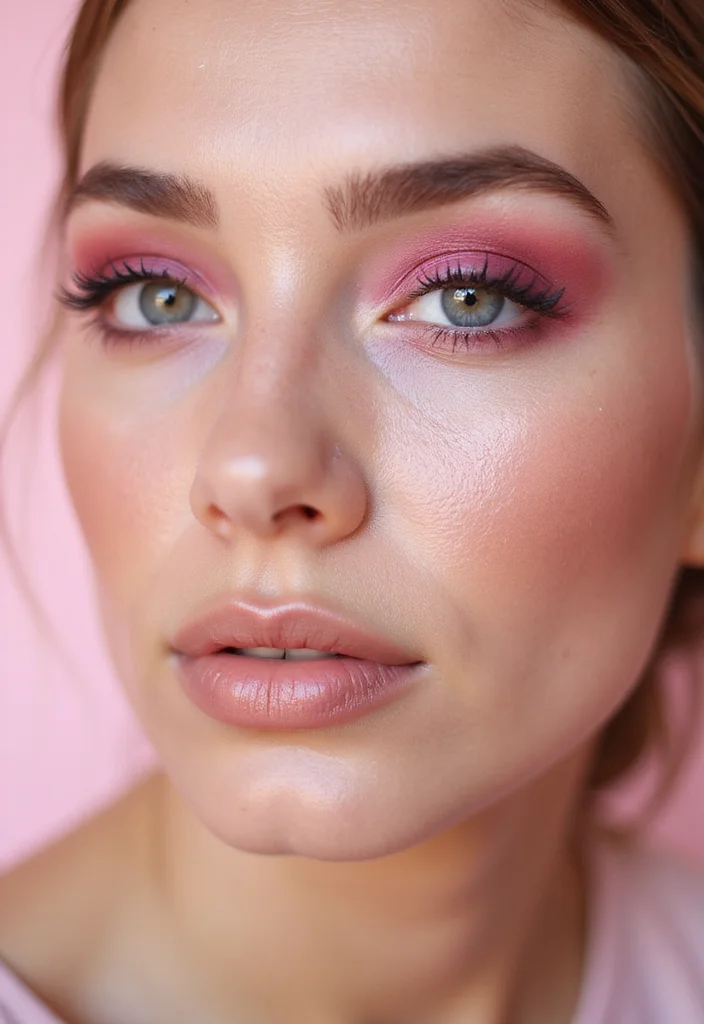
For a softer take on the smoky eye, the soft pink variant is both romantic and versatile. This lovely look is perfect for date nights or spring gatherings. Start with a delicate pink shade on the eyelid, blending deeper pink or plum shades into the crease. Finish with a touch of highlighter on the inner corner to brighten your gaze.
This gentle approach keeps your look fresh and flirty! Consider pairing it with a glossy lip for a lovely finish.
Steps to achieve the soft pink smoky eye:
– Apply soft pink eyeshadow over the eyelid
– Blend deeper shades into the crease for dimension
– Highlight the inner corner with a shimmery shade
– Line your eyes and finish with mascara
This enchanting look enhances your natural beauty and is perfect for any occasion. You’ll feel effortlessly chic and ready to charm!
Soft Pink Smoky Eye
Editor’s Choice


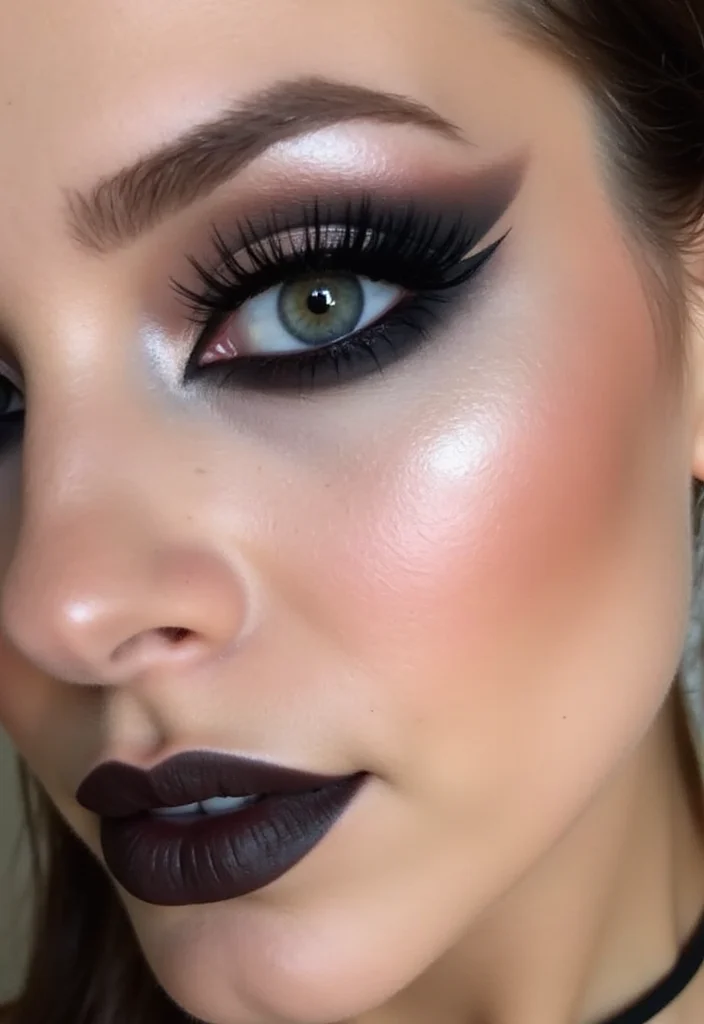
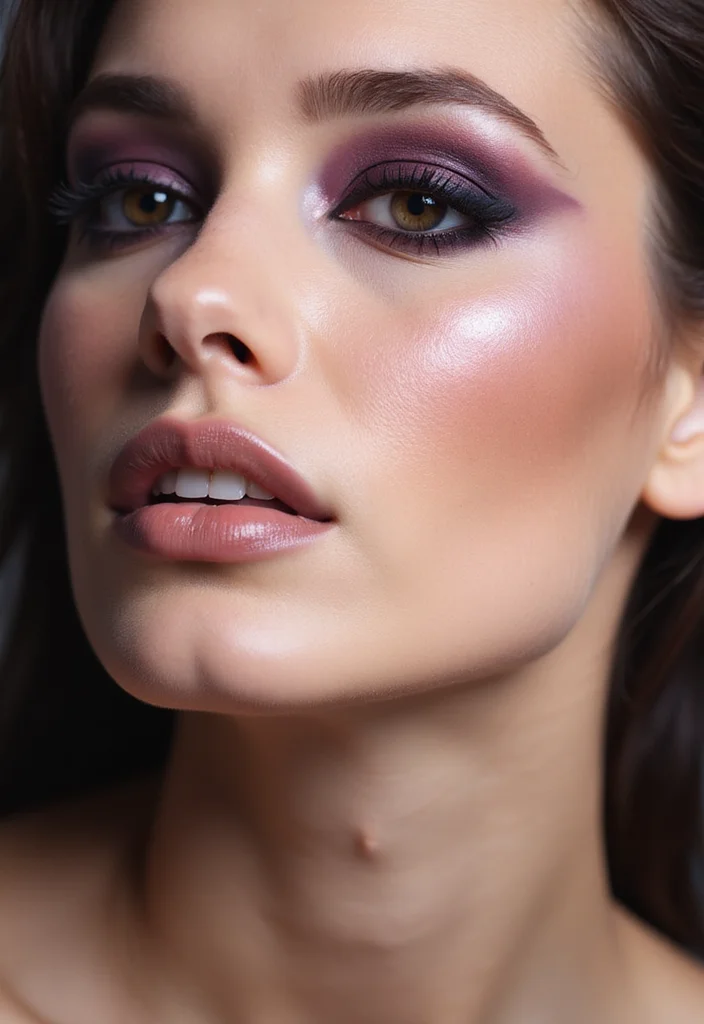
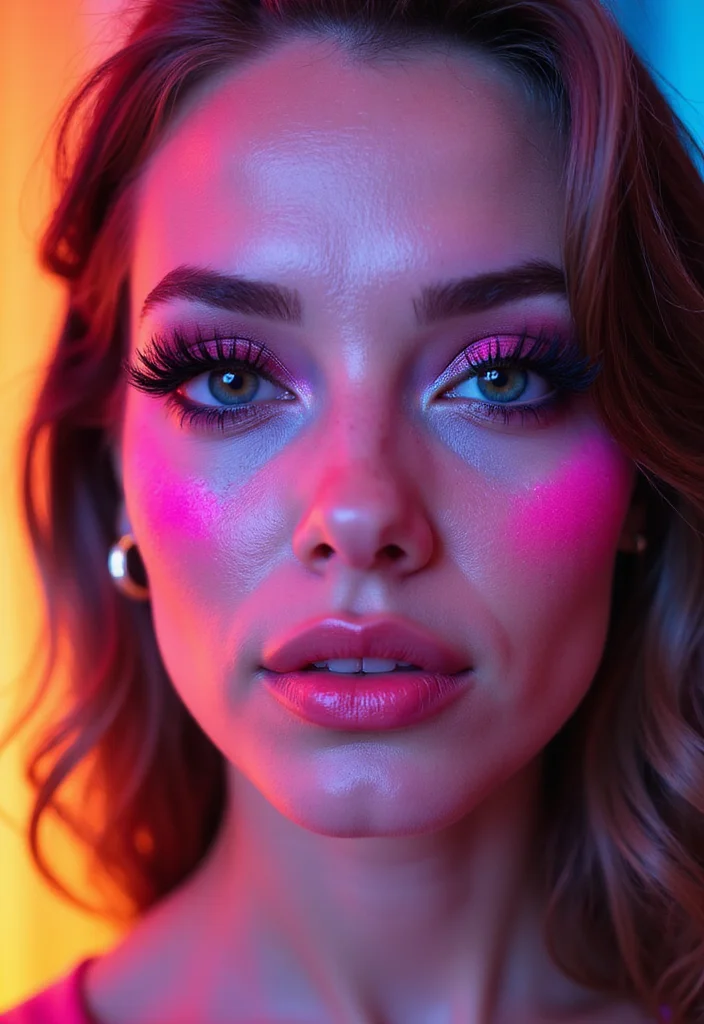
6. Gemstone Smoky Eye (Stunning!)
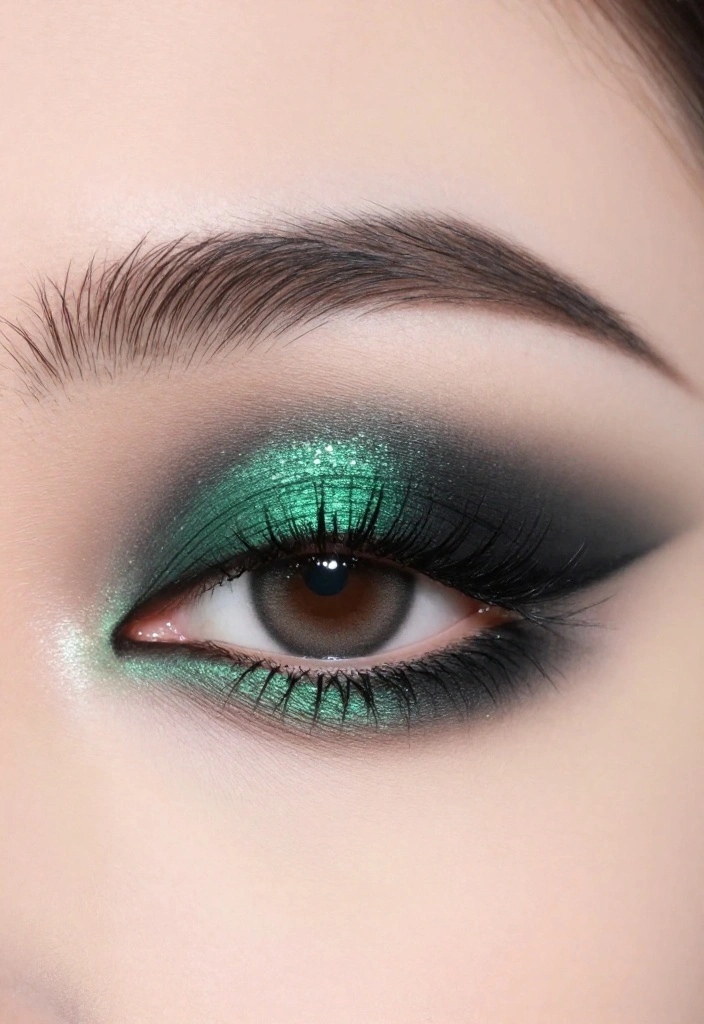
Get ready for a showstopper with the gemstone smoky eye! This dazzling look is perfect for special occasions when you want to steal the spotlight. Choose rich jewel tones like emerald, sapphire, or ruby and pair them with black or dark brown for depth. Start with a base of black shadow, then layer your chosen gemstone color on top.
Blend carefully to ensure a smooth transition, and add a hint of shimmer for a sparkling finish. Pair it with a bold lip for maximum impact!
Key steps for the gemstone smoky eye:
– Apply black eyeshadow as a base
– Layer your gemstone shade on top
– Blend dark brown into the crease for depth
– Add shimmer and finish with eyeliner and mascara
This look is sure to make you feel glamorous and confident. You’ll be the center of attention, shining bright like the gem you are!
Gemstone Smoky Eye (Stunning!)
Editor’s Choice


You might also like

7. The Reverse Smoky Eye
Looking for an edgy twist? The reverse smoky eye flips the classic style by placing the smoke on the lower lash line instead of the upper lid. This trendy look is perfect for anyone wanting to stand out. Start by drawing a bold line of eyeliner along the lower lash line and then blend a darker shadow below it.
Use a light shade on the lid to create balance and keep the focus on your lower lash line.
Steps to achieve the reverse smoky eye:
– Line your lower lash line with eyeliner
– Blend dark eyeshadow beneath the eyeliner
– Apply light eyeshadow on the lid
– Finish with mascara for a striking look
This innovative style allows for a fresh take on traditional makeup. You’ll feel bold and confident wearing this unique look!
The Reverse Smoky Eye
Editor’s Choice


8. Seasonal Smoky Eye: Fall Edition
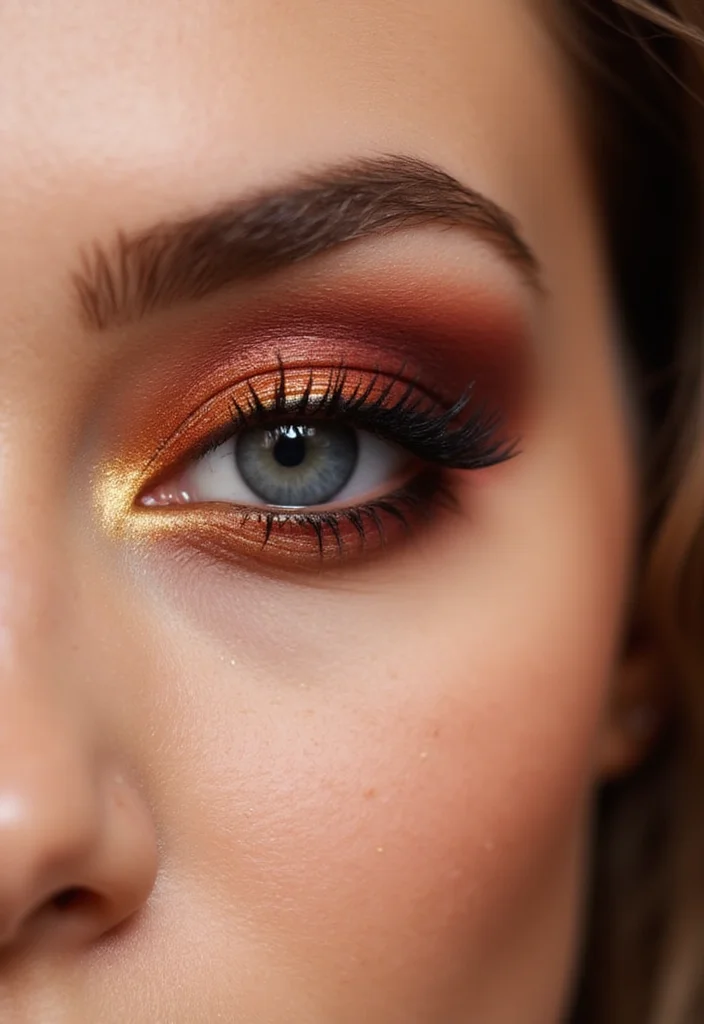
Celebrate autumn with a fall-inspired smoky eye! Use warm tones like burnt orange, deep burgundy, and gold to create a stunning look that captures the essence of the season. Start with a warm base and blend darker colors into the crease, finishing with a touch of gold on the inner corner to reflect the sparkle of autumn leaves.
Pair this look with earth-toned lips for a complete seasonal vibe.
Steps to create your fall smoky eye:
– Apply a warm base eyeshadow
– Blend burnt orange into the outer corner
– Add deep burgundy in the crease for depth
– Highlight the inner corner with gold
– Finish with eyeliner and mascara
This seasonal look is perfect for any autumn occasion. You’ll feel cozy and stylish, embracing the beauty of fall!
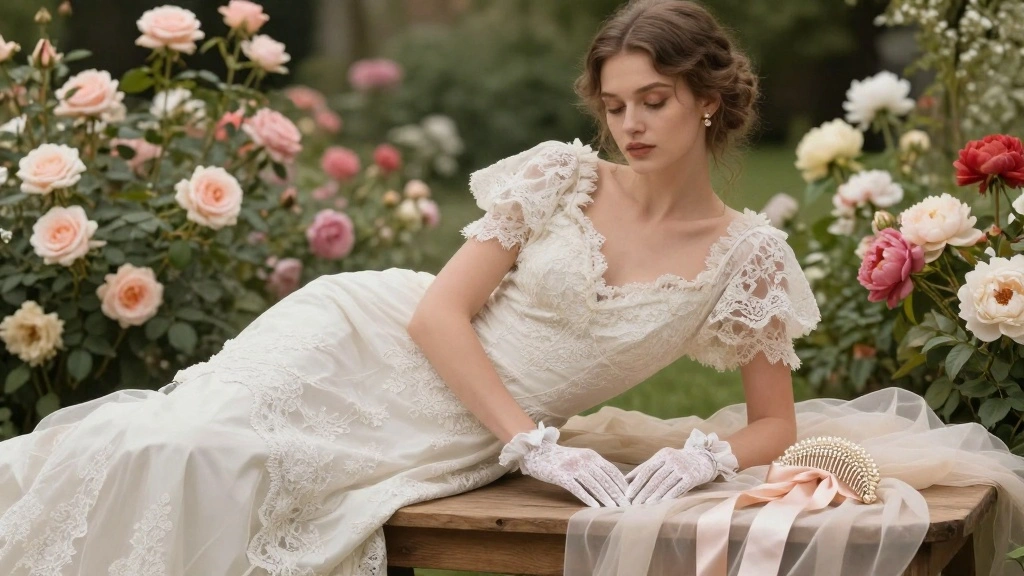
9. Wedding Smoky Eye
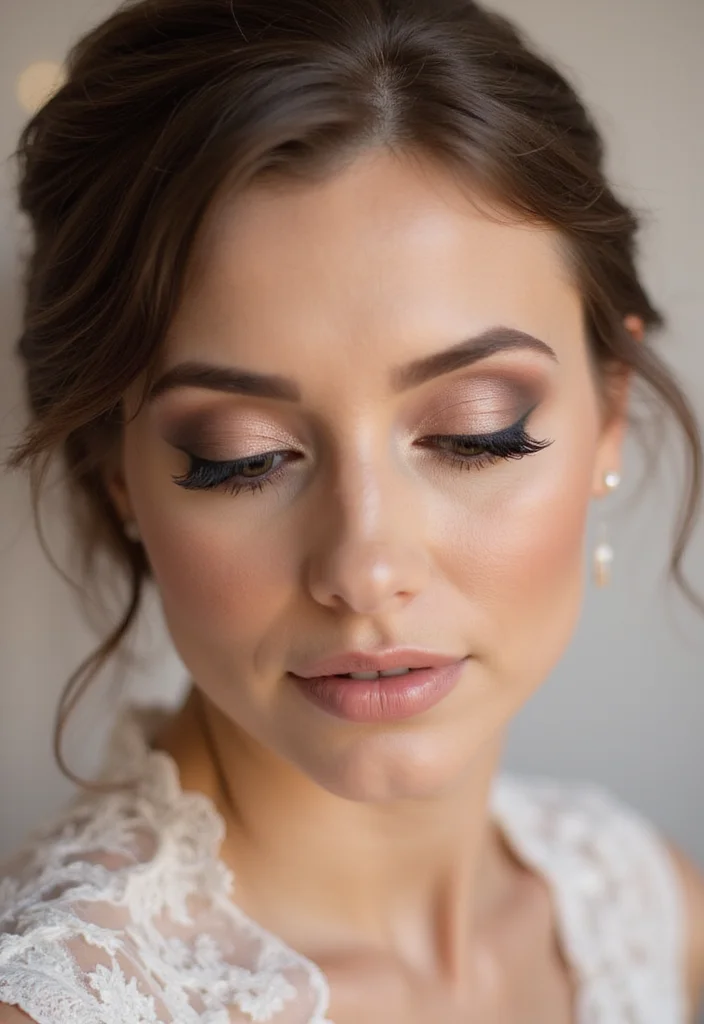
For brides who want a smoky eye that enhances their natural beauty, the wedding smoky eye is the ideal choice! Opt for soft taupes, pinks, and browns to create a timeless look. Start with a light base and gently blend taupe into the crease. Add darker shades for definition while keeping it soft and romantic.
Pair it with soft, natural lip colors for a bridal glow.
Steps for the perfect wedding smoky eye:
– Apply a light base shadow on your eyelids
– Blend taupe into the crease softly
– Add darker shades for definition
– Finish with highlighter and mascara
This elegant look will ensure you feel beautiful on your special day. You’ll glow with confidence as you walk down the aisle!
10. Graphic Smoky Eye
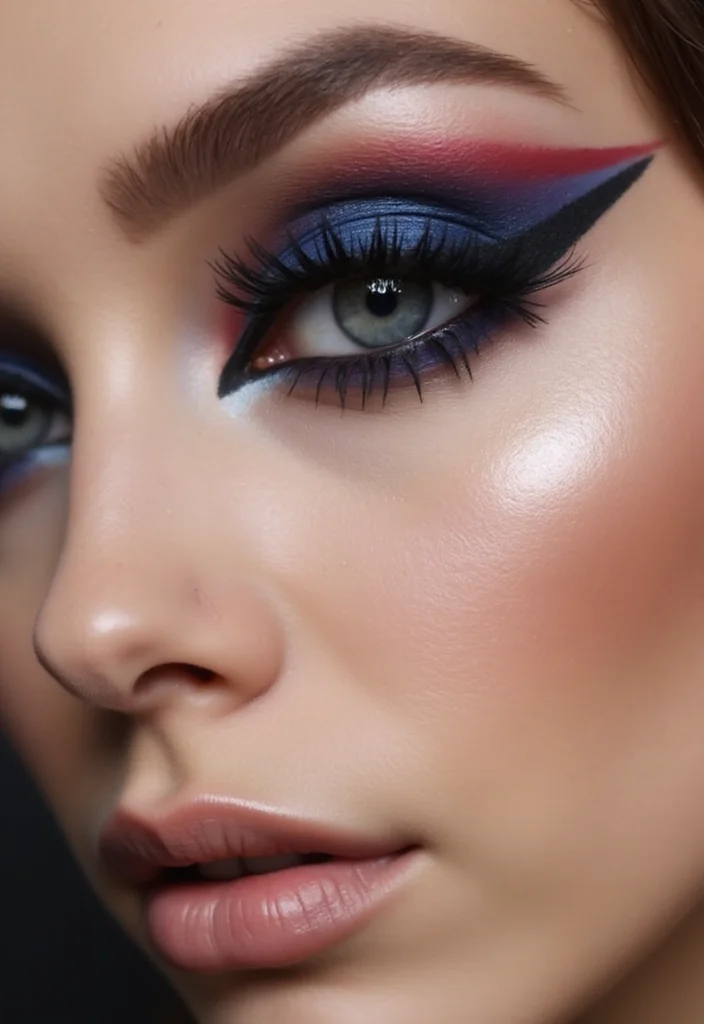
Dare to be different with a graphic smoky eye! This bold look focuses on sharp angles and striking lines to reinvent the traditional smoky style. Incorporate dark shades with high contrast between the eyeliner and eyeshadow to create a dramatic effect. This eye-catching look is ideal for a night out or a fashion-forward event.
Pair it with minimalist lips to keep the focus on your stunning eyes.
Steps to master the graphic smoky eye:
– Apply dark eyeshadow as your base
– Create sharp lines and angles with eyeliner
– Use a contrasting color for highlights
– Finish with mascara for a bold statement
This daring style is sure to turn heads. You’ll feel empowered and ready to make a statement!
11. Vintage Hollywood Smoky Eye
Channel your inner starlet with a vintage Hollywood smoky eye! This glamorous look draws inspiration from the classic film era, featuring sultry dark shadows paired with bold winged eyeliner and luscious lashes. Start with a rich black shadow and create a dramatic winged liner for that retro vibe. Blend a warm brown into the crease for added dimension.
Finish with a bold red lip for a total throwback!
Steps to achieve the vintage Hollywood look:
– Apply black shadow on the lid and wing it out
– Blend warm brown into the crease for depth
– Create a winged eyeliner to accentuate your eyes
– Finish with mascara and a bold lip
This timeless style will have you feeling glamorous and ready for the spotlight. You’ll embody the elegance of classic Hollywood!
You Might Also Like
12. Monochrome Smoky Eye
Explore the chic monochrome trend with a smoky eye that features varying shades of the same color. This clean, modern look is perfect for day and night. Choose a color like deep plum or navy, starting with a lighter base, then transition to medium and dark shades in the same hue.
This technique creates a stunning, cohesive appearance. Pair with a nude or matching lip color for a polished finish.
Steps to create your monochrome smoky eye:
– Apply the light shade all over the lid
– Blend the medium shade into the crease
– Deepen the outer corner with the dark shade
– Line your eyes and finish with mascara
This versatile look suits a variety of occasions. You’ll feel stylish and put together, no matter where you’re headed!
Monochrome Smoky Eye
Editor’s Choice


13. Neon Smoky Eye
Bring the party to your eyes with a neon smoky eye! This vibrant look is perfect for festivals or fun nights out. Start with a bright base like neon pink or green and blend in darker shades within the same color family to create that smoky effect. Keep the rest of your makeup minimal to let your eyes be the star.
Finish with plenty of mascara and maybe some fun false lashes for an extra pop.
Steps to achieve your neon smoky eye:
– Apply a bright neon shade as your base
– Blend in a deeper shade for a smoky effect
– Line your eyes and finish with mascara
This energetic look allows for endless creativity and fun. You’ll feel fabulous and ready for a good time!
14. Understated Smoky Eye
Sometimes less is more! The understated smoky eye offers a subtle, sophisticated vibe perfect for various occasions. Start with a soft taupe or gray as a base, and blend a slightly darker shade into the outer corners. This look adds just a hint of drama while remaining polished and refined.
It pairs beautifully with natural makeup or bold lips, making it versatile for any situation.
Steps for the understated smoky eye:
– Apply soft taupe to the lid as a base
– Blend darker gray into the outer corner
– Optionally line your eyes and finish with mascara
This look is ideal for work or casual outings. You’ll feel effortlessly chic and ready to conquer your day!
Conclusion

There you have it! Fourteen stunning smoky eye tutorials ready to elevate your makeup skills to pro status. From bold and colorful to soft and understated, there’s a smoky eye for every occasion and every style. Embrace your creativity, and don’t be afraid to experiment with colors and techniques!
What’s your favorite smoky eye look? Share your attempts on social media or with friends, and let your makeup artistry shine!
Note: We aim to provide accurate product links, but some may occasionally expire or become unavailable. If this happens, please search directly on Amazon for the product or a suitable alternative.
This post contains Amazon affiliate links, meaning we may earn a small commission if you purchase through our links, at no extra cost to you.
Frequently Asked Questions
What are the must-have products for a smoky eyes tutorial that delivers glam?
For a killer smoky eyes tutorial that looks glam, grab these must-haves: a smooth eye primer, a creamy base or concealer, a matte transition shade, a deep matte smoky eyes shade, a blending brush set, a precise liner, and a metallic or satin shade for that glam pop. Don’t forget waterproof mascara and optional lashes for extra drama.
Steps: prime the lid and set with a light powder; sweep the transition shade through the crease; press and blend the darkest shade along the outer corner and lash line; blend until edges disappear; line and softly tightline the upper lash line; apply the shimmer to the center or inner lid; finish with mascara or lashes; seal with a setting spray. With practice, this smoky eyes tutorial will feel second nature and your look will stay cohesive all night.
How can I adapt smoky eyes for different eye shapes in a glam tutorial?
Eye shapes vary, but the core smoky eyes technique can be adapted in a glam tutorial. For hooded eyes, apply the darkest shade slightly above the crease and keep the lid lighter to prevent hiding the look.
For almond eyes, follow the standard placement but extend the outer corner for lift to keep the drama.
For monolids, focus depth along the lash line and outer corner rather than the crease.
Tips that help all shapes: prime, use a soft hand when blending, and opt for a waterproof liner and mascara to keep smudges away. This adaptable approach helps every eye shape achieve a polished smoky eyes look.
Can you share a beginner-friendly 5-step smoky eye tutorial that still looks glam?
Here’s a beginner-friendly 5-step smoky eyes tutorial that looks glam: 1) Prime and set the lid. 2) Apply a light transition shade in the crease. 3) Pack a mid-tone shade on the lid and blend into the crease. 4) Deepen the outer V with a dark shade and blend along the lash line. 5) Add liner (tightline or wing) and finish with mascara; add a touch of shimmer on center lid for glam. Optional: false lashes. With these steps, you’ll master the smoky eyes in minutes.
How do I make smoky eyes last all night without smudging or creasing?
To make smoky eyes last all night: 1) start with a crisp eye primer and a matte base, 2) set with a light powder to prevent creasing, 3) use long-wearing matte shadows for the base and a waterproof liner, 4) apply waterproof mascara, 5) set the finish with a makeup setting spray, 6) keep a tiny brush and powder for quick touch-ups. This routine helps your smoky eyes stay glam and sharp through late hours.
Is there a quick way to recreate the stunning look #6 from the article?
Yes—quickly recreate the standout look #6 from the article with these bite-sized steps: 1) choose a deep, warm shade for the outer corner, 2) sweep a mid-tone lid shade from lash line to crease, 3) blend the outer corner in a dramatic V, 4) tightline with black liner and add a precise wing, 5) dab a metallic or satin shimmer on the center lid for that glam pop, 6) finish with mascara or lashes. Tailor the intensity to your eye shape and skin tone, practice a couple of rounds, and you’ll nail the look in minutes for a show-stopping smoky eyes moment.
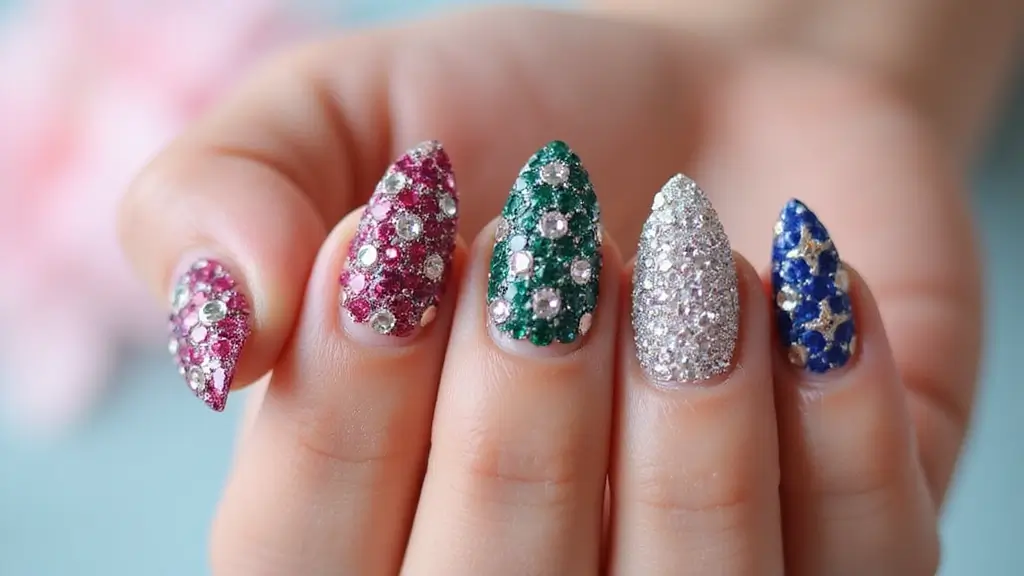
Related Topics
smoky eyes
makeup tutorials
glam looks
beginner friendly
advanced techniques
night out makeup
smoky eye styles
eye makeup tips
step-by-step guide
beauty hacks
trending makeup
holiday glam
Did you know that the smoky eye look dates back to ancient Egypt? Cleopatra was definitely ahead of her time with that style! I can’t wait to try out these tutorials.
I remember the first time I attempted a smoky eye for a party. I was so excited, but my friend thought I was going for the ‘just cried’ look! 😂 Have you had any funny makeup fails?