
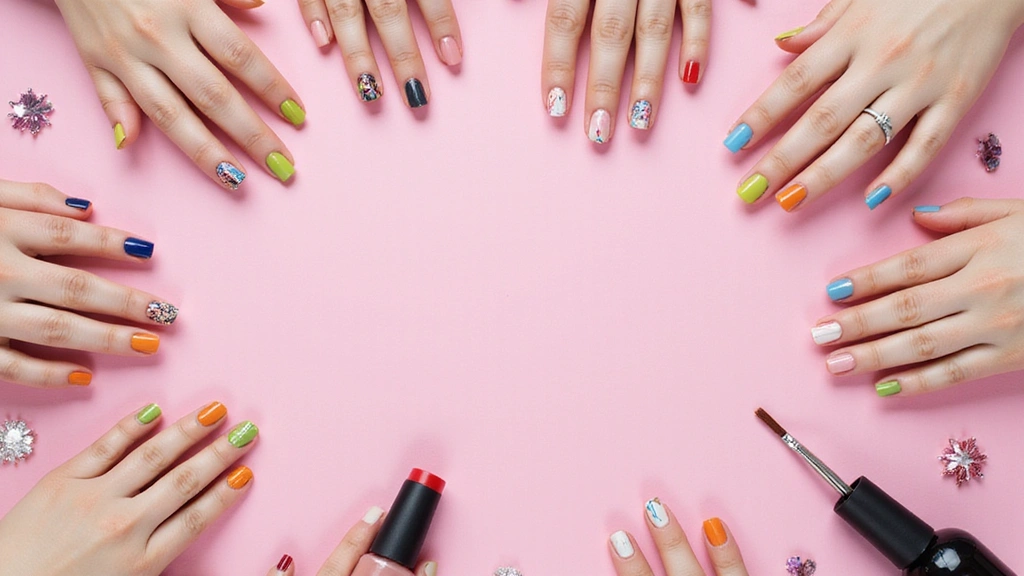
Milky nails are the enchanting new trend stealing hearts and feed space across Instagram. This style embodies a dreamy, understated elegance that’s perfect for any season. The soft, glossy finish and subtle hues make milky nails a versatile choice, whether you’re going for a casual day out or dressing up for a special occasion. With minimalist artistry becoming increasingly popular, these designs elevate the classic manicure into a statement about personal style. Let’s dive into 18 spectacular milky nail designs that you’ll want to try!
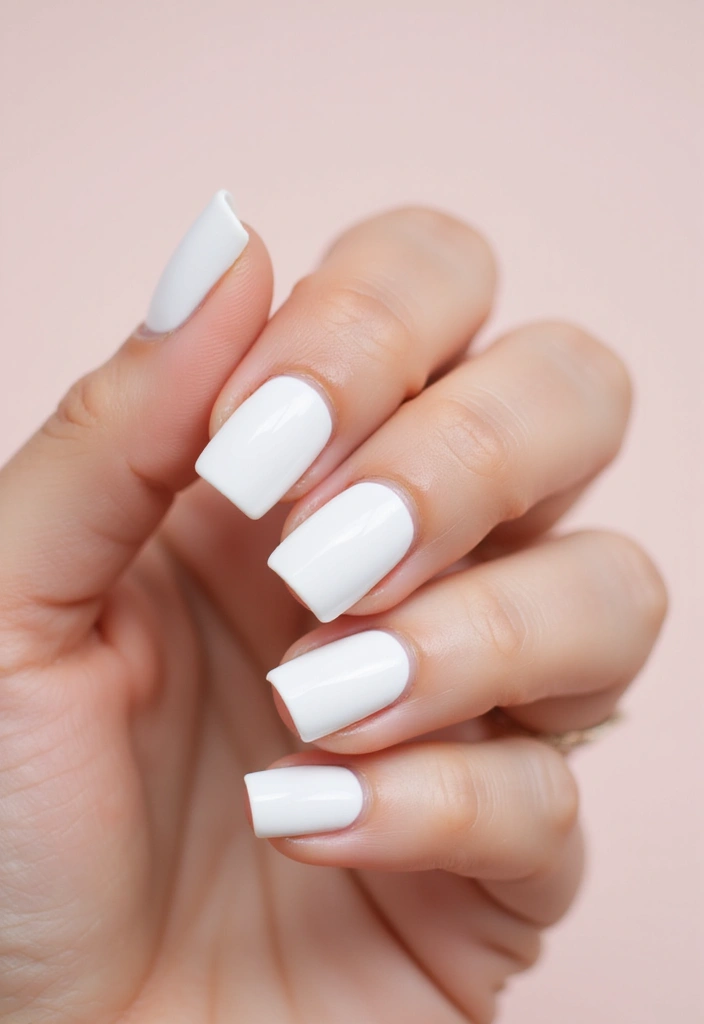
1. Classic Milky White


Last update on 2025-12-05 / Affiliate links / Images from Amazon Product Advertising API
Nothing beats the simplicity of a classic milky white nail design. This style features a sheer white base that is glossy and smooth, allowing your natural nail shine through while still providing a polished look. It’s the epitome of minimalist beauty! Pair this manicure with any outfit, and you’ll instantly feel chic and put together.
Tips for achieving the look:
– Start with a nourishing base coat to protect your nails.
– Apply two coats of a milky white polish for a perfect finish.
– Seal with a top coat for that extra shine.
Not only does it look clean, but it’s also incredibly easy to maintain, making it ideal for anyone who loves low-maintenance beauty.
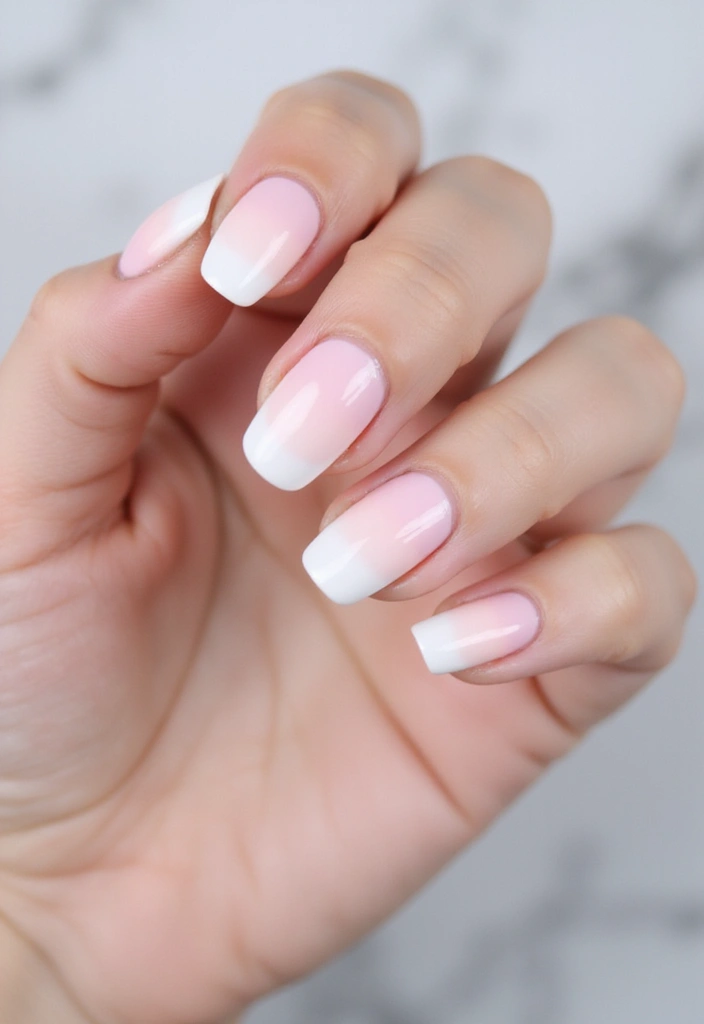
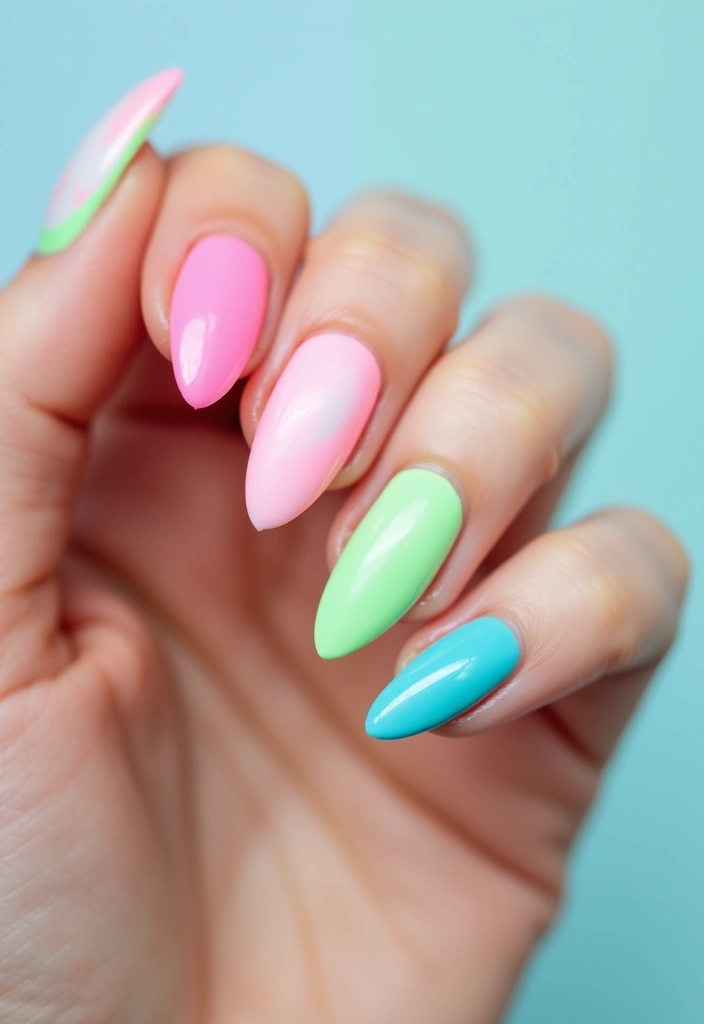
2. Milky Ombré
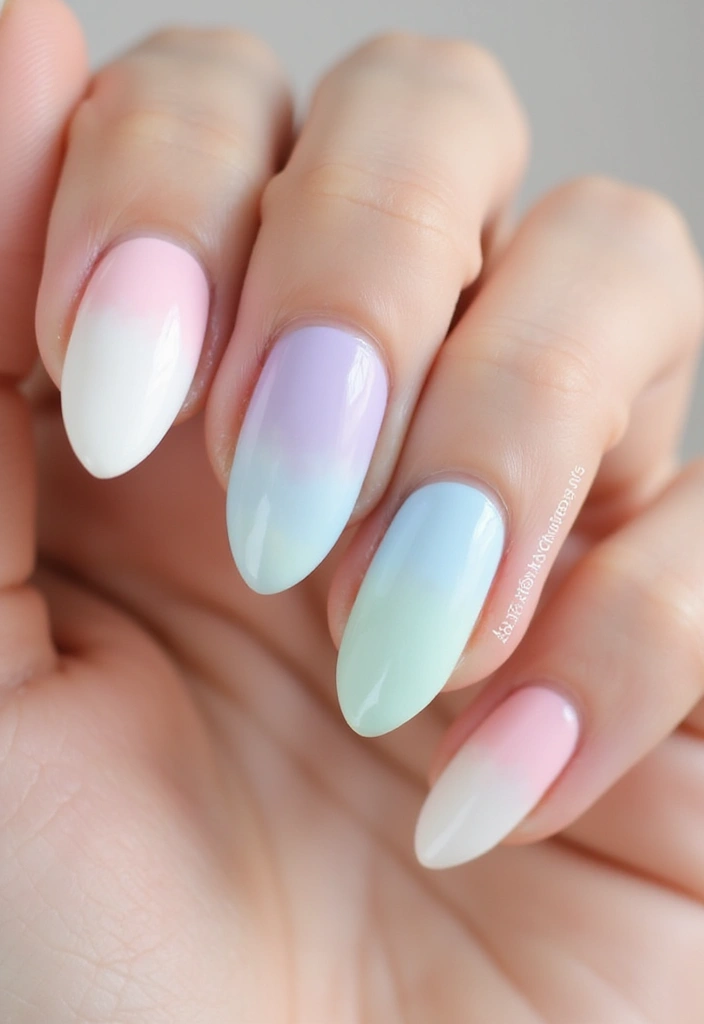
The milky ombré nail design is a gorgeous way to play with shades and achieve a gradient effect. This design blends the soft milky white with other pastel hues like pink, lavender, or mint green, creating a dreamy transition that’s simply mesmerizing.
Saving the secrets:
– Use a makeup sponge to dab on your chosen color for a smooth ombré effect.


Last update on 2025-12-05 / Affiliate links / Images from Amazon Product Advertising API
– Blend the colors gently for a seamless look.
– Finish off with a top coat to enhance the shine and longevity of the design.
Ombré nails not only look stunning but also allow for creativity in your color choices. It’s a fun way to showcase your personality while keeping it chic.
Embrace the art of milky ombré! A soft blend of pastel hues can transform your nails into a dreamy masterpiece – and all it takes is a little dabbing magic with a sponge!
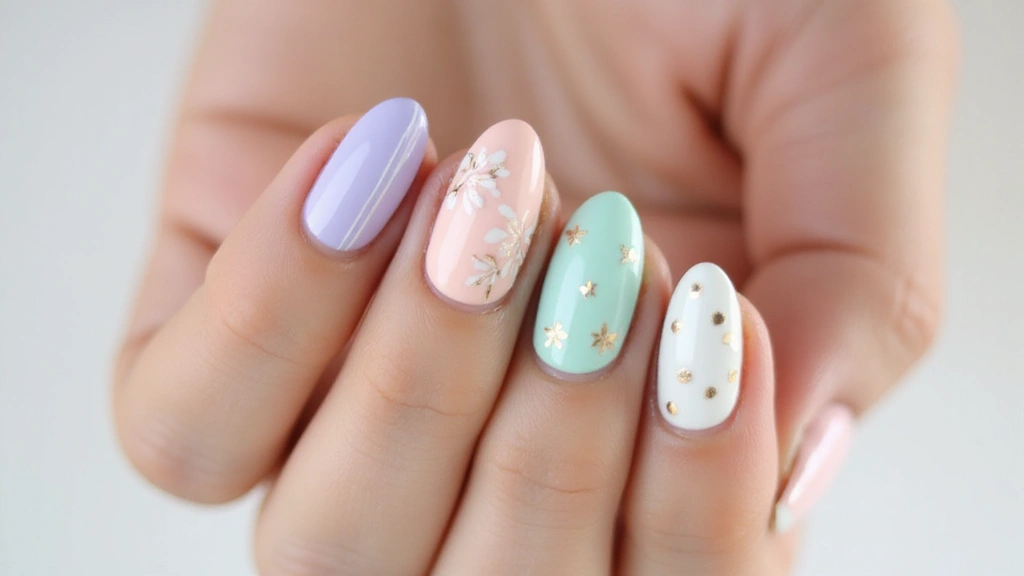
3. Milky with Minimalist Art
For those who appreciate art without the fuss, milky nails adorned with minimalistic patterns are a perfect match. Think simple lines, geometric shapes, or tiny dots in monochromatic shades against the milky base. This design creates an artistic appeal while staying grounded in simplicity.
Tips to create this look:
– Use a thin nail brush for precise lines.
– Choose one or two accent nails to feature your minimalist art.
– Keep the designs subtle to maintain that chic vibe.
These nails are a conversation starter and showcase your artistic side without being overwhelming. Plus, they fit perfectly into any wardrobe!
4. Milky French Tips
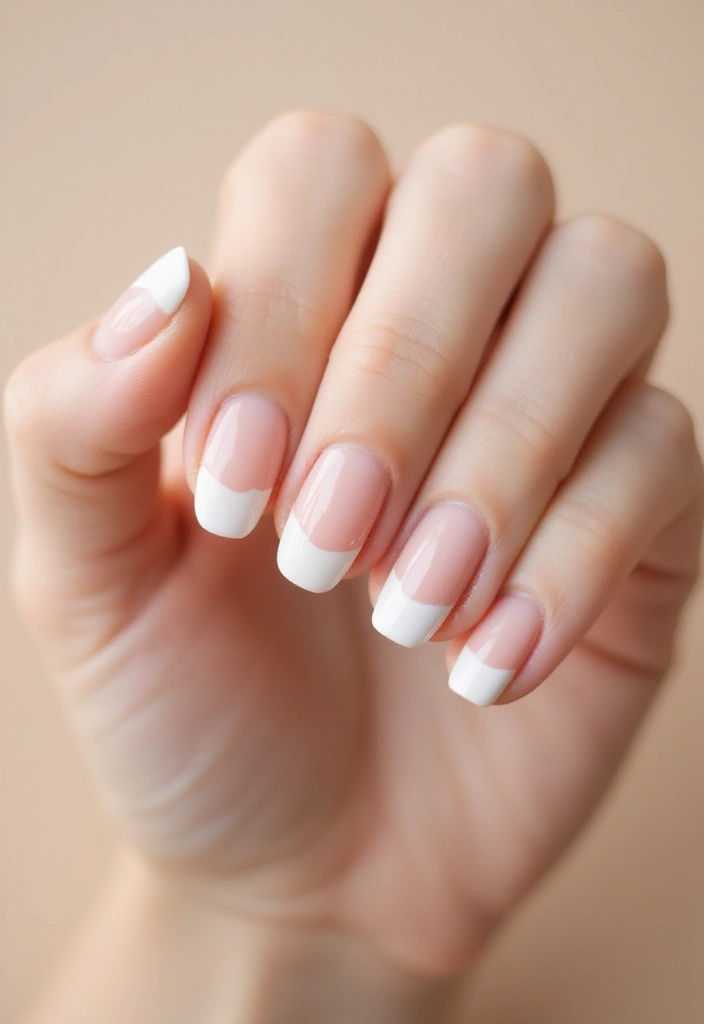
The milky twist on the classic French manicure brings a fresh perspective to an old favorite. Replace the traditional white tips with a milky, sheer white for a soft and sophisticated look. This design is perfect for any occasion and adds a delicate touch to your nails.
How to achieve the perfect milky French tips:
– Start with a milky base coat.
– Use nail tape to create crisp lines for your tips.
– Carefully apply the milky polish to the tips and finish with a top coat.
This design is not only timeless but also versatile, making it a must-have in your nail art repertoire!
5. Milky Pastel Dots
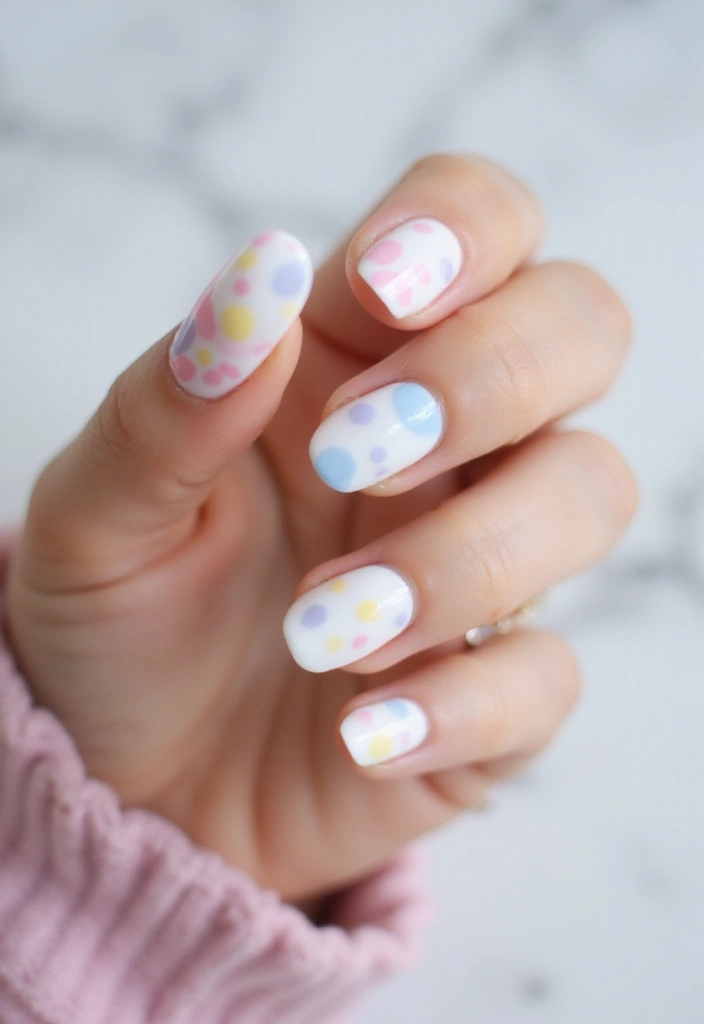
Add a playful touch with milky nails dotted with pastel colors! This design brings joy and whimsy, combining the soft sheen of milky polish with cheerful dots of baby pink, light blue, or pale yellow. It’s a fun take on a minimalist style that brings out your inner child.
Creating this joyful design:
– Use a dotting tool or the end of a bobby pin to create dots.
– Randomly place the dots on your milky base for a casual look.
– Seal with a glossy top coat for a polished finish.
These nails are perfect for spring or summer outings, adding a splash of color to your day without overpowering your overall look.
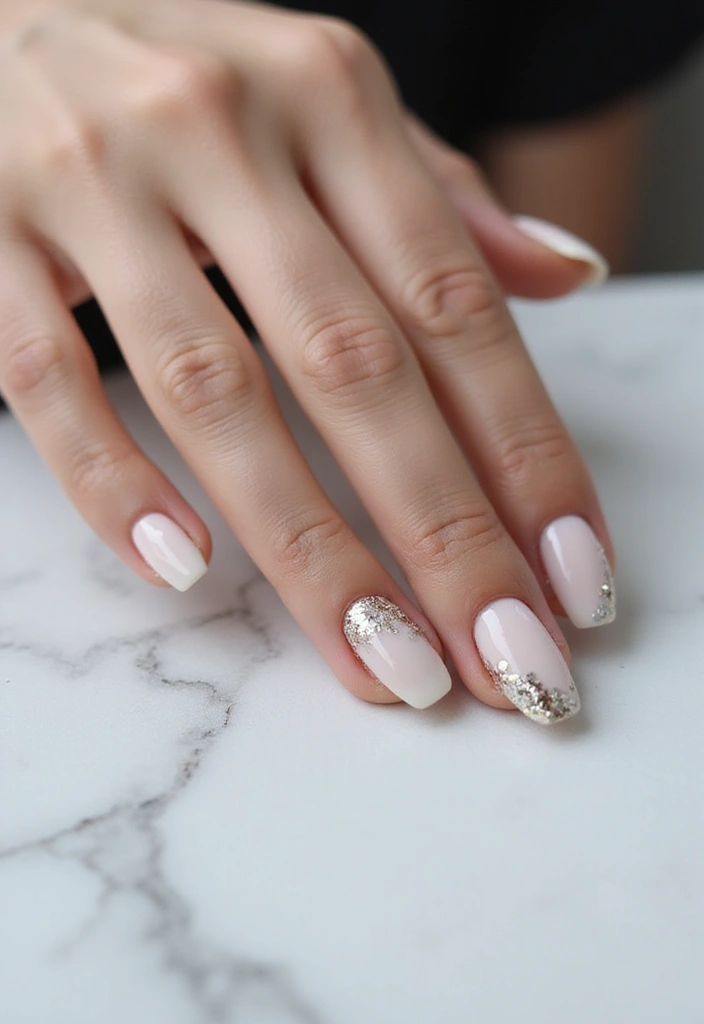
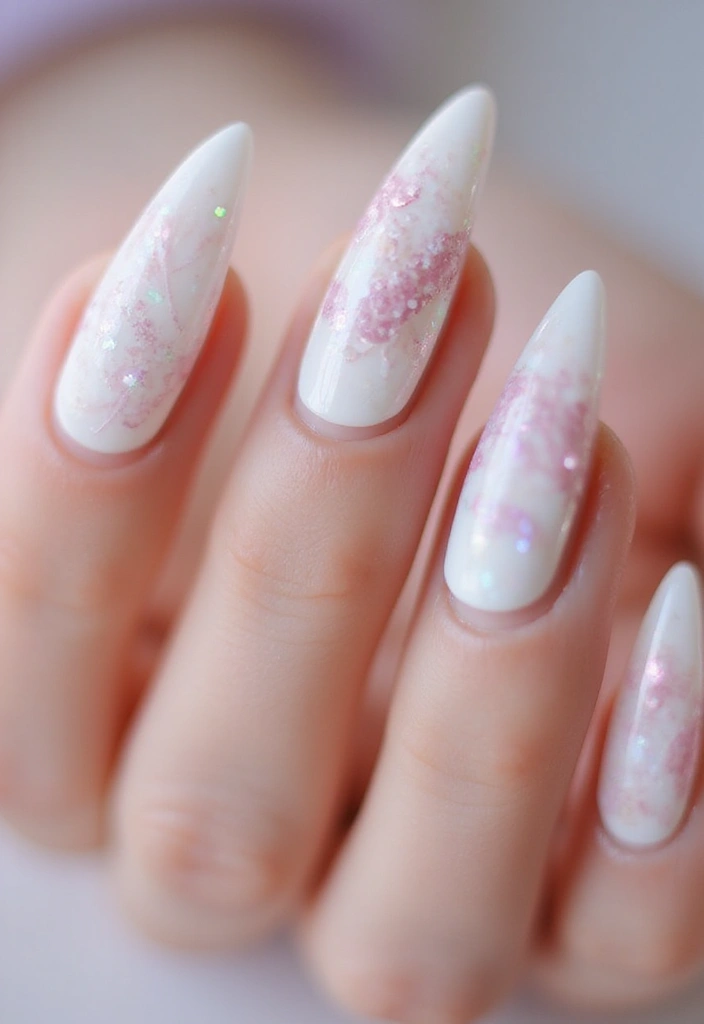
6. Milky Nails with Glitter Accents
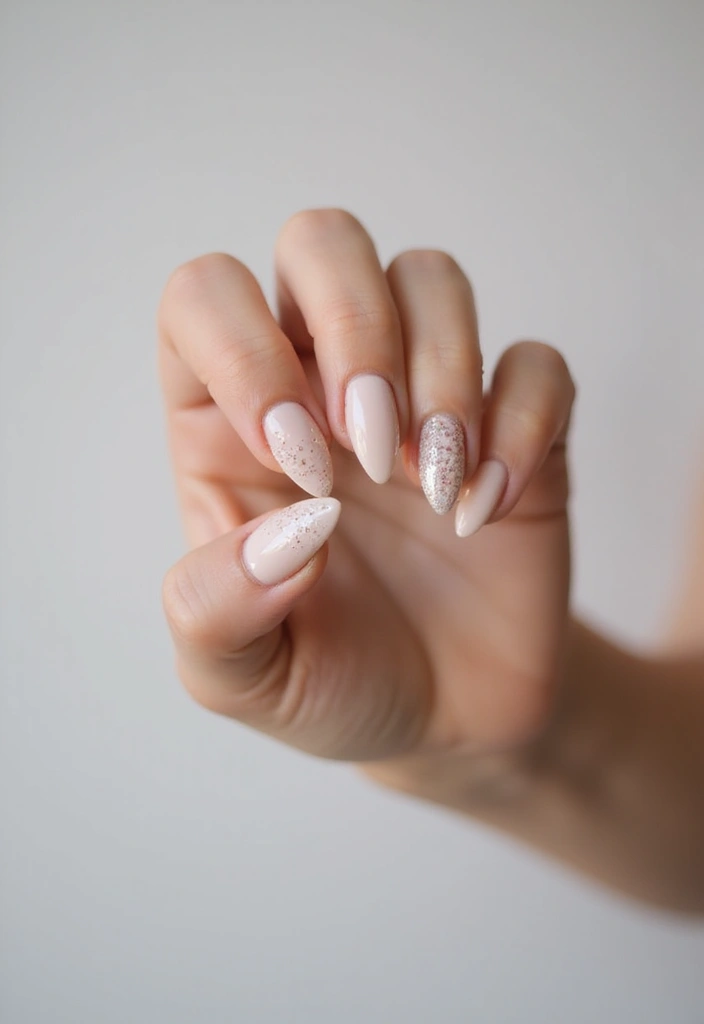
For those who love a little sparkle, milky nails can easily be dressed up with glitter accents! Imagine a soft milky base with a touch of fine glitter on a couple of accent nails – it’s glam without being over the top. This design strikes the perfect balance between understated elegance and sparkling flair.
Achieving the glitter look:
– Apply a milky base coat and let it dry.
– Use a fine glitter polish or loose glitter for the accent nails.
– Finish with a top coat to seal everything in.
This style is perfect for a night out or any occasion when you want to shine while still keeping things classy.
Sparkle meets simplicity! Dazzling glitter accents on milky nails bring understated elegance to life—perfect for those who want just a hint of glam without overwhelming flair.
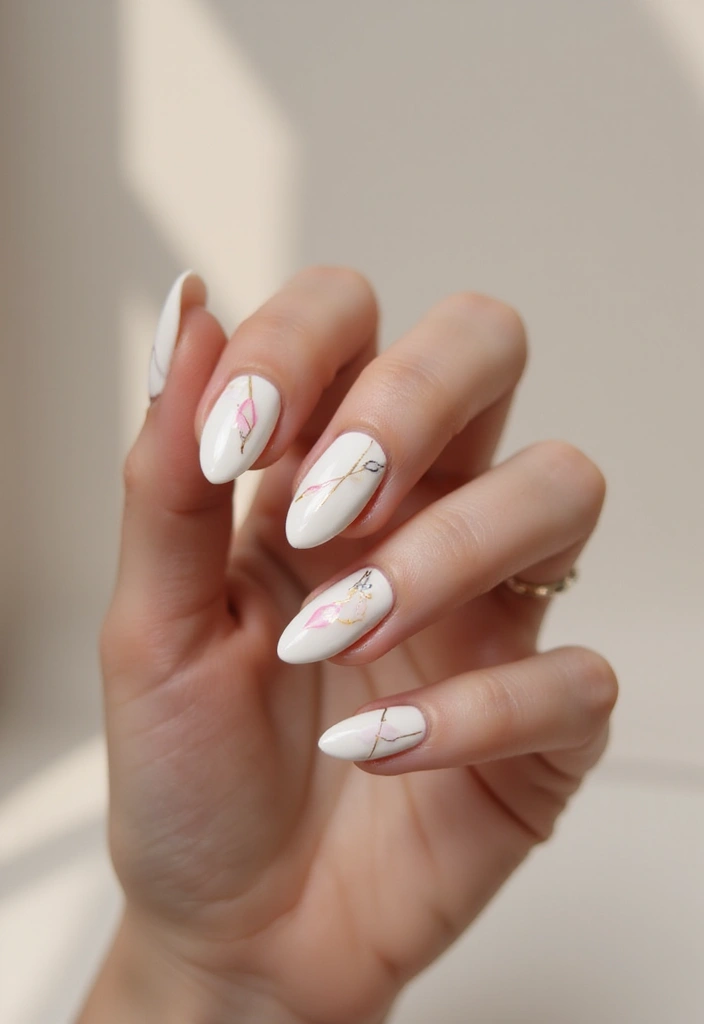
7. Milky Marble Effect
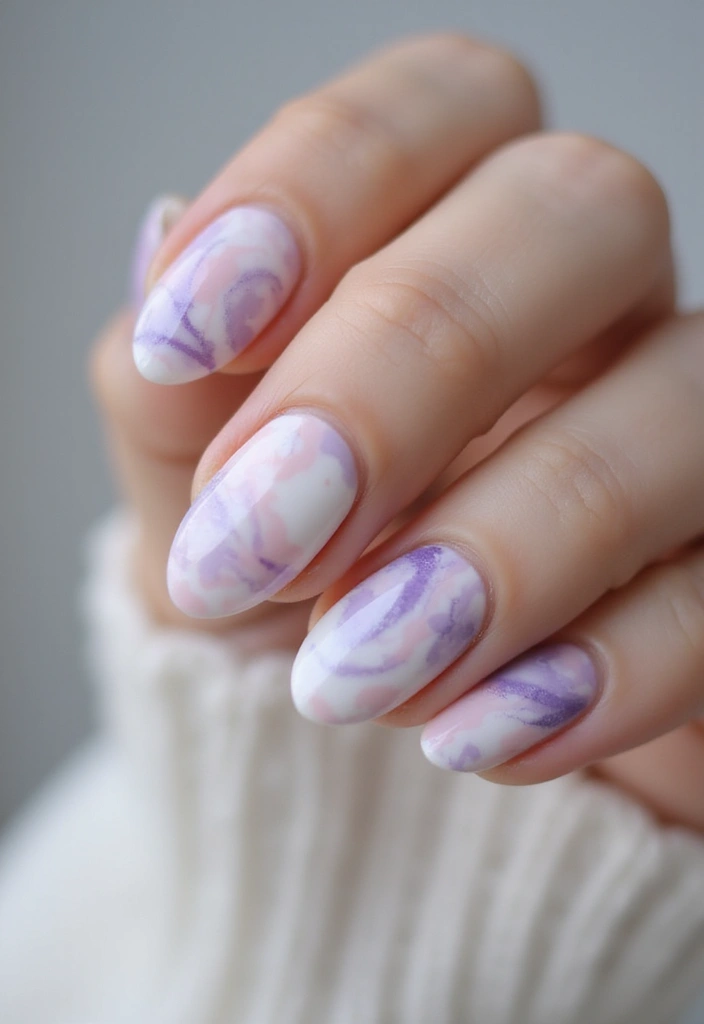
Marble nails are stunning, and when combined with a milky base, they become breathtaking! This design mimics the elegant swirls of marble stone and creates a sophisticated, luxurious look. Playing with shades of white and gray (or even pastel colors) gives your nails a chic aesthetic.
To create this marble effect:
– Use a nail art brush and a contrasting color for the marble lines.
– Swirl the colors gently for a natural look.
– Finish with a glossy top coat to enhance the marble effect.
This design can elevate your nail game and is definitely one that will turn heads on Instagram!
8. Milky Swirl Design
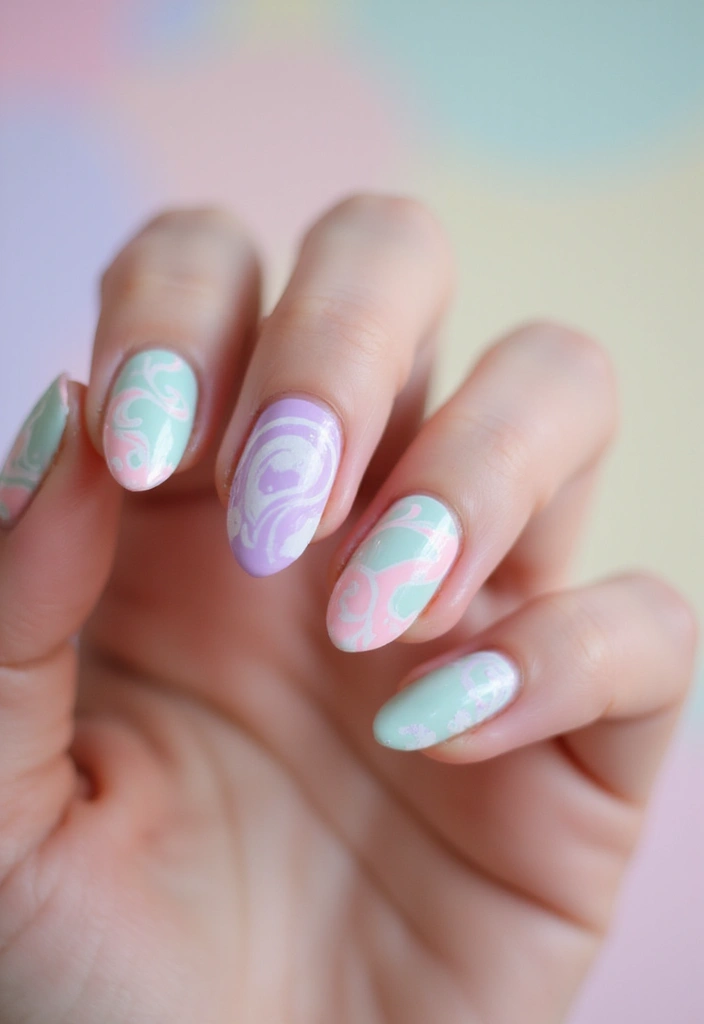
Swirls add a fun and playful touch to milky nails! This design involves creating soft, flowing patterns in pastel colors over a milky base, which gives a sense of movement and creativity. It’s perfect for showcasing your artistic flair while keeping the overall look subtle.
Tips for the swirl effect:
– Use a fine brush or a dotting tool for easier design creation.
– Blend the colors softly to avoid harsh lines.
– Seal your design with a top coat to keep it fresh.
These nails are perfect for those who want a unique twist on their milky manicure without going overboard.@media (max-width: 768px) { .internal-links-flex { flex-direction: column !important; } .internal-links-flex > div { flex: none !important; } }
You might also like
15 Trendy Animal Print Nail Designs to Make Heads Turn in 2025! – The Glow Grove HQ | Skincare Tips, Clean Beauty & Women’s Wellness

14 Trendy Dark Red Nail Styles for 2025 That Are Totally Must-Try!
9. Milky Floral Accents
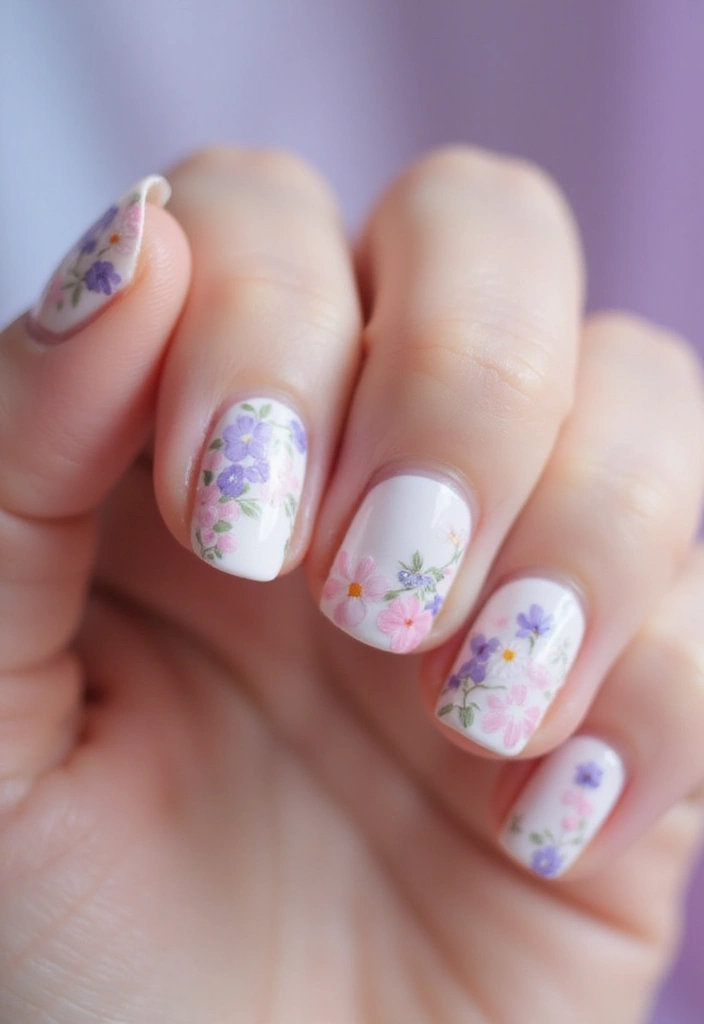
Floral designs never go out of style, and when paired with milky nails, they create a fresh and lively look. Think delicate flowers painted on a milky base. It’s romantic and perfect for spring and summer!
How to create floral accents:
– Use a fine brush for detailing.
– Choose two to three colors for your flowers and green for the leaves.
– Add tiny dots to mimic flower centers.
This design is a great way to express your femininity while maintaining that minimalist approach.
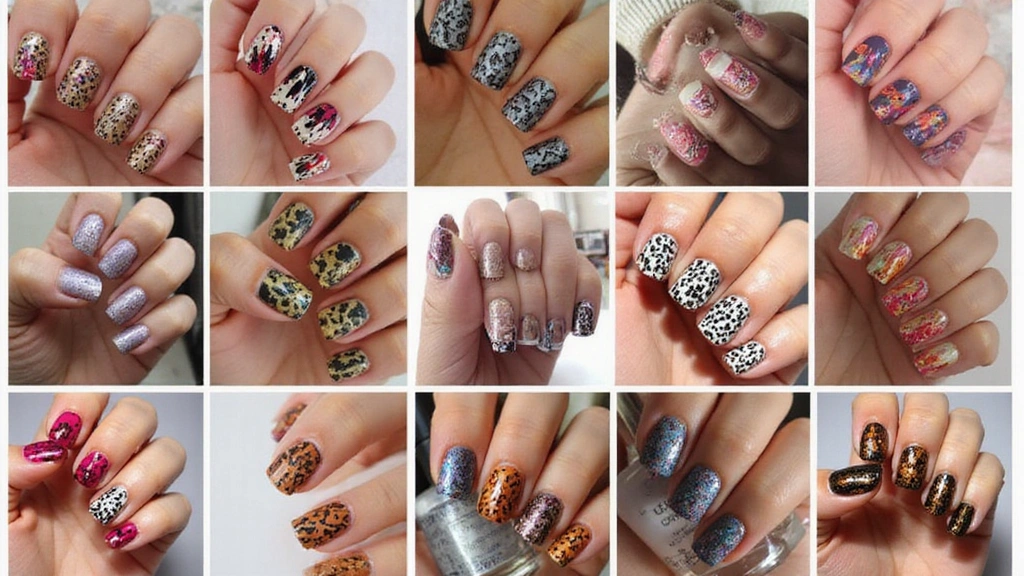
10. Milky Animal Print
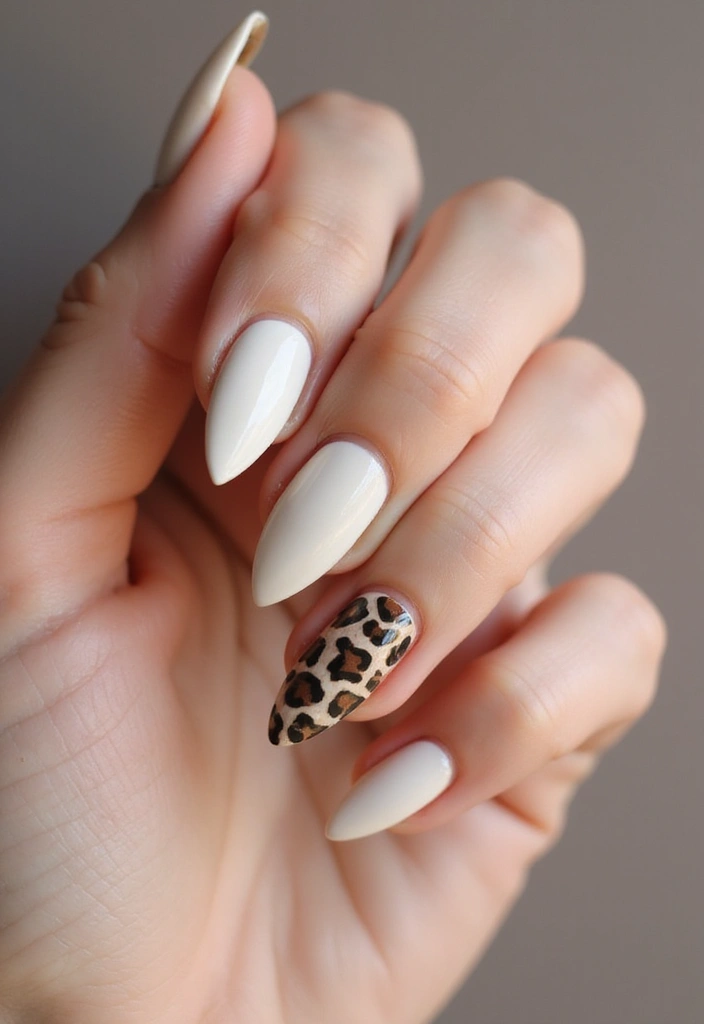
For those who still want to embrace the wild side of nail art, consider milky nails with animal prints! Think soft animal patterns like leopard or zebra, but in muted tones that blend with the milky base. It’s a way of adding edge while still keeping it classy!
Tips for animal prints:
– Use a thin brush for precision.
– Keep the colors soft and subtle to maintain the milky aesthetic.
– Seal your design with a top coat for durability.
This design is perfect for the daring yet sophisticated individual who wants to showcase their personality!
11. Milky Matte Finish

A matte finish transforms the classic milky nail into a trendy statement! This design gives a modern vibe, making it suitable for fashion-forward looks. The matte texture adds depth, allowing the milky color to really shine without glossiness.
How to achieve the matte look:
– Use a matte top coat after applying your milky polish.
– Ensure your base is completely dry before sealing.
– Experiment with different colors under the matte coat.
It’s a unique twist that offers a sophisticated vibe, making it perfect for any occasion!
12. Milky Accents with Foil
Add a touch of luxury to your milky nails with foil accents! This design involves using metallic foils to create dynamic patterns or random touches over your milky base, adding shimmer and richness to your look.
Steps to achieve foil accents:
– Apply a layer of milky polish and let it dry.
– Use nail glue or a special foil adhesive for the accents.
– Press the foil onto your nails for a chic finish.
Foil accents elevate any manicure, making it perfect for special events or simply when you want to feel glamorous!
13. Milky Color Block
Color blocking is a fun way to incorporate bold colors into milky nails! Think of sections of your nails painted in vibrant colors while the base remains milky. This design is eye-catching and perfect for those who love to experiment with colors.
How to create this look:
– Use tape to define your color blocks.
– Choose contrasting colors that complement the milky base.
– Finish off with a glossy top coat for added shine.
This design gives off a playful yet artistic vibe, perfect for showcasing your creativity!
14. Milky Negative Space
Negative space designs are trendy, and milky nails can perfectly incorporate this style! This design cleverly leaves parts of the nail bare while accentuating others with milky polish. It’s chic, modern, and allows for a lot of creativity.
Tips for negative space designs:
– Use nail tape to outline the areas you want to keep bare.
– Be precise with your milky polish application.
– Seal with a top coat to keep it fresh.
This modern approach is perfect for anyone wanting to express a minimalist vibe while keeping it interesting!@media (max-width: 768px) { .internal-links-flex { flex-direction: column !important; } .internal-links-flex > div { flex: none !important; } }
You Might Also Like
19 Tendencias de Manicure Francesa para 2025 Que No Te Puedes Perder – The Glow Grove HQ | Skincare Tips, Clean Beauty & Women’s Wellness
12 Unique French Tip Variations That Will Have Everyone Asking Where You Got Them! – The Glow Grove HQ | Skincare Tips, Clean Beauty & Women’s Wellness
15. Milky Gradient Tips
Instead of traditional French tips, why not go for a gradient effect? This design features milky tips that gently fade into the natural nail color, offering a unique and fresh twist on a classic manicure. It’s subtle yet eye-catching!
Steps to achieve gradient tips:
– Use a makeup sponge for blending the tones.
– Apply milky polish at the tips and gradient it down.
– Finish with a high-shine top coat for that wow factor.
This style is perfect for those who love to play with combinations while keeping the elegance intact!
16. Milky Twinkle Stars
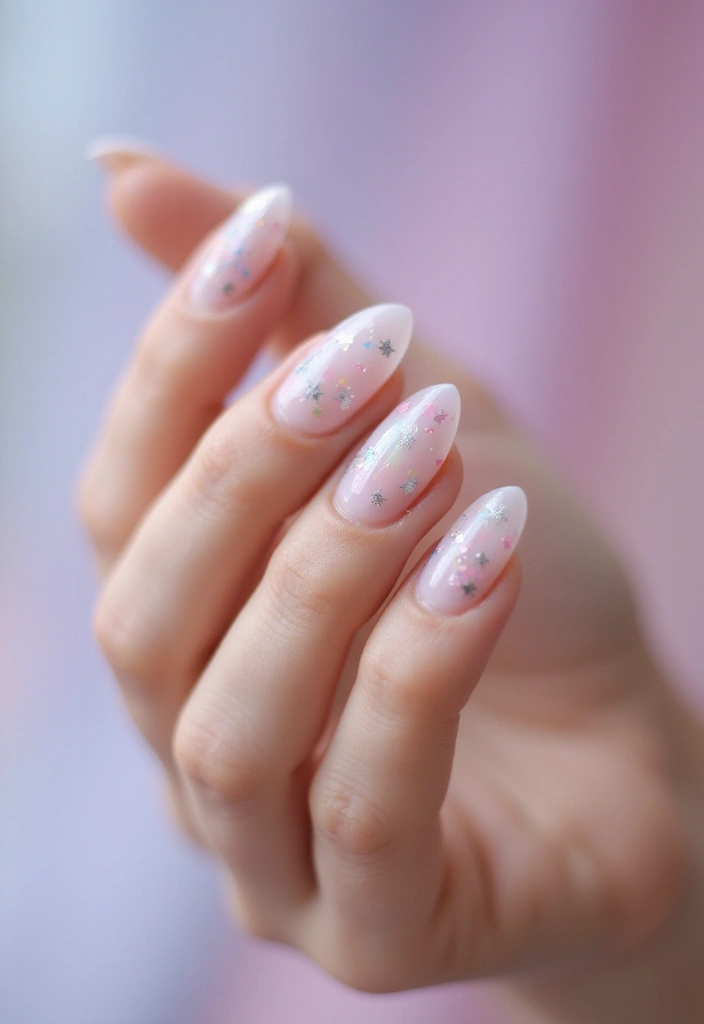
Bring a bit of magic to your nails with twinkle stars against a milky backdrop! This design combines the allure of a starry night with the elegance of milky polish. It’s whimsical and perfect for those wanting a creative, charming look.
Creating starry designs:
– Use a fine brush to paint tiny stars in a contrasting color.
– Sprinkle some glitter for an extra twinkle effect.
– Seal everything with a glossy top coat.
These nails are perfect for special occasions or simply when you want to feel enchanting!
Let your nails reflect the cosmos! With milky twinkle stars, you can easily add a sprinkle of magic to your look. Shine bright and embrace your creativity – your fingertips deserve the spotlight!
17. Milky Heart Accents
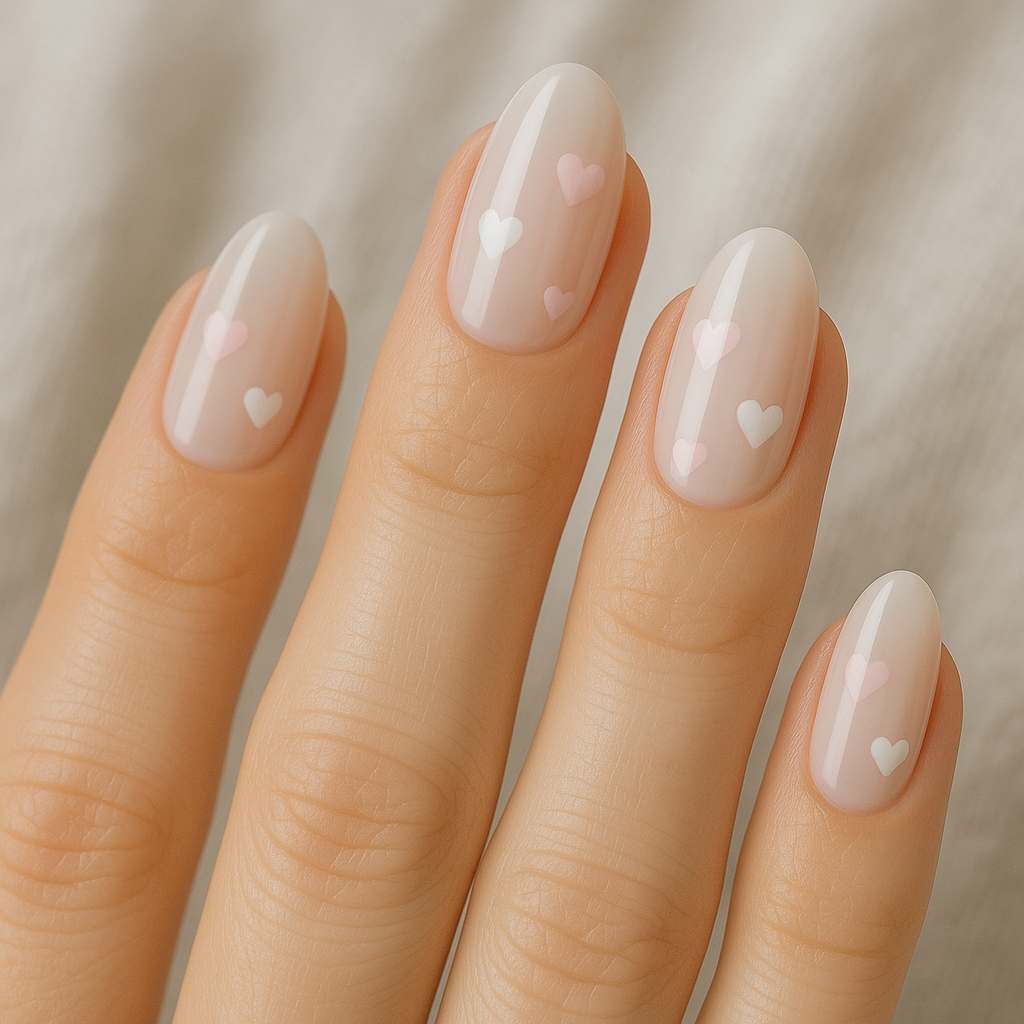
Hearts are always in style, and milky nails can showcase this trend beautifully! By adding tiny heart designs to a milky base, you create a sweet and charming manicure perfect for any romantic occasion.
How to create heart accents:
– Use a fine brush to craft small hearts in a contrasting color.
– Keep the heart designs to a minimum for a chic look.
– Seal with a top coat for durability.
This design embodies love and warmth, making it ideal for date nights or special celebrations!
Tiny hearts on milky nails add a sprinkle of love to your look! Perfect for date nights, these sweet accents are a simple way to showcase your style—and your romantic side.
18. Milky Neon Pop
For those who want to stand out, consider adding neon pops to your milky nails! This design features vibrant accents like neon stripes or dots against a milky base, making a bold statement that’s fun and trendy.
Tips for the neon look:
– Use bright neon colors that contrast well with the milky base.
– Keep designs simple to maintain balance.
– Finish with a high-gloss top coat for an extra wow effect.
This playful style is perfect for festivals, parties, or any event where you want to shine!
Conclusion
Milky nails have undoubtedly claimed their spot as a must-try trend in the nail art world. With their versatility and appeal, these designs offer something for everyone, whether you’re a minimalist at heart or love a splash of creativity. With so many styles to choose from, it’s easy to find one that resonates with your personal aesthetic. Get inspired by these trends and don’t forget to share your favorite milky nail designs on social media!
Frequently Asked Questions
What Are Milky Nails and Why Are They Trending?
Milky nails are a chic nail art trend characterized by a soft, glossy finish that creates a dreamy, understated look. This style has gained popularity on social media, particularly Instagram, due to its versatility and elegance, making it perfect for any season or occasion.
The trend is all about embracing a minimalist aesthetic while allowing your natural nails to shine through, making it an appealing choice for many nail art enthusiasts.
How Can I Achieve the Perfect Milky Nail Design at Home?
Achieving the perfect milky nail design at home is easier than you think! Start with a sheer white base coat to create that milky effect. You can then add layers until you reach your desired opacity.
For added flair, try incorporating designs like milky ombré or minimalist art using nail art brushes or dotting tools. Don’t forget to finish with a glossy top coat for that dreamy shine!
What Nail Shapes Work Best with Milky Nail Designs?
Milky nail designs look fabulous on various nail shapes, but they particularly shine on oval and almond shapes. These shapes complement the soft, elegant vibe of milky nails beautifully.
If you’re into more edgy styles, coffin or stiletto shapes can also enhance the trend, making a bold statement while still keeping the minimalist aesthetic intact!
Are Milky Nails Suitable for All Occasions?
Absolutely! Milky nails are incredibly versatile and can be styled to suit any occasion. Whether you’re dressing up for a formal event with milky marble effects or keeping it casual with classic milky white, there’s a design for everyone.
Additionally, you can easily adapt your milky nail design with accents like glitter or floral patterns to match your outfit or mood, making them a go-to choice for all settings!
How Do I Maintain My Milky Nails for Longer Lasting Wear?
To keep your milky nails looking fresh and fabulous, start with a strong base coat to protect your natural nails. Regular touch-ups are key, especially if you notice any chips or wear on the tips.
Moisturizing your cuticles and using a top coat every few days can help maintain that glossy finish. Also, consider wearing gloves while doing chores to protect your nails from damage, ensuring they stay stunning for longer!