

When it comes to nail art, the trend of unique jelly nails is taking the beauty world by storm. These translucent styles have been making waves on social media, and I couldn’t help but get swept up in the excitement. With their eye-catching colors and playful finishes, jelly nails offer a fresh way to express yourself through your fingertips. I created this post because I believe everyone deserves to discover new and fun ways to adorn their nails.
If you’re someone who loves to stay on top of nail trends and enjoys experimenting with different styles, this guide is made just for you. Whether you’re planning for a special event or simply want to refresh your look, you’ll find something that resonates with your unique style. I’m sharing 16 unique jelly nail styles you’ve probably never tried, each one designed to inspire creativity and fun. Get ready to elevate your nail game with these fresh, exciting ideas!
By diving into this post, you’ll uncover a treasure trove of creative ideas that will make your nails the center of attention. From fruity designs to ocean-inspired looks, there’s a jelly nail style for every mood and season. You’ll leave with practical tips and inspiration to help you try out these unique jelly nails, ensuring that your nails are as trendy and fabulous as you are.
Key Takeaways
– Fruity Jelly Nails: Combine vibrant colors with fruity designs for a fun and playful look that’s perfect for summer.
– Gradient Jelly Nails: Achieve a stunning ombre effect by blending two or more jelly colors, creating a smooth transition that dazzles.
– Glitter Jelly Nails: Add some sparkle to your jelly nails with glitter accents for a touch of glam that’s great for parties.
– Transparent French Tips: Update the classic French manicure by using jelly polish for tips that are fresh and modern while keeping that elegant vibe.
– Artistic Negative Space Jelly Nails: Embrace the negative space trend with jelly nail art that showcases your natural nail while adding color and design in a unique way.
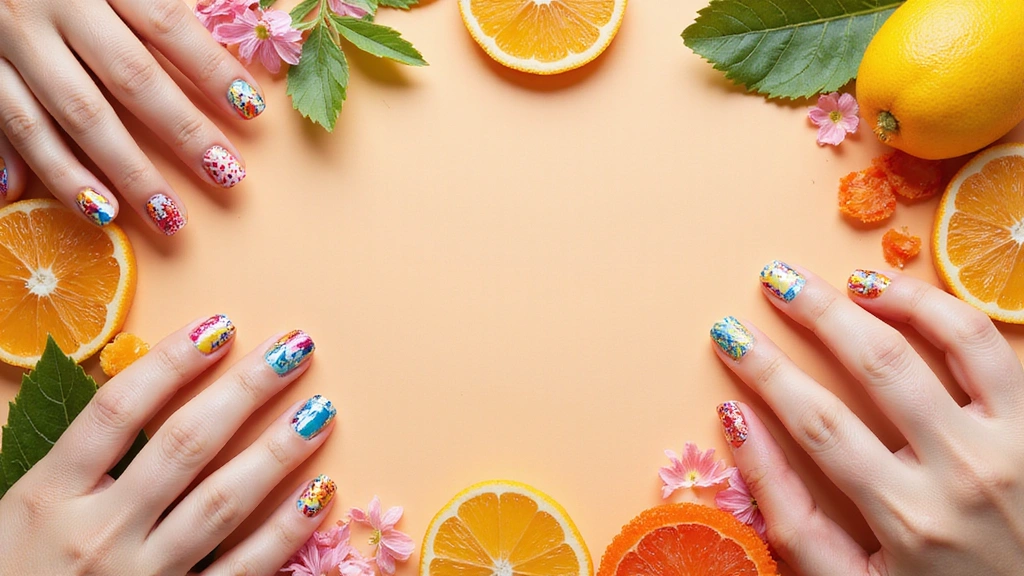
1. Fruity Jelly Nails

Fruity jelly nails are a delightful way to bring summer vibes right to your fingertips. Imagine bright citrus slices floating in a clear jelly base, offering a playful and vibrant look. With the translucent layers, you can create depth, making the fruits seem suspended in time, and this style is perfect for showcasing your fun side.
Outfit Pieces:
– Clear base coat
– Jelly nail polish in bright colors (red, orange, yellow, green)
– Nail art tools (fine brushes, dotting tools)
– Glossy top coat
Styling Tips:
– Use a fine brush for precise fruit slice designs.
– Layer different jelly colors for a unique effect.
– Finish with a glossy top coat for a shiny, fresh look.
Fruity jelly nails are perfect for picnics, beach outings, or whenever you want to add a pop of joy to your day. They give your nails a playful and cheerful touch that’s simply irresistible!
Fruity jelly nails are your shortcut to summer vibes—simple to build with a clear base and bright citrus colors. Layer thin coats to create depth, so the fruit looks suspended—perfect for unique jelly nails. Pro tip: seal with a glossy top coat for a bubble-free, long-lasting finish.
Fruity Jelly Nails
Editor’s Choice


2. Gradient Jelly Nails
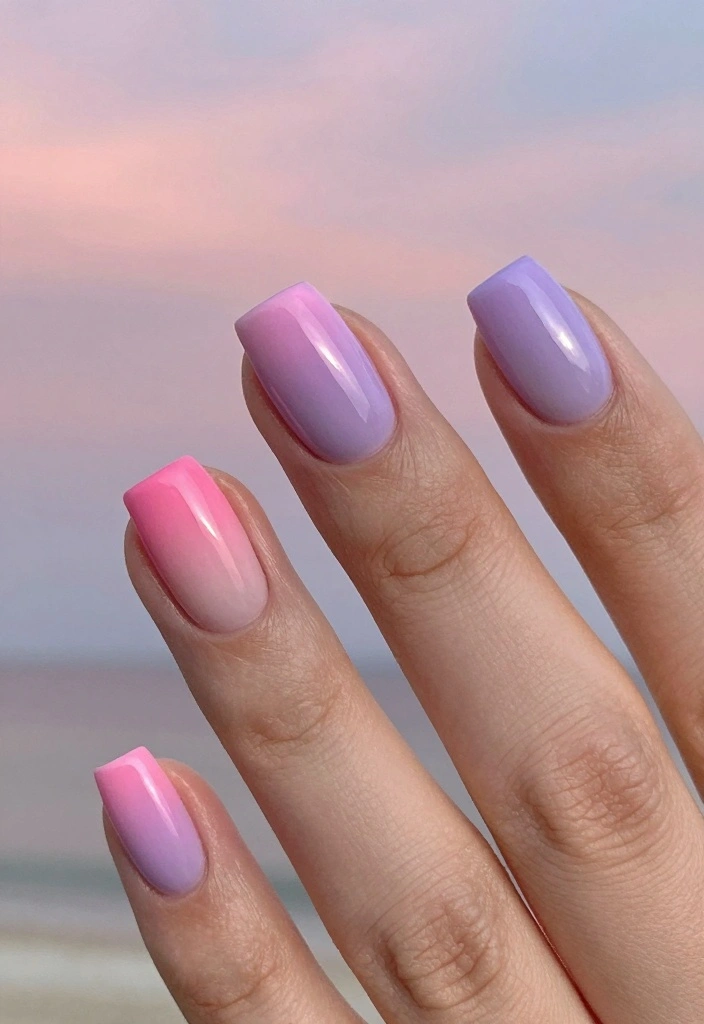
Gradient jelly nails are an enchanting trend that elevates your nail game with their dreamy ombre effect. This style allows colors to blend beautifully, creating a soft and ethereal look. The jelly polish adds a glossy finish that enhances the depth of the colors, making your nails truly stand out.
Outfit Pieces:
– Clear base coat
– Jelly nail polish in two to three colors (light pink, lavender, soft blue)
– Makeup sponge
– Top coat
Styling Tips:
– Use a makeup sponge for a smooth color transition.
– Choose complementary colors for a harmonious blend.
– Seal your design with a glossy top coat for a polished finish.
Gradient jelly nails are perfect for casual outings, romantic dates, or whenever you want to express your creativity with a touch of elegance. They’re versatile enough to suit any occasion!
Did you know that blending just two to three jelly shades can create a stunning ombre gradient in under 10 minutes for unique jelly nails? The glossy jelly polish lets colors melt into each other, giving an ethereal finish that shines in any light.
📹 Related Video: Easy Gradient Nail Art Tutorial Compilation! DIY Manicure || KELLI MARISSA
3. Neon Jelly Nails
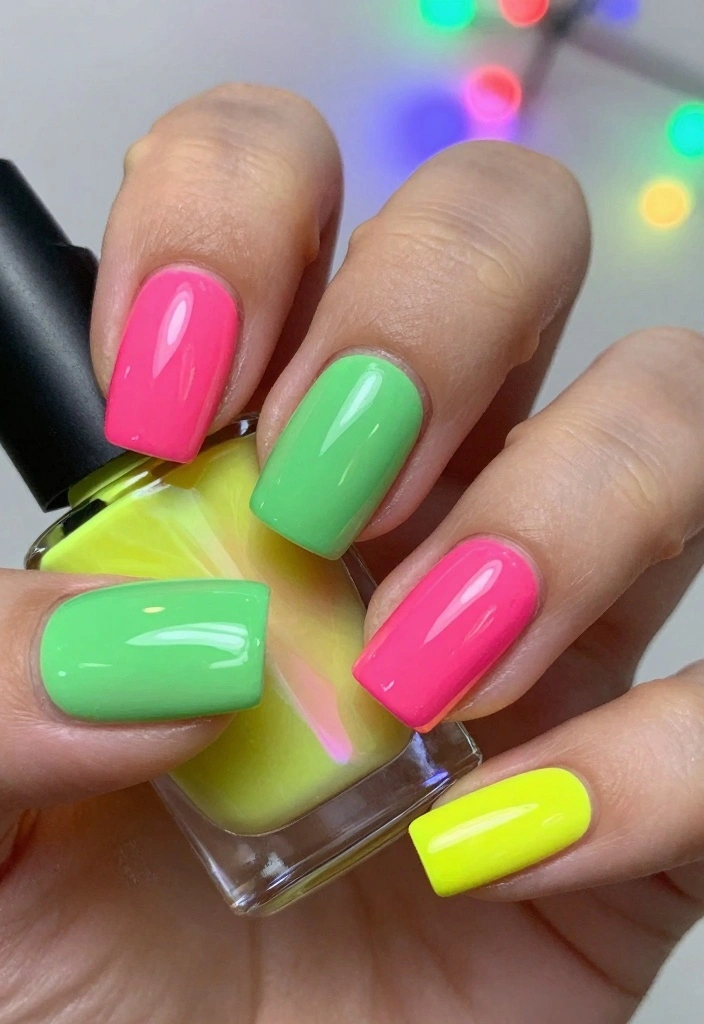
Neon jelly nails are the ultimate choice for anyone looking to make a bold statement. These vibrant shades catch the eye and add a playful touch to your look. The jelly finish enhances the brightness, making the colors pop even more, perfect for summer festivals or parties.
Outfit Pieces:
– White base coat
– Neon jelly polish in bold colors (hot pink, bright green, electric yellow)
– Nail tape for geometric designs
– Top coat
Styling Tips:
– Apply a white base coat to amplify neon vibrancy.
– Mix and match colors for a fun design.
– Use nail tape to create sharp geometric patterns.
Neon jelly nails are ideal for summer events or whenever you want to brighten your day. They radiate fun and energy, making your nails a focal point of your style!
Neon Jelly Nails
Editor’s Choice


4. Marble Jelly Nails
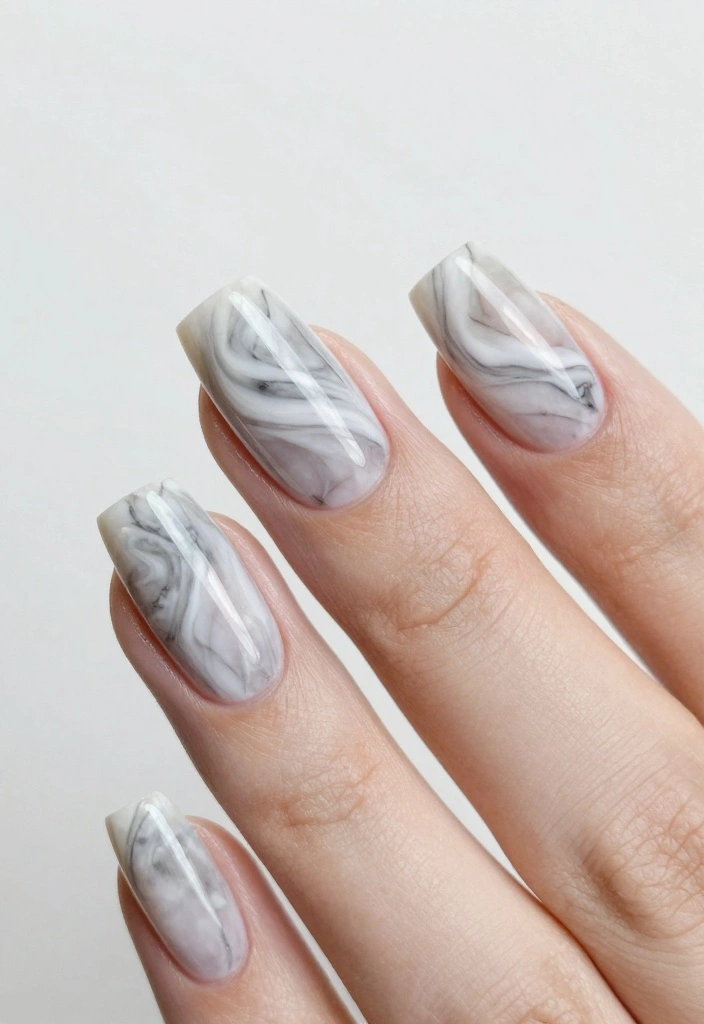
Marble jelly nails bring a sophisticated twist to a classic design. The combination of elegant marble patterns with a jelly finish creates a unique and eye-catching look. You can choose subtle colors for a muted effect or go bold with vibrant hues, allowing for endless creativity.
Outfit Pieces:
– Clear base coat
– Jelly nail polish in two colors (soft grey and white)
– Thin nail brush
– Top coat
Styling Tips:
– Use a thin brush to create delicate marble swirls.
– Opt for contrasting colors for a striking effect.
– Add glitter for a touch of sparkle.
Marble jelly nails are perfect for special occasions or whenever you want your nails to feel luxurious. They beautifully blend elegance with artistry!
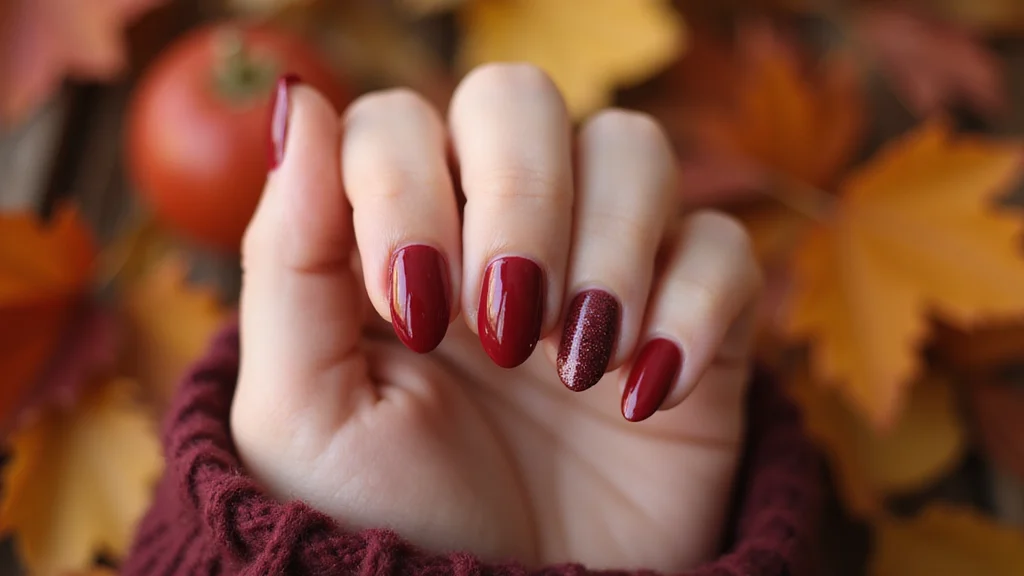
5. Glitter Jelly Nails
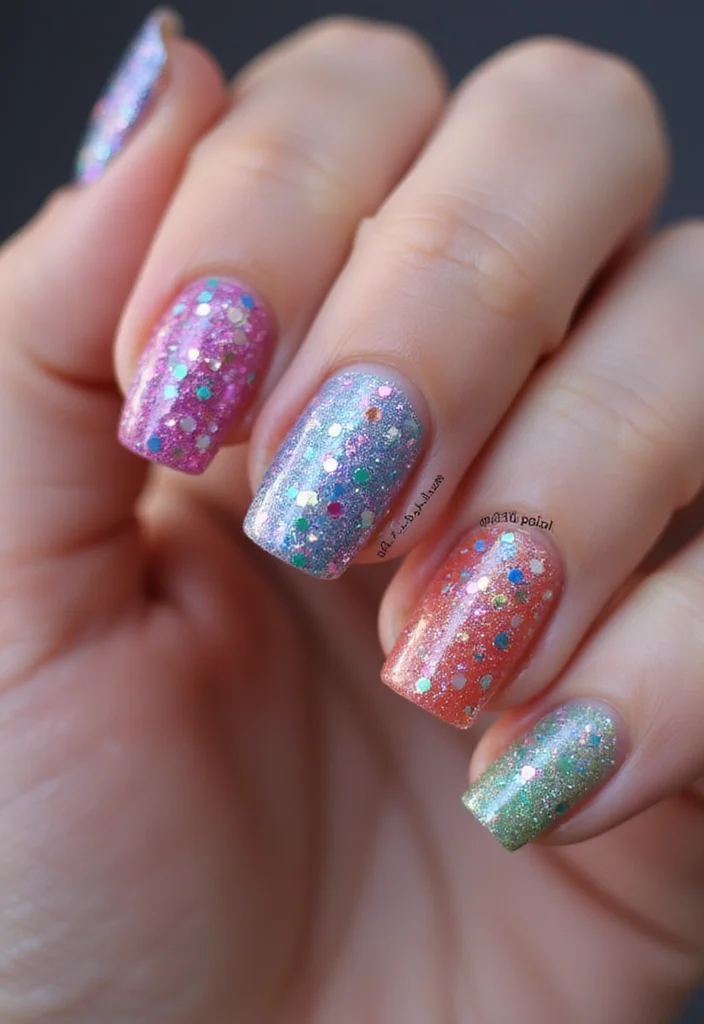
Glitter jelly nails combine the fun of jelly polish with the sparkle of glitter, creating a dazzling effect. You can sprinkle glitter throughout your jelly layers or use it to create stunning designs that steal the spotlight. The combination allows you to express your personality while adding a touch of glamour.
Outfit Pieces:
– Clear base coat
– Jelly nail polish of your choice
– Fine or chunky glitter
– Top coat
Styling Tips:
– Layer glitter for added depth.
– Use a clear jelly base to help the glitter shine.
– Experiment with different glitter shapes for variety.
Glitter jelly nails are perfect for parties, celebrations, or whenever you want to sparkle. They’ll make your nails a true statement piece!
6. Transparent French Tips
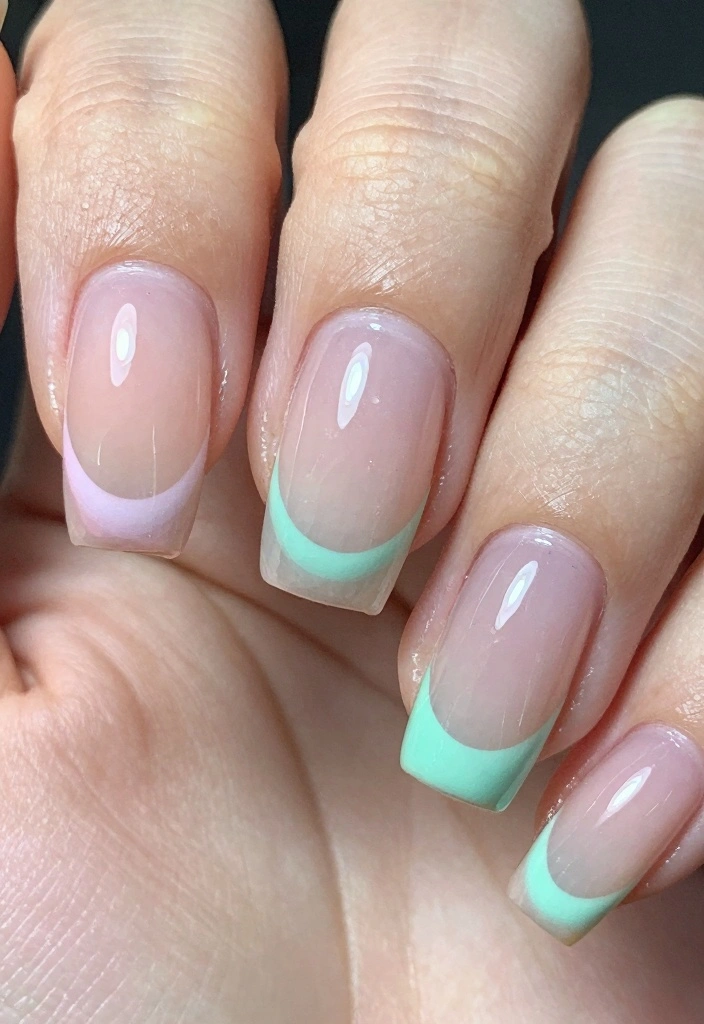
Give the classic French manicure a modern twist with transparent jelly tips! Instead of traditional white, opt for colorful jelly finishes that elevate this timeless style. Soft pastels or bright colors can be used, offering a chic and vibrant touch.
Outfit Pieces:
– Clear base coat
– Jelly nail polish in colors for tips (light pink, mint green)
– Top coat
Styling Tips:
– Start with a clear base to enhance jelly colors.
– Experiment with different jelly colors for tips.
– Keep nails longer for a sleek look.
Transparent jelly French tips are versatile for any occasion, from casual outings to special events. They add a unique flair while maintaining a sophisticated style!
Transparent French Tips
Editor’s Choice


7. Layered Jelly Stripes

Layered jelly stripes are an artistic and colorful way to express yourself through nail art. This design involves applying different colors in stripes, allowing them to overlap for a stunning effect. You can keep it simple with two colors or go wild with a rainbow of hues!
Outfit Pieces:
– Clear base coat
– Jelly nail polish in multiple colors
– Nail tape
– Top coat
Styling Tips:
– Use tape for clean, sharp lines.
– Layer colors patiently, allowing each to dry.
– Seal with a top coat for a glossy finish.
Layered jelly stripes are perfect for festivals or summer events, adding a playful touch to your nails. They allow for endless creativity and fun!
You might also like
8. Color Block Jelly Nails
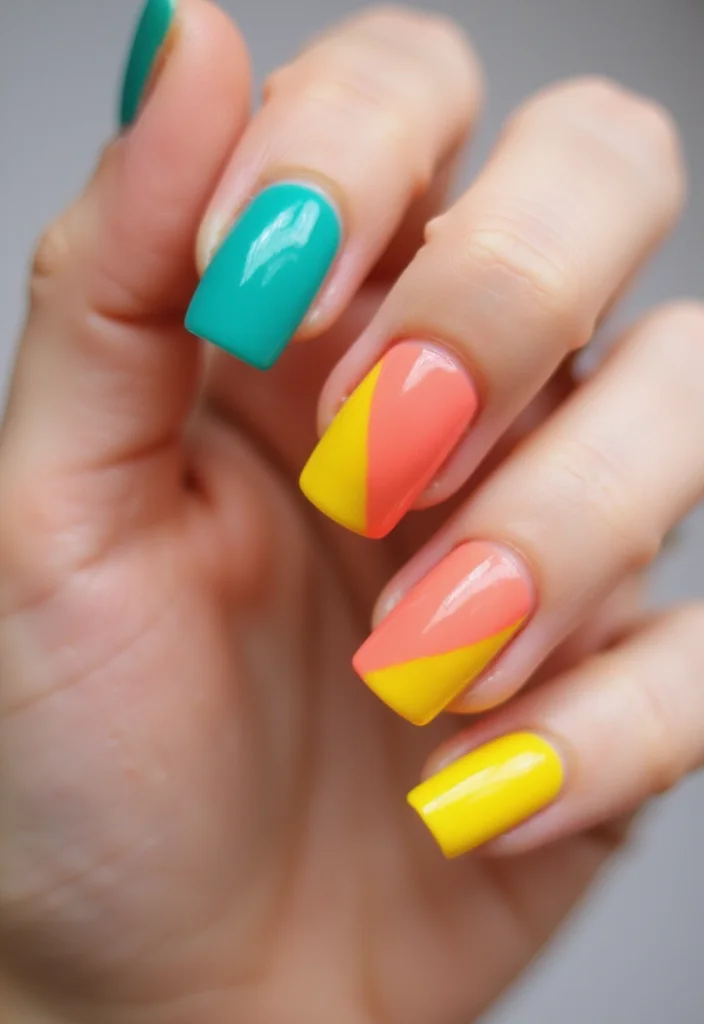
Color block jelly nails are all about boldness and fun! This design features sections of different jelly colors, creating a geometric pattern that’s modern and stylish. You can mix vibrant shades or stick to a monochrome effect for a sleek look.
Outfit Pieces:
– Clear base coat
– Jelly nail polish in a variety of colors
– Nail tape for clean edges
– Top coat
Styling Tips:
– Use tape to create distinct blocks.
– Experiment with shapes beyond squares.
– Use contrasting colors for a striking design.
Color block jelly nails are perfect for anyone wanting to showcase their creativity. They can be tailored to fit your mood, ensuring your nails always reflect your personal style!
9. Jelly Nail Art with Dried Flowers
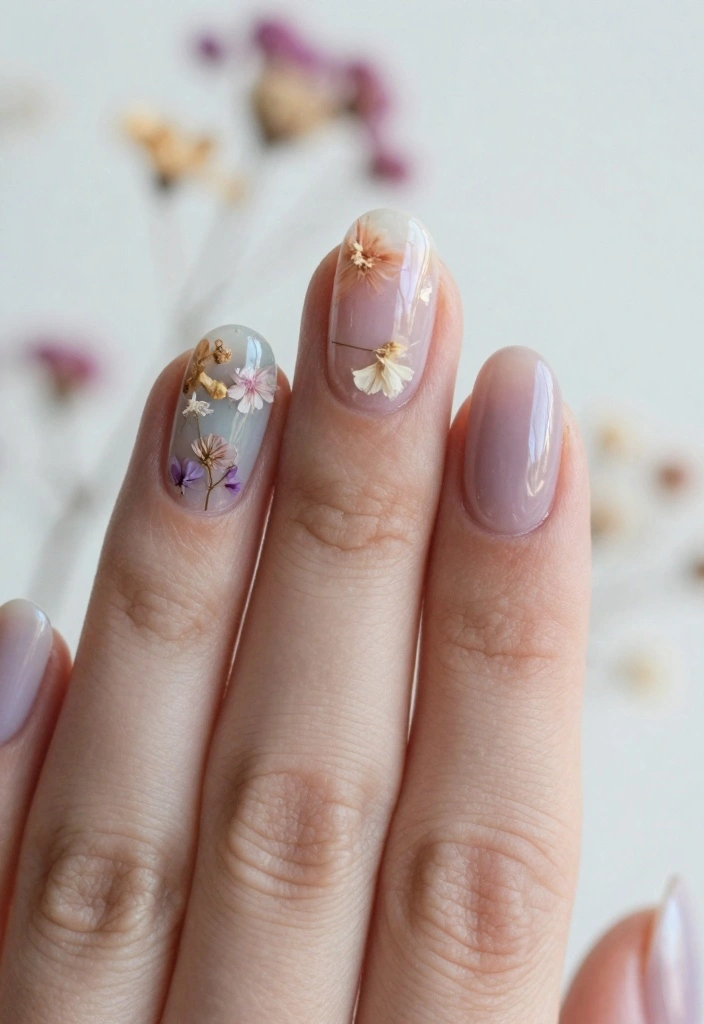
Jelly nails adorned with dried flowers create a stunning, natural effect reminiscent of a blooming garden. This design combines the beauty of flowers with the squishy finish of jelly polish. You can embed the flowers directly or use them as accents for a truly elegant look.
Outfit Pieces:
– Clear base coat
– Jelly nail polish in chosen colors
– Small dried flowers
– Top coat
Styling Tips:
– Choose delicate dried flowers for the best effect.
– Apply them while the jelly polish is wet for better adhesion.
– Consider a matte top coat for a different finish.
Jelly nail art with dried flowers is perfect for spring or romantic occasions, adding a fresh and elegant touch to your look!
How To Choose Unique Jelly Nail Styles
Choosing the perfect jelly nail style can seem overwhelming with so many creative ideas and nail trends out there. Follow these simple steps to help you select the jelly nail look that resonates with your personal style and occasion.
1. Assess Your Personal Style
Before diving into the world of unique jelly nails, take a moment to think about your own style. Do you prefer bold and bright colors, or are you more into soft pastels? Consider what types of colors you typically wear and how they reflect your personality. This will help you narrow down your options to styles that you’ll truly love.
2. Consider the Occasion
Different occasions call for different nail styles. Are you getting ready for a beach day, a wedding, or a casual outing with friends? For example, vibrant neon jelly nails are perfect for a summer festival, while pastel jelly nails might be more fitting for a spring wedding. Matching your nail style to the event can elevate your overall look.
3. Experiment with Patterns and Textures
Unique jelly nails allow for a variety of creative patterns and textures. Think about trying gradient jelly nails if you want a smooth transition between colors, or glitter jelly nails for a touch of sparkle. You can also consider artistic negative space jelly nails, which can add an edgy look. Look for inspiration on social media platforms like Instagram or Pinterest to help you find the perfect design.
4. Choose the Right Length and Shape
The length and shape of your nails can dramatically affect the final look. Long stiletto nails may enhance a bold jelly design, while short square nails offer a more understated appearance. Consider what you’re comfortable with and how much maintenance you’re willing to put in when deciding on nail length and shape.
5. Think About Color Combinations
A significant part of jelly nail artistry lies in color combinations. You might want to try color block jelly nails for a fun contrast or layered jelly stripes for a more sophisticated vibe. Always keep in mind the color wheel; complementary colors can create a striking look, while analogous colors will offer a more harmonious feel.
6. Factor in Your Skill Level
Consider your own nail art skills when choosing a unique jelly nail style. Some techniques, like marble jelly nails or jelly nail art with dried flowers, require more practice and precision. If you’re a beginner, you might want to start with simpler designs and work your way up as you gain confidence.
Pro Tip: If you’re uncertain about what style to choose, don’t hesitate to try a few test nails. Use press-on jelly nails or nail wraps to experiment with different colors and designs before committing to a full set. This way, you can find out what you love without going all in right away.
By following these steps, you’ll be in a much better position to select a unique jelly nail style that not only suits you but also makes you feel fabulous. Happy nail designing!
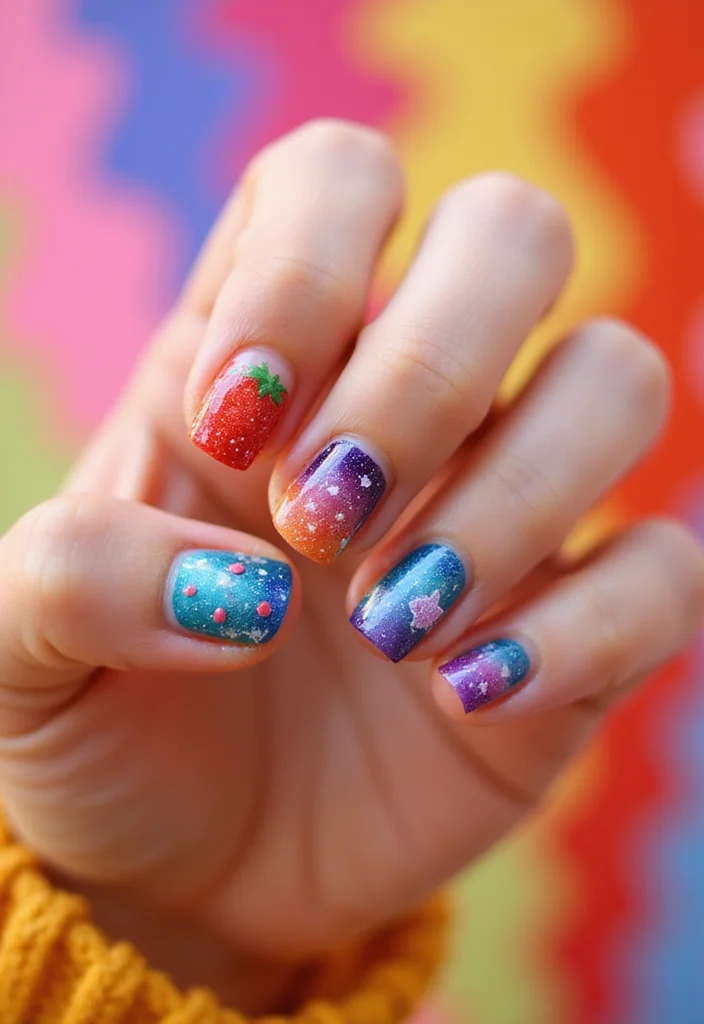
10. Sunset Jelly Nails
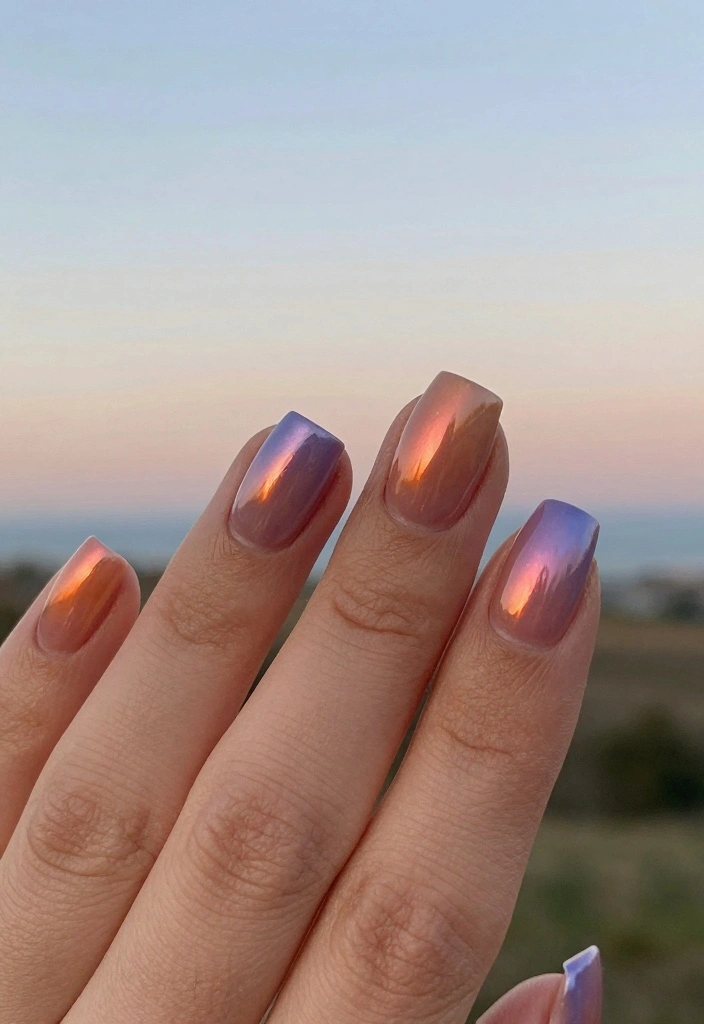
Capture the essence of sunsets with sunset jelly nails! This design features a gradient of colors like oranges, purples, and yellows, creating a mesmerizing effect that resembles a sunset sky. The jelly finish adds a delightful gloss, making the colors come alive.
Outfit Pieces:
– Clear base coat
– Jelly nail polish in sunset colors (orange, pink, purple)
– Makeup sponge
– Top coat
Styling Tips:
– Blend colors while still wet for a smooth transition.
– Use a sponge for a seamless gradient.
– Seal with a top coat for a glossy finish.
Sunset jelly nails are perfect for vibrant summer days or whenever you want to brighten your look. They radiate warmth and creativity!
11. Ocean-Inspired Jelly Nails
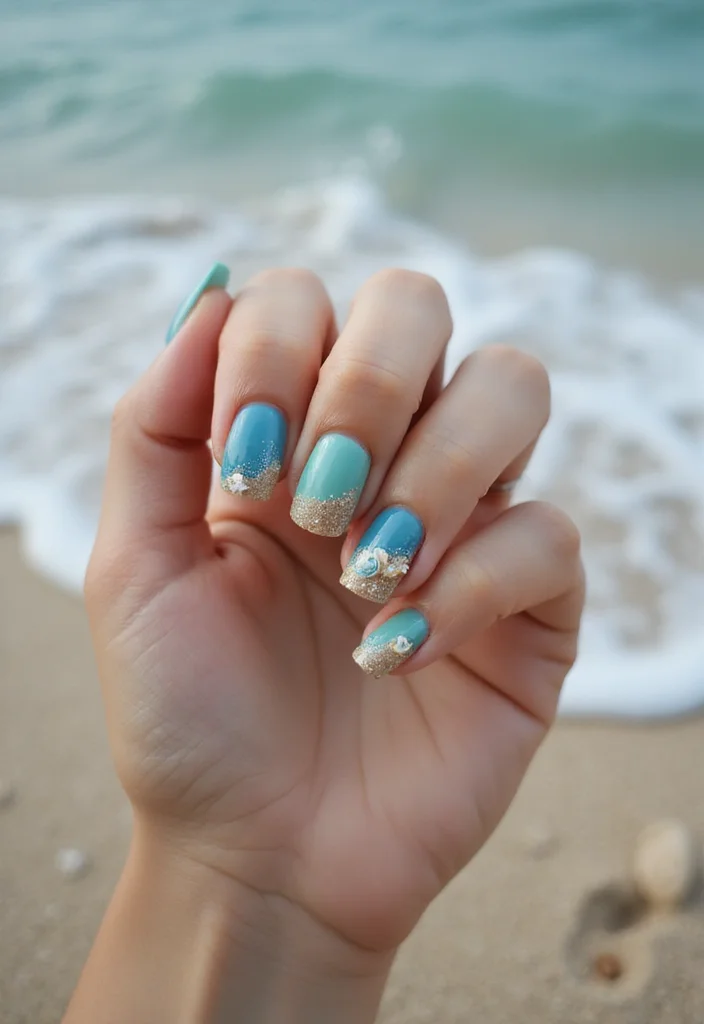
Bring the calming vibes of the ocean to your nails with ocean-inspired jelly nails! This look incorporates shades of blue, green, and sandy beige to create a tranquil beach effect. Adding tiny seashells or glitter enhances this ocean theme.
Outfit Pieces:
– Clear base coat
– Jelly nail polish in ocean colors (blue, teal, green)
– Tiny seashells or ocean-themed charms
– Top coat
Styling Tips:
– Use various shades of blue and green for depth.
– Incorporate tiny seashells for added detail.
– Seal everything with a glossy top coat.
Ocean-inspired jelly nails are perfect for summer or whenever you’re dreaming of sunny shores. They bring a refreshing aesthetic to your style!
12. Artistic Splatter Jelly Nails
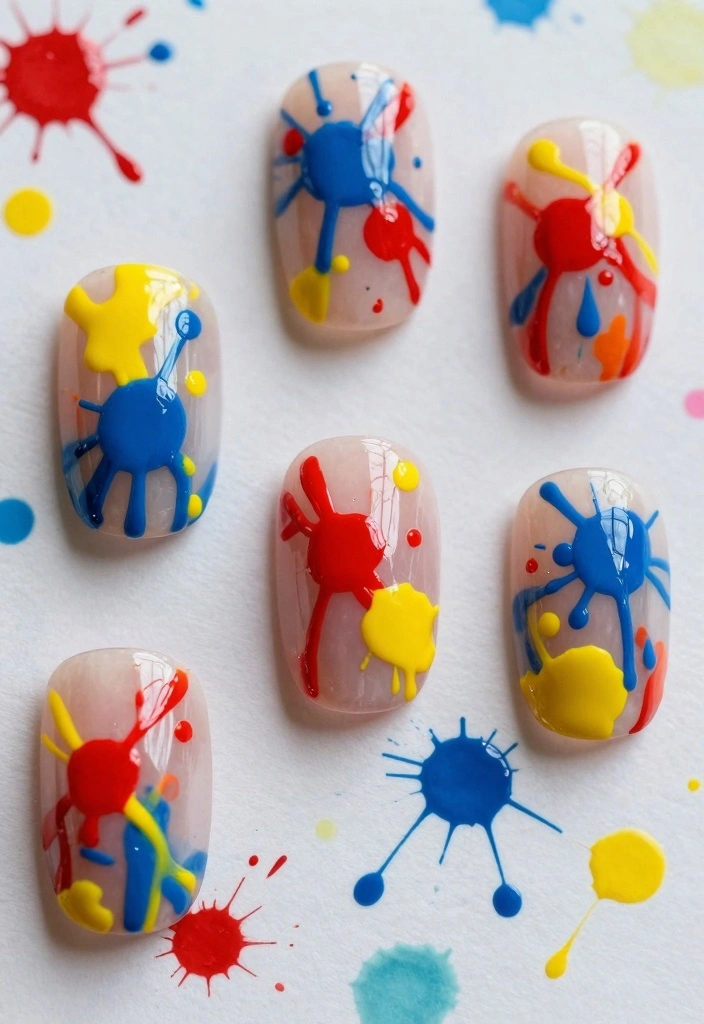
Artistic splatter jelly nails are a fun way to unleash your creativity! This design involves splattering different jelly colors onto a base, creating a vibrant abstract piece right on your fingertips. There are no rules—just let your imagination run wild!
Outfit Pieces:
– Clear base coat
– Jelly nail polish in various colors
– Brush or straw for splattering
– Top coat
Styling Tips:
– Use a brush or straw for creative splatter effects.
– Experiment with colors for a lively design.
– Seal with a top coat for durability.
Artistic splatter jelly nails are perfect for expressing your unique style. They add a playful touch to any nail routine!
You Might Also Like
13. Jewel-Toned Jelly Nails
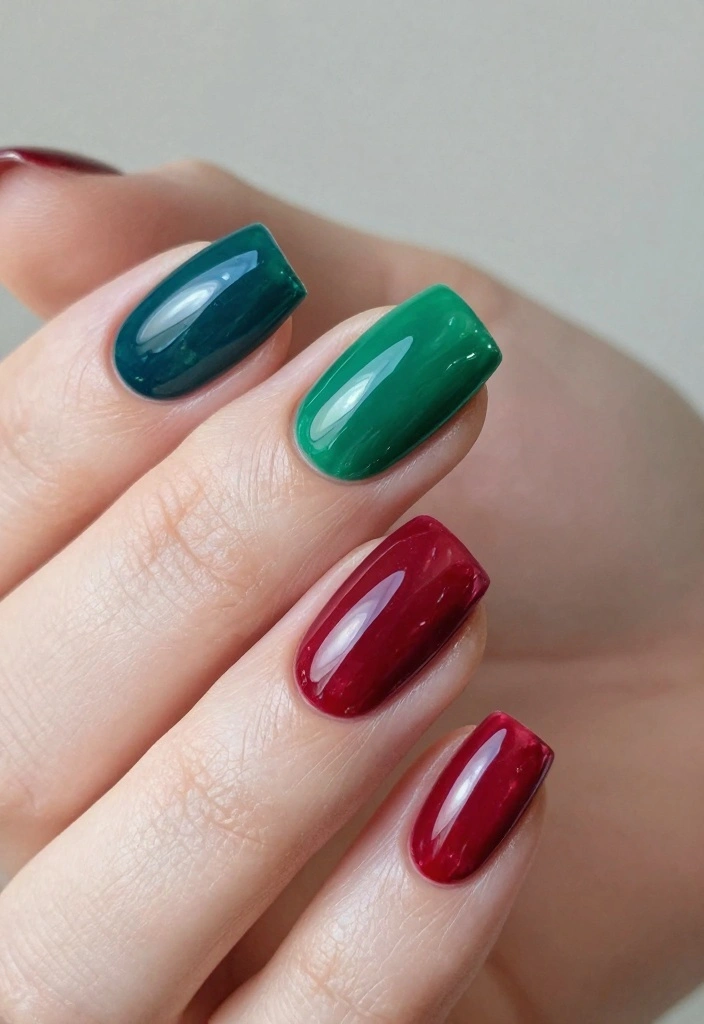
Elevate your nail game with jewel-toned jelly nails! Rich colors like emerald, sapphire, and ruby create a luxurious appearance, perfect for special occasions or when you want to feel fabulous. The jelly finish enhances the depth of these colors, making them truly pop.
Outfit Pieces:
– Clear base coat
– Jelly nail polish in jewel tones (emerald, ruby, sapphire)
– Gold or silver foil accents
– Top coat
Styling Tips:
– Pair jewel tones with metallic accents for added luxury.
– Use a shiny top coat to enhance the jewel-like quality.
– Consider glittery bases for extra sparkle.
Jewel-toned jelly nails are ideal for parties or momentous events, allowing your nails to shine with elegance!
Jewel-Toned Jelly Nails
Editor’s Choice

14. Artistic Negative Space Jelly Nails
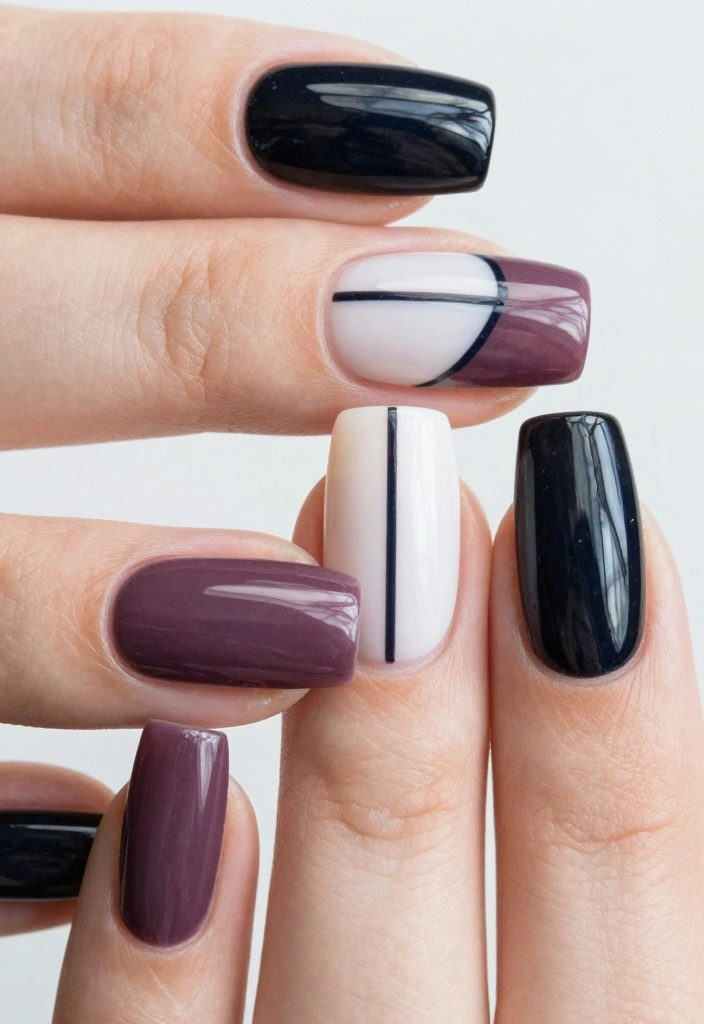
Negative space jelly nails combine minimalism with creativity by leaving parts of the nail bare. This design allows your natural nail to shine while showcasing artistic flair with jelly polish. The modern touch of jelly makes the negative spaces even more striking.
Outfit Pieces:
– Clear base coat
– Jelly nail polish in various colors
– Striping tape
– Top coat
Styling Tips:
– Plan your design in advance for clear negative spaces.
– Use striping tape for clean lines.
– Keep a neutral base coat for the jelly colors to stand out.
Artistic negative space jelly nails are perfect for those who enjoy a clean yet stylish look. They offer simplicity with an artistic twist!
Artistic Negative Space Jelly Nails
Editor’s Choice


15. Pastel Jelly Nails
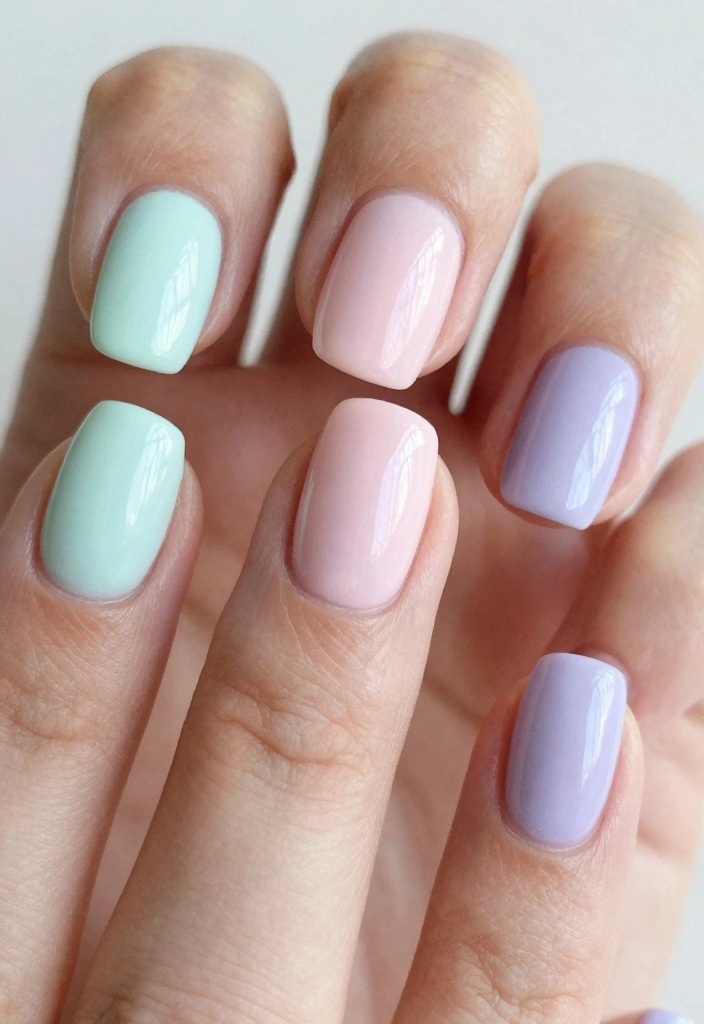
Pastel jelly nails are ideal for a soft, serene look that exudes sweetness. These delicate shades can be layered or worn alone, making them versatile for any occasion. The jelly finish adds a dreamy gloss, creating a calming effect on your nails.
Outfit Pieces:
– Clear base coat
– Pastel jelly nail polish (mint green, baby pink, lavender)
– White base coat (optional)
– Top coat
Styling Tips:
– Layer different pastels for a unique look.
– Use a white base coat to enhance vibrancy.
– Consider a matte top coat for a different texture.
Pastel jelly nails are perfect for casual outings or whenever you want a gentle touch of color. They embody a soft, charming aesthetic!
16. Celestial Jelly Nails
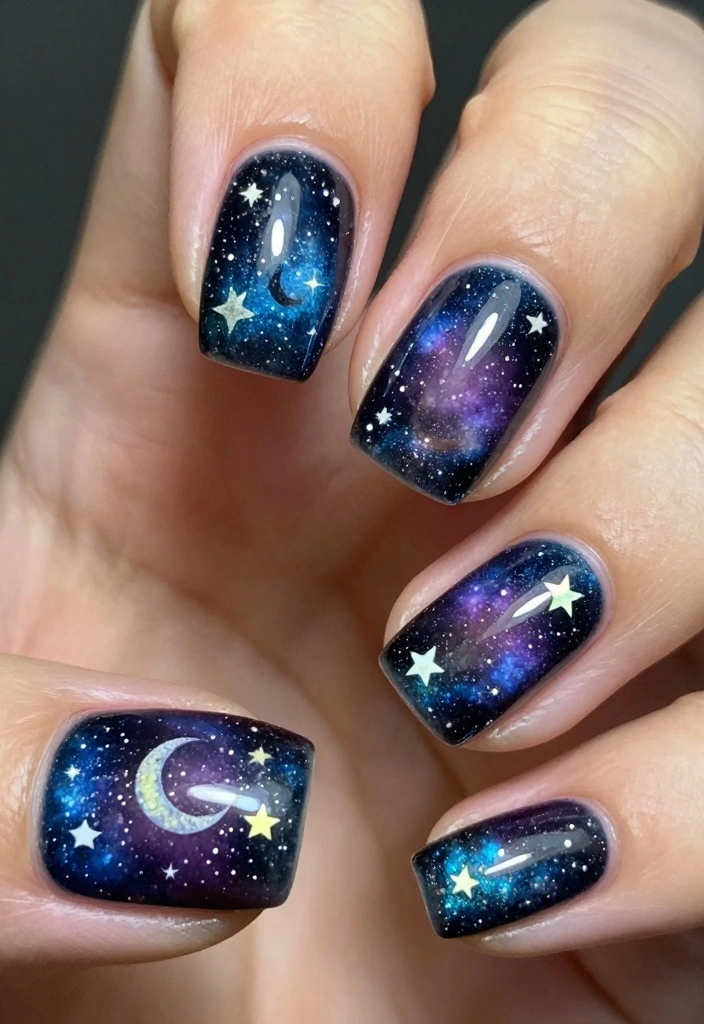
Celestial jelly nails are a magical way to incorporate cosmic elements into your style. This design features stars, moons, and galaxy swirls in deep blues, purples, and blacks. The jelly finish adds an ethereal quality, making your nails look otherworldly.
Outfit Pieces:
– Dark base coat (black or navy)
– Jelly nail polish in galaxy colors (purple, blue, silver)
– Star and moon stickers
– Top coat
Styling Tips:
– Use a dark base coat for contrast.
– Incorporate shiny star and moon stickers for extra detail.
– Blend colors with a sponge for a swirling effect.
Celestial jelly nails are perfect for anyone wanting to add a touch of whimsy to their look. They transform your nails into a beautiful piece of cosmic art!
Fun fact: Celestial jelly nails create a galaxy depth for your unique jelly nails with just 3 thin coats of jelly polish—the final layer adds shimmer like starlight. Pro tip: pair with star/moon stickers and a strong top coat for lasting, out-of-this-world shine.
Conclusion
With so many unique jelly nail styles to choose from, there’s no excuse not to get creative! Each design offers a different way to express yourself and show off your personality through your nails. From fruity fun to celestial beauty, these jelly nail styles are perfect for experimenting with color, texture, and creativity.
So why not try your hand at one (or all!) of these joyous trends? Your nails will thank you, and you’ll undoubtedly turn heads with your stunning nail art!
Note: We aim to provide accurate product links, but some may occasionally expire or become unavailable. If this happens, please search directly on Amazon for the product or a suitable alternative.
This post contains Amazon affiliate links, meaning we may earn a small commission if you purchase through our links, at no extra cost to you.
Frequently Asked Questions
What exactly are unique jelly nails and how do they differ from other translucent nail styles?
Unique jelly nails are translucent, glassy nails built with sheer gels or polishes to create a see-through, jelly-like finish. They differ from other translucent nail styles by adding depth and dimension through layered, ultra-thin coats and sometimes subtle 3D accents. To spot the look, look for a juicy, glassy shine and visible depth across the nail.
How to achieve it: ask your nail tech for a jelly overlay or use a sheer builder gel, apply in thin coats, cap the free edge, and cure under a UV/LED lamp. Finish with a high-gloss top coat for that signature jelly glow. If you’re chasing ideas, you’ll see this vibe in many nail trends and creative ideas across jelly nail designs, from floating glitter to translucent gradients and jelly tips.
How can I recreate unique jelly nail styles at home or with a professional?
For at-home creation, prep nails, correct cuticles, apply dehydrator, base coat, then build 2–3 sheer jelly coats, curing between layers. Add subtle accents like micro-glitter or tiny foil between coats, then seal with top coat and cure. For a pro, bring reference pics of a specific jelly nail style you want and ask for a jelly glaze or translucent overlays to build depth. Communicate: you want unique jelly nails with a soft, glassy finish. Regular maintenance and proper curing will help keep the look vibrant—check in with your tech about optimal lamp settings and top-coat refreshes to stay on top of nail trends.
What are some creative ideas and nail trends I can try with unique jelly nails?
Here are creative ideas that fit current nail trends: 1) Clear jelly base with floating glitter for depth and sparkle; 2) Jelly ombre that fades from sheer to a pale shade in multiple thin coats; 3) Soap-bubble jelly nails with iridescent bubbles suspended inside; 4) Pastel jelly tips with negative space for a soft, modern look; 5) Transparent marble with subtle swirls; 6) Tiny 3D accents embedded in a clear layer for a playful finish. The beauty of unique jelly nails is that you can seasonally adapt the palette and add subtle accents without losing the translucent vibe.
Are jelly nails durable for everyday wear and how should I maintain them?
Yes, they can be durable when cared for properly. Avoid harsh chemicals; wear gloves when cleaning; don’t pick or peel. Keep nails hydrated with cuticle oil and schedule regular fills every 2–3 weeks to prevent lifting and maintain shape. Refresh the top coat every 1–2 weeks to maintain that glassy finish. With these tips, your unique jelly nails will stay pristine and on trend with minimal effort.
What tools and products do I need to achieve high-quality unique jelly nails, and what jelly nail trends should I watch?
Stock up on essentials for high-quality unique jelly nails: jelly gels or sheer builder gels, a base coat, a top coat, and a reliable UV/LED lamp. You’ll also want a good gel brush, slip solution or isopropyl alcohol, nail forms or tips for structure, a dehydrator and cleanser, and optional decor like glitter, foil, or decals. Build depth by applying 2–4 thin jelly layers and sealing with top coat. Stay current with nail trends by trying ideas like glass jelly nails, translucent marbles, floating glitter, pastel jelly gradients, or negative-space jelly designs.
Related Topics
unique jelly nails
translucent nail art
creative nail trends
nail design ideas
colorful jelly styles
beginner friendly nails
summer nail trends
easy nail techniques
nail inspiration
playful nail designs
trendy nail styles
artistic nail looks
I love the jelly nail styles you shared! They look so fun and playful. Have you tried any of them yourself?