
This Halloween, I want nails that last through party after party. Glitter and long nights can chip a mani fast. So I put this together to give you 18 Halloween nails 2025 tricks that help you keep your mani looking great from the first hello to the last toast. Why I made this post is simple: practical nails save you time and stress.
Who it’s for: If you love Halloween, costumes, or cute spooky nails, this is for you. You juggle photos, parties, and outfits, so you need looks that stay put. Whether you’re new to nail art or a seasoned pro, you’ll find options that fit your skills and budget.
What you’ll get: 18 nail ideas that cover spooky chic to playful creepiness. I share easy steps, the supplies you need, and tips to make each look last. These ideas work with gel polish, regular polish, or press-on nails, so you can adapt to what you already own.
You’ll learn prep tips to boost wear. You’ll see how color choices pop on camera and how to seal glitter. There are ideas for decals, negative space, and clean silhouettes that look stylish without hours of work.
These looks lean into 2025 trends—fun twists on classic Halloween icons. Think negative-space pumpkins, skeletons with clean lines, and glow accents you can cap with a clear top coat. You can mix and match to fit your vibe, from spooky to chic.
Start by scanning the ideas, pick your top three, and sketch a plan. Prep a quick shopping list, choose a base color, and map out where glitter or decals go. Then test a look on a nail wheel or on a free afternoon, so you’re ready for the season.
1. Classic Orange and Black Ombre
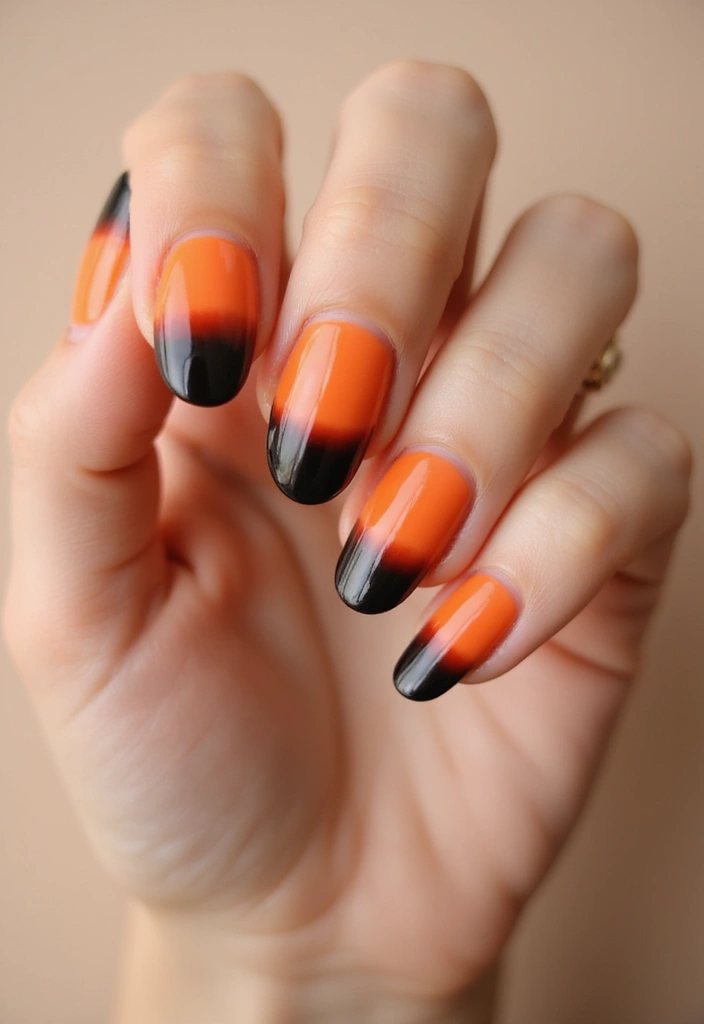
Classic orange and black ombre nails make a bold Halloween statement, yet they stay simple. You get a fade that fits many costumes. This look works in daylight or under party lights, so you can wear it to any event.
– Base first: Apply a solid black base coat and let it dry fully. This gives a dark canvas that makes the orange pop.
– Create the gradient: Use a small makeup sponge. Dab bright orange onto the sponge, then press it onto the tips. Lightly blend back toward the center for a smooth transition.
– Finish choices: A matte top coat creates a chic, velvety look. A glossy top coat adds extra shine and makes the colors stand out.
– Seal and protect: Finish with a durable top coat to lock in color and extend wear. Thin coats work better than thick ones.
This style is easy to tweak. If you want a warmer vibe, swap in pumpkin or tangerine tones. For extra flair, add tiny black dots or a light stripe across the nail.
– Care tips: Keep the look longer by avoiding hot water for a few hours after application. Reapply a clear top coat every 2–3 days to maintain shine. Wear gloves when cleaning to protect the finish.
2. Spooky Nail Art Stencils

Want quick, clean Halloween nails? Spooky nail art stencils give you sharp shapes without a pro’s steady hand. Bats, spiders, and pumpkins pop with clean lines when you follow simple steps. You’ll save time and still get a mani that lasts through parties and photos.
Prep and base: Apply a Halloween-friendly base color and let it dry completely so the stencil sticks.
Position the stencil: Place the stencil exactly where you want the design, press lightly to keep it flat, and tweak alignment before you start painting.
Apply color through the stencil: Use a small sponge or a blunt brush to dab color into the cutouts, not brush from side to side.
Peel and reveal: Gently lift the stencil from the edge toward the center while the polish is still a bit wet, giving you crisp edges.
Seal with top coat: Wait for the colored layer to dry a bit, then sweep on a clear top coat for shine and extra durability.
Clean up and store: Rinse or wipe the stencil after use, dry it well, and store flat so it stays clean for next time.
With a little practice, you’ll line up multiple stencils for mini Halloween scenes that wow without the mess.
3. Glitter Galore

Glitter nails light up Halloween. You want that shine, but you also want nails that last through party hops and photo moments. Here’s a simple way to do it right.
Full glitter mani
Choose a base color you love. Paint a smooth coat and let it dry. Brush on a glitter polish over the base. Add a second glitter layer if you crave more sparkle. Finish with a sturdy top coat. Let every layer dry fully before you touch anything.
Glitter tips or accents
Paint a dark, solid base and let it dry. Apply glitter polish just on the tips, or on one or two nails for a chic contrast. You can also dab glitter onto a wet top coat for a concentrated glitter spot. Seal with a final top coat for durability.
Make it last
Always layer with a top coat between steps. Don’t rush the dry time—let air dry, and use a small fan if you have one. If you hate cleanup, use a small brush dipped in remover to tidy edges.
Pro tips
– Use a peel-off base coat for easy glitter removal.
– Pair glitter with dark colors for a moody, party-ready look.
– Finish with a quick-drying top coat to cut wait times.
This approach keeps glitter bright, dries evenly, and fits many Halloween looks.
4. Ghostly Matte Finish

Ghostly Matte Finish
You want nails that stay neat through Halloween parties. Matte nails add drama without shine. A ghostly matte look starts with a color base sealed with a matte top coat. Choose white, black, or a deep purple for a spooky backdrop.
Apply two thin coats of your chosen color. Let each coat dry fully. Then sweep on a matte top coat to erase shine. The finish stays sleek and mysterious, great for midnight events.
To add a haunt, place ghost or skull decals over the matte layer. Use tweezers to set them, then seal with one more matte coat for long wear. Keep decals simple and evenly spaced.
Maintenance matters. Don’t use oily hand lotions. Oils break the matte effect. If your skin feels dry, pick a non-greasy hand cream and wash hands gently to avoid slickness on the nails.
Quick tips:
– Keep a matte top coat on hand for quick touch-ups.
– Let each layer dry completely before the next.
– Cap the free edge to prevent chips and add staying power.
– Wipe nails with a clean, oil-free cloth before reapplying decals or top coats.
Matte nails give you a chic, eerie look this Halloween—easy to wear and hard to beat.
Unleash your inner ghost this Halloween with a matte finish! A sleek, eerie touch keeps your Halloween nails 2025 ready for all the spook-tacular parties ahead.
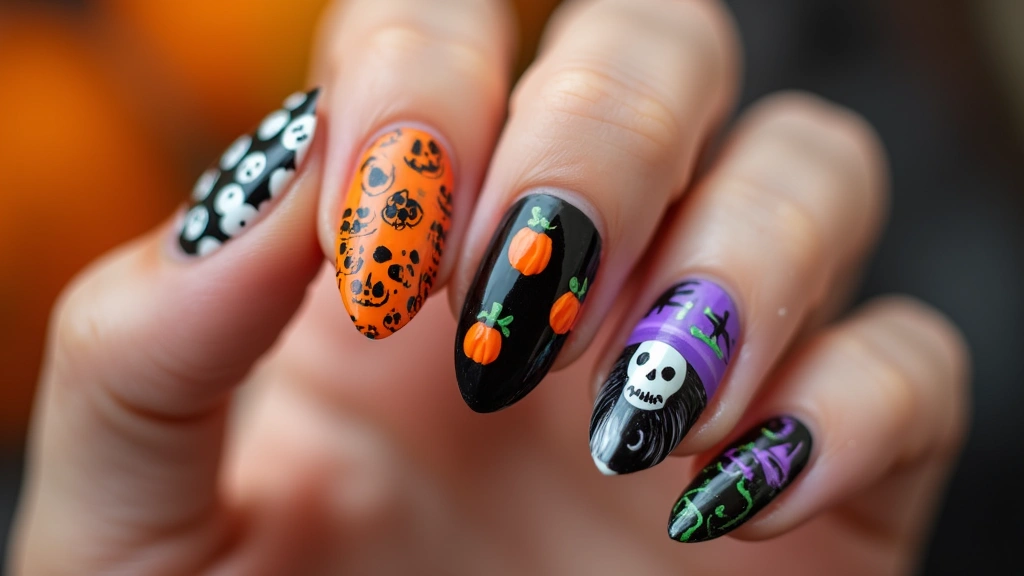
5. Creepy Cartoon Characters

If you want Halloween nails that stand out, creepy cartoon characters are a perfect match. You can paint them by hand or use stickers for a fast, bold effect. Start with a base color that fits your character. Then add features with a fine brush or dotting tool. Finish with a glossy top coat to keep colors sharp and prevent chips.
1) Pick a creepy cartoon character.
2) Choose a base color.
3) Paint the big features.
4) Add small details.
5) Seal with top coat.
Here are tips to help you nail the look.
Look up references and practice on paper first.
A small brush helps you keep edges neat.
Stickers save brush work and still look sharp.
Use high-quality polish and a steady hand for color that lasts.
Popular character ideas:
– Frankenstein on an accent nail.
– Witch with a hat and broom.
– Ghost with wavy outlines.
– Vampire with fangs and cape.
– Skeleton grin across a full nail.
Keep nails dry after painting and reapply top coat every 2–3 days.
If you chip, touch up the line art quickly to avoid a messy look.
To remove, soak in acetone and gently lift with a cuticle stick.
6. Fall Leaves and Pumpkins

Fall Leaves and Pumpkins
You want nails that bring fall color and a touch of Halloween. This look blends autumn charm with party vibes and looks lively on your fingertips.
– Prep nails with a clean base layer so colors grip well.
– Start with a warm base: choose deep orange or burgundy to set the mood.
– Use a fine brush or a nail art pen to paint small leaves in green, red, and yellow, and add tiny pumpkins for a playful scene.
– Create leaf veins with a thin striping brush and tiny lines, keeping the details neat.
– Use a dotting tool to form round pumpkins, so the shapes stay cute and clear.
– Let each color dry before adding the next to avoid smudges.
– Apply a high-gloss top coat to lock in color and add a brilliant shine that lasts through parties.
– If you want a different feel, switch to a matte finish to give the art a soft, modern look.
– Add metallic accents like gold lines or tiny dots to give your nails an elegant touch without overpowering the design.
– Choose a top coat or base coat that offers long wear and easy removal to spare your nails.
– Finish with cuticle oil and a quick hand rub to keep the polish smooth and bright.
– With these steps, you’ll have nails that fit every Halloween party and fall gathering.
7. Blood Drip Effect

Blood Drip Effect
Want a Halloween look that grabs attention? The blood drip nails do it with style. It’s bold, spooky, and great for photos.
– Start with a solid base in white or nude so the red drips pop. Let the polish dry completely.
– Create the drips with a fine brush or toothpick dipped in red polish. Draw thin lines from the tip toward the nail bed. Let each line dry before adding more.
– If you want thicker drips, add a second layer. Dry between coats for clean edges.
– Seal the look with a high-gloss top coat. The shine makes the drips feel real and bright.
Pro tips: Use a fine tool for precise lines. Practice on paper first to get the drip flow right. Clean up mistakes with a quick swipe of remover on a brush.
This style is beginner-friendly and works well at home. It pairs with many outfits, especially white, black, or dark costumes. It also photographs nicely in dim party lighting.
Limitations to know: chips can happen with heavy use. A quick top-coat touch-up after a night out keeps it fresh.
8. Witchy Vibes

Witchy Vibes
Need a Halloween look that shouts witch vibes? Witchy nails fit the bill. Start with a deep purple base that feels moody and magical. Then add silver accents like tiny stars, crescent moons, and a playful witch hat. You can paint these details by hand, or use nail stickers for quick, clean lines.
Style wise, this nail art can be sleek and elegant or fun and bold, depending on how you finish. To resist chips at parties, end with a strong top coat. A quick cap on the edges helps wear.
Helpful tips
– Try a matte base with glossy accents for contrast.
– Experiment with several shades of purple to find your vibe.
– Use a fine brush or stickers for clean lines.
– For longer wear, cap the free edge and recoat after a few days.
– Add a touch of silver glitter near the tips for extra drama.
Placement ideas help you keep the look tidy during parties. Use the focal nail for a larger witch hat or moon sticker, and keep other nails simple with tiny stars near the cuticle. If you want extra shine, apply a holographic top coat on the silver accents.
Witch nails can charm the crowd at Halloween parties.@media (max-width: 768px) { .internal-links-flex { flex-direction: column !important; } .internal-links-flex > div { flex: none !important; } }
You might also like

9. Neon Halloween

Neon Halloween Nails: Bright, Bold, and Party-Ready
You want nails that glow at every party. Neon Halloween nails give you pop, energy, and a modern edge. The shades buzz with color and catch every eye.
Neon nails catch light from stage lamps and phone flashes. They look lively in photos and videos. Mix several neon colors for a big, party-ready finish. These shades glow in dim rooms and shine in flash.
How to create neon nails
– Start with clean nails and push back cuticles.
– Apply a white base coat to lift the neon hues.
– Paint two coats of neon polish in lime green, electric pink, or bright orange.
– Add patterns with tape for stripes, blocks, or simple chevrons.
– Finish with a glossy top coat to seal color and add shine.
– If you have a black light, choose neon shades that glow under it for extra party effect.
Quick tips for neon nails
– White base boosts brightness.
– Let each layer dry before the next.
– Use a fine brush or tape for clean lines.
– Reapply top coat every couple days to keep gloss and prevent chipping.
Even with one color, you can get a bold look with stripes or blocks. Practice on a nail wheel to keep lines neat.
Neon nails are a bold way to stand out. They feel festive, playful, and perfect for Halloween crowds.
@media (max-width: 600px) {
.visual-quiz-iframe { min-height: 995px !important; height: 1100px !important; }
}
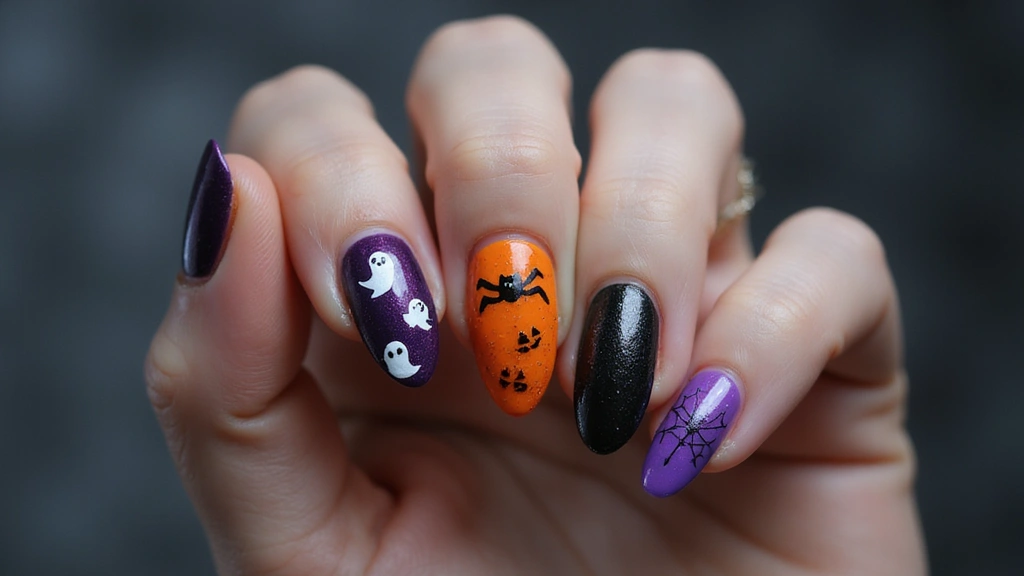
10. Spider Web Delights

You want nails that feel spooky and stylish at Halloween parties. Spider web nails give that vibe without looking cheesy.
Start with a solid base color. Choose black or a deep purple and apply a smooth coat. Let it dry completely before you move on.
Grab a fine nail brush or a dotting tool. Draw thin lines that form a web on one or two accent nails. Let the lines dry before you add more.
For extra impact, place a small plastic spider or a handful of tiny jewels at the center of the web. Secure them with a dab of top coat so they stay put through the night.
Finish with a glossy top coat. It seals the design and adds bright shine under party lights. If you prefer a softer look, try a matte top coat for contrast against the glossy web.
Pro tips
– Practice drawing webs on paper before attempting them on your nails.
– Use a very thin top coat to keep lines crisp and avoid smudges.
Spider web nails give you that spooky vibe while staying fashionable.
Enjoy the night, and switch looks as you go. This look works on natural nails and gel alike. Add a tiny red gem.
11. Glow-in-the-Dark Accents

Want nails that shine when the room goes dark at Halloween? Glow-in-the-dark accents are a playful, easy way to stand out at every party.
Start with a clean base coat on all nails. This keeps colors smooth and lasts longer.
Next, sketch a spooky backdrop in a dark shade—think black, deep purple, or midnight blue. Ghosts, bats, or tiny pumpkins come to life against a moody background.
Then apply glow-in-the-dark polish on top of your design. Layer it for a brighter, longer glow. Usually 2–3 coats does the trick. Let each coat dry before you add the next.
Charge the glow by exposing your nails to bright light. Sunlight or a strong lamp for 2–5 minutes works well so the colors glow later in the dark.
Finish with a clear top coat. It seals the glow layer, adds shine, and helps the manicure last through parties and messy bites of candy.
Extra tips:
– Choose designs that emphasize glow so the effect is easy to read in the dark.
– Use glow polish only on the parts you want to glow; it saves time and layers.
– Re-charge your glow nails daily by a quick light exposure to keep the effect alive.
Glow-in-the-dark nails are a sure-fire way to add fun to Halloween nights, without losing your polish to all the festivities.
12. Elegant Skull Patterns

Want Halloween nails that look bold but classy? Elegant skull patterns give you that edgy vibe without going over the top.
What you need
– A solid base color (black, white, or nude works best)
– A fine nail brush or skull sticker sheets
– Black and white polish, plus metallic gold or silver for accents
– A top coat to seal and protect the design
How to get it right
– Start with your base: paint two coats, then dry. A matte finish on the base adds chic contrast.
– Create skulls: use the fine brush to draw tiny skulls, or place stickers for quick, clean shapes.
– Add accents: dot or line with gold or silver to lift the design and give it a jewel-like feel.
– Build contrast: keep the skulls glossy while the base stays matte for a modern look.
– Seal the deal: finish with a strong top coat so the design lasts through parties.
Tips for best results
– Practice first on paper or a plastic nail before trying nails.
– Keep lines steady with a light hand and short strokes.
– If a line wobbles, fix it with a second, clean brush stroke rather than starting over.
– Clean up edges with a tiny brush dipped in remover for a neat finish.
These skull nails let you show a daring side while staying stylish this Halloween.
Elevate your Halloween nails 2025 with elegant skull patterns! A chic base and metallic accents can turn a spooky design into a sophisticated statement. Dare to be bold while keeping it classy!
13. Candy Corn Delight

Candy Corn Delight
You want a Halloween nail look that lasts through parties and pics. Candy corn nails fit that need with a playful three-color stripe. The effect reads as cheerful and seasonal on any skin tone.
To get it right, follow these steps:
1) Prep. Clean nails, push back cuticles, and apply a thin base coat.
2) White base. Paint the area near the cuticle white. This becomes the base.
3) Tape. Place striping tape to create three zones: white, orange, and yellow.
4) Orange color. Paint the middle zone orange. Let it dry briefly.
5) Yellow color. Paint the tip yellow. Keep the edge clean with the tape in place.
6) Remove tape. Lift the tape while the polish is still a touch tacky for sharp lines.
7) Top coat. Add a glossy top coat and let it cure.
8) Quick options. Use candy corn nail stickers for fast results. Or swap in glitter polish to mimic the look.
Finish. Candy corn nails give a sweet, festive vibe that lasts through parties and photos.
Try different skin tones or add a tiny spark with a sprinkle of glitter.
Adjust the thickness to fit short or long nails. This keeps the lines crisp and easy to touch up.
Get your Halloween nails 2025 on point with Candy Corn Delight! A playful blend of white, orange, and yellow not only captures the festive spirit but also ensures your mani lasts through every party and photo op!
14. Haunted House Silhouettes

Haunted House Silhouettes
Are you chasing a nail design that looks bold, not bulky? Haunted house silhouettes can do the trick. It creates a night-scene vibe you wear to Halloween parties.
– Base color: Start with a deep blue or black. The shade sets the mood and makes the cutouts pop.
– Outline: Use a fine brush to paint simple house shapes on your chosen nails. Think steep roofs, chimneys, and tiny windows. Keep lines clean.
– Details: Add bats wheeling above the roofs, a bare tree, or a pale moon peeking out. A touch of white or gray helps details read on dark nails.
– Top coat: Finish with a top coat for shine and protection. If you prefer a softer look, try a satin or matte top coat.
– Accent nails: Put the haunted scene on 2–3 nails, and leave the others plain or with a tiny house silhouette. Experiment with shades—midnight blue, charcoal, or black for the houses.
– Tips: Practice on a swatch nail first. Rest your hand on the table, use slow, deliberate strokes. If a line goes astray, fix it quickly with a dab of remover on the brush.
These nails give a stylish Halloween twist.
Dare to wear the night! Haunted house silhouettes bring a bold touch to your Halloween nails 2025, turning every party into a scene from a spooky storybook.
@media (max-width: 768px) { .internal-links-flex { flex-direction: column !important; } .internal-links-flex > div { flex: none !important; } }
You Might Also Like

15. Easy Gradient Shades

Feeling rushed but still want a festive look for Halloween parties? Easy gradient shades are your fast track to chic nails. Pick two or three colors that look good together, and blend them on every nail for a bold, simple look.
What you’ll need is simple: a base coat, your chosen colors, a small cosmetic sponge, and a top coat. Start with a clean base and let it dry. Paint each nail from cuticle to tip with the first color. Then dab the second color onto the sponge and press it onto the nail, moving the sponge up and down to blend. Add the third color if you like, and repeat the dabbing until the colors meet in a smooth fade. Finish with a clear top coat for shine and long wear.
Color ideas that scream Halloween: purple, orange, and black; or switch in emerald, deep purple, and bronze for a spooky twist. You can keep it matte or add a shimmer top coat for extra glow.
Quick tips:
– Use a light touch when blending so colors flow softly.
– Let each layer dry before the next to avoid smudges.
– Wipe the sponge between colors to keep lines clean.
– Seal with a top coat to protect your gradient all night.
Common questions:
– How many colors work best? Two to three colors create a clean gradient.
– Do you need a sponge? Yes—the sponge helps blend the shades evenly.
– How to fix a rough edge? Clean up with a small brush and recoat the top coat.
16. Pumpkin Spice Dreams

Want nails that fit fall and survive Halloween parties? Pumpkin spice nails blend a warm pumpkin orange base with latte-inspired swirls for a cozy, festive vibe.
1) Prep your nails.
Push back cuticles, file edges, and wipe clean.
Apply a base coat to protect your nails.
2) Paint a pumpkin orange base.
Paint a smooth layer of orange. Let it dry fully before you continue.
3) Create latte swirls.
Use a brown, bronze, or copper nail art pen to draw gentle latte swirls. Keep the lines simple so you don’t overwork the look.
4) Add whipped cream accents.
On one or two nails, apply white acrylic paint or gel to form a fluffy, whipped-cream puff.
5) Sprinkle accents.
Drop tiny gold or copper glitter or microbeads onto the cream or near the swirls. Press them gently into a dab of clear top coat or nail glue to hold.
6) Seal with a glossy top coat.
Finish with a shiny top coat. Wait for it to dry so the design stays smooth.
For variation, bring in metallic accents to lift the design—gold, copper, or bronze work well. If you’re new to nail art, keep the swirl small and clean. You can also use stencil guides or dot tools to guide the pattern.
This pumpkin spice style blends seasonal flavors with festive flair. It’s easy, looks chic, and works on short or long nails. With these steps, your mani stays fresh through the Halloween party season.
@media (max-width: 600px) {
.normal-quiz-iframe { min-height: 570px !important; height: 570px !important; }
}
17. Chic Black Cat Designs

You want a Halloween look that’s stylish and fun. Chic black cat designs fit that need. They stay classy for casual parties and chic nights.
What to do:
– Prep your nails. Clean, shape, and push back cuticles. Apply a base coat.
– Paint a deep black base on all nails. Let it dry.
– Accent nail: a simple cat face. Draw with white or gray or use a sticker. Keep eyes small. Add a tiny nose and whiskers.
– Add paw prints or a small collar for detail. Place a paw on one nail or a collar on the accent nail.
– Top it off with a coat. A shiny top coat locks color and adds durability.
Tips that help:
– Nail stickers make the look quick and neat.
– Practice the cat face on a plastic nail wheel first.
– Use a dotting tool for eyes or paw pads.
– Try matte top coat for a modern vibe or gloss for classic shine.
Why this works for Halloween:
– It fits casual outfits and dressy looks.
– It stays neat through parties and selfies.
– It’s easy to adjust—change the eyes or paw layout.
Give this chic black cat style a try and enjoy a stylish Halloween mani.
18. Fun Halloween Icons
Want nails that wow at every Halloween party? Try Fun Halloween Icons on your tips. Pumpkins, ghosts, and bats pop in bright colors. You can mix icons on different nails for a lively set. Plan 5–6 small icons to keep the look cohesive. Each nail tells a tiny story, from friendly ghosts to pumpkins. You can mix matte and glossy finishes for extra depth.
Start with a base color that makes the icons pop. A dark shade works, or a bold pastel for a playful look. Add your icons with a fine brush or tiny stickers. Keep edges neat so the shapes stay crisp. Take your time with clean lines and simple shapes. The goal is clear, readable images from arm’s length. If your base is light, add a thin black outline for sharp icons.
Finish with a glossy top coat. It seals the design and helps it last through parties, photos, and handshakes. Layer colors as needed to give the icons depth and shine. If you’re new to nail art, practice on a sticker sheet first.
Tips
– Choose colors that stand out against the base.
– Add glow-in-the-dark polish for a night surprise.
Fun Halloween icon nails bring smiles and show your festive spirit. It’s easy to adapt for quick touch-ups.
Conclusion

As Halloween approaches, your nails can easily reflect the festive spirit of the season. With these 18 creative Halloween nails 2025 tricks, you’ll be ready for every celebration with style and flair.
Remember to take care of your nails using the right nail care tips and products to keep them looking stunning throughout the season. Happy haunting and nail painting!
Frequently Asked Questions
What Are Some Nail Care Tips for Long-Lasting Halloween Nails 2025?
To keep your Halloween nails looking fabulous through all the parties, start with a solid base coat to protect your natural nails. Ensure you apply your nail polish in thin layers, allowing each coat to dry completely before adding the next. Finish with a quality top coat to seal in the design and add shine. Don’t forget to touch up with the top coat every few days for that long-lasting effect!
Using a quick-dry top coat can also save you time while ensuring your nails stay chip-free throughout the festivities.
How Can I Achieve the Perfect Glitter Nail Look for Halloween?
Glitter nails are a Halloween favorite, but they can be tricky to apply. To achieve that perfect glittery finish, start with a base color that complements your glitter. Then, sprinkle or dab glitter onto your nails while the polish is still wet. For a more controlled application, use a small brush to apply the glitter. Seal everything with a top coat to prevent chipping and give your nails that stunning shine!
Remember, less is more when it comes to glitter for a chic, spooky vibe.
What Halloween Nail Designs Are Trending in 2025?
In 2025, Halloween nails are all about creativity and fun! Trending designs include classic orange and black ombre, spooky nail art stencils featuring bats and pumpkins, and eerie blood drip effects. Neon colors and glow-in-the-dark accents are also hot this year, ensuring your nails pop at any party!
Consider mixing and matching these designs for a unique look that showcases your personality while celebrating the Halloween spirit.
How Do I Remove Halloween Nail Designs Without Damaging My Nails?
Removing Halloween nail designs can be a breeze with the right approach. Start by soaking a cotton ball in acetone or a nail polish remover and place it on your nail. Wrap it in aluminum foil to let the remover work its magic for about 10-15 minutes. After that, gently wipe away the polish, and if any stubborn bits remain, use a nail file to buff them off. Remember to hydrate your nails and cuticles with a nourishing oil or cream post-removal to keep them healthy!
This method helps prevent damage and keeps your nails looking great for your next festive look.
Can I Use Regular Nail Polish for Halloween Nail Art, or Do I Need Special Products?
You can absolutely use regular nail polish for your Halloween nail art! Most Halloween designs can be created with a variety of colors and tools you already have at home. However, if you’re looking for more detailed designs, consider using nail art pens or brushes for precision. Special nail art products like stencils and decals can also make creating spooky designs easier.
Ultimately, what matters most is your creativity and the fun you have while decorating your nails!
Related Topics
Halloween nails 2025
nail care tips
long-lasting colors
easy nail art
spooky designs
glitter nails
matte finish
beginner friendly
party-ready nails
seasonal nail trends
creative nail designs
Halloween party tips