
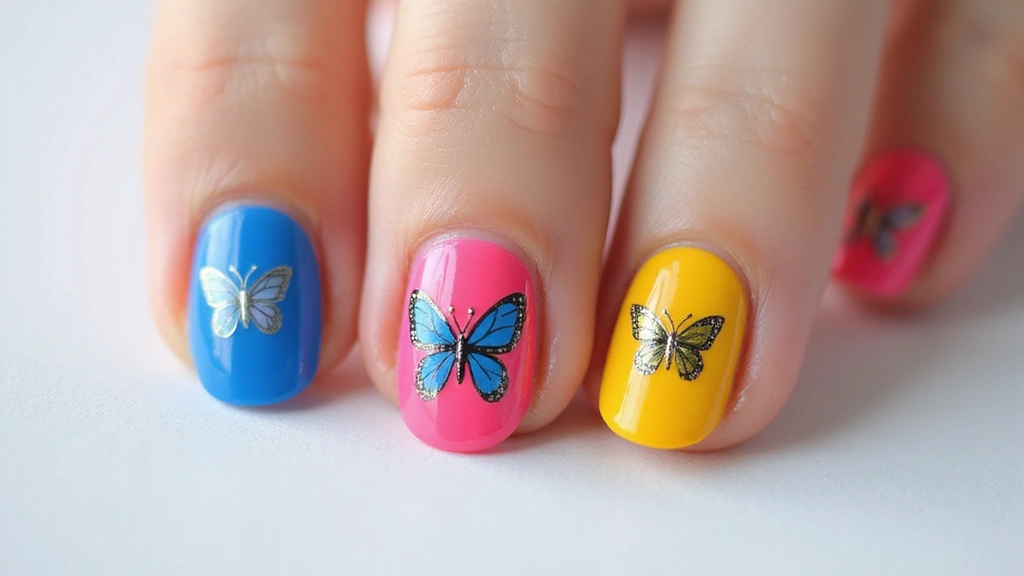
Spring and summer nail season has me craving something playful and fresh. Butterfly nail art feels light and fun, like a small piece of garden luck on your fingertips. I made this post to round up 18 trendy butterfly nail manicures you can try this season. Here is why this matters: these looks are easy to recreate, fit busy schedules, and brighten any outfit with a touch of whimsy.
If you love cute nails and a bit of art you can actually do at home, this is for you. If you care about style that travels from work desk to weekend plans, you will find options here. This is for anyone who wants ideas that are affordable, beginner friendly, and flattering on different nail shapes and skin tones.
What you’ll get is a practical guide to butterfly nails that work in real life. You’ll see gentle pastels and bold color blocks, clear decals and tiny hand painted wings. You can pick looks that suit short nails or long nails, gel wearers or standard polish, and even those who hate long setup times. I’ve included finishes from glossy to matte so you can match your vibe.
Here is how to make it happen. Start with a base color you love, then pick wing colors that pop. Add a tiny dot for the butterfly body and a thin line for the wing edge. Use a small brush or a stamp plate to get clean lines. Top it with a quick dry top coat to keep chips away.
These ideas are designed to be easy to follow. You can complete a look in a single evening or while you watch a show. The tips cover tools you might already own and budget friendly options if you want to buy new decals or plates. They also explain how to adapt each style to your nail shape and daily life.
Next steps. Pick one butterfly style to try this week and tweak it to your mood. If you test a design, share a photo and tell me what base color you chose. I will love to see your work and cheer you on.
1. Colorful Gradient Butterflies

Looking for a butterfly nail design that feels fresh and simple? A colorful gradient with butterfly silhouettes fits. A soft pastel melts into a brighter shade, giving a sunny, garden-ready vibe. You can tweak the colors to match your outfit.
Here is why this works: It stays stylish without heavy nail art. The gradient hides small flaws, and the butterfly accents add a playful touch for warm days and evenings.
What you need
– Base coat
– Two nail colors (pastel and bright)
– A makeup sponge
– Black or white butterfly decals or a fine nail brush
– Clear top coat
Let’s break it down
1) Prep your nails: shape, buff, and clean.
2) Apply a thin base coat and let it dry.
3) Create the gradient: dab colors with the sponge, blending from tip to base. Let dry briefly.
4) Add butterflies: place decals or paint tiny wings on each nail.
5) Seal: top coat to smooth and protect.
Tips for crisp results
– Clean edges with a small brush dipped in remover.
– Apply in thin layers and let each dry.
– Use a quick-dry top coat for durability.
Style ideas
– Use bold black silhouettes for a graphic look.
– Match the gradient to your outfit for a coordinated feel.
Next steps
Try this look on a weekend outing and refresh with new color pairs when you want a new mood.
2. Artistic Butterfly Sketches

Artful butterfly sketches give your nails a refined, artsy vibe. They blend clean lines with a playful touch. You can keep it soft or go dramatic. You choose the mood.
Here is how to do it.
– Materials: a fine detail brush, a thin liner brush, a steady hand, base coat, top coat, and your color of choice for the sketches. Use white or black for the line work.
– Technique: start with a smooth base color. Draw a slim body in the center. Add two curved wings that mirror each side. Begin light, then deepen lines for contrast. Include tiny inner lines to show wing sections. Leave small gaps to keep the look airy.
– Accents: place tiny sparkles around the butterfly to catch light. A micro dot of silver or a tiny crystal works, but keep it delicate.
– Finishing: seal the design with a glossy top coat. Let it dry completely before you move your hands.
– Wearability: this style fits casual looks and dressy outfits alike. It works on short and long nails.
Next steps: practice on a nail wheel, then try one nail first to test your hand. If you love it, experiment with different colors or add a second butterfly for balance.
3. Glittery Butterfly Accents

Glittery Butterfly Accents
You want nail art that shines but stays classy. Glittery butterfly accents do that. A solid base color with shiny butterfly details catches light as you move.
Choose gold or silver glitter for a chic feel. Multicolored glitter gives a bright, summery vibe. Apply glitter in a way that it supports the design, not hides it.
– Tip: place glitter on the butterfly wings or along the edge of the nail so it reads clearly.
– Unique Insight: a matte top coat under glitter makes the sparkle pop.
These accents fit a night out.
– Paint your base color and let it dry fully.
– Pick butterfly decals, stamps, or stencils.
– Add fine glitter to the wings or outline the butterfly with a thin line of glitter.
– Finish with a clear top coat to seal the look.
Next steps: try one nail as an accent, or cover several nails for a full glitter butterfly mani. If you want less shine, use a sheer base and focus glitter on a single butterfly.
Common questions: Will glitter peel? Use a good top coat and file gently when removing. Glitter can feel rough at first, but a thick top coat helps.
Try this for a fun, dressy vibe.
4. Minimalistic Butterfly Tips

What minimal butterfly tips look like
You want nails that look classy but not loud. Minimal butterfly tips place tiny butterfly shapes at the tips while the rest stays clean and bare. Use pale shades for a fresh feel, or bold black lines to add drama. It stays modern.
Why this style works
This design is timeless and easy to wear daily. It fits with jeans, dresses, and work outfits. The butterflies add whimsy without stealing focus.
How to apply
– Prep and shape: Start with clean nails. File to your favorite shape and gently push back cuticles.
– Base coat: Apply a sheer base coat for protection and a smooth canvas.
– Butterfly tip: At the tip, draw a tiny butterfly with a fine brush in pale ink or use a small decal.
– Seal: Finish with a clear top coat and let it cure for shine.
– Maintenance: Refresh the tip line every few days and recoat as needed.
Pro tips
– Choose pale base colors to keep the look soft and clean.
– If you are new to freehand art, decals work best.
– Pair with simple jewelry or a solid outfit to complete the look.
Next steps
Here is why this approach works for most people: it gives you a tiny moment of art that lasts through daily life. Practice on a nail wheel first, then try one hand.
@media (max-width: 600px) {
.normal-quiz-iframe { min-height: 570px !important; height: 570px !important; }
}
5. Neon Butterfly Designs

Want nails that grab attention at every party? Neon butterfly designs give you a bold pop with a delicate wing look. They shine in sun and under indoor lights, and they pair well with light and dark outfits alike.
What neon butterfly nails give you
Bright, cheerful color on a tiny canvas. A white base makes neon shades glow. A tiny butterfly adds charm without slowing you down.
What you need
– White base coat for a clean canvas
– Neon polishes (pink, yellow, green or other bold shades)
– Fine liner brush or dotting tool
– Small cosmetic sponge for a smooth ombre
– Clear top coat
– Nail polish remover and a small cleanup brush
Step-by-step design
1) Prep your nails. Shape, buff, and wipe clean. Apply the white base and let it dry.
2) Create butterfly wings. Use a neon shade to draw two small wings on each nail. Start near the cuticle and curve outward.
3) Add contrast. Use a second neon color on the inner wing edges or form a tiny two-tone wing for depth.
4) Seal and shine. Finish with a top coat to protect the art and give a glassy finish.
Tips you can use now
– Let each layer dry before you add the next.
– Clean edges with a small brush dipped in remover for crisp lines.
– For a stronger look, lightly press the sponge onto the tip to blend colors into an ombre.
Next steps: try one nail as a test run, then apply the design to all nails for a bold set.
6. Butterfly Nail Stencils

If you want neat butterfly nail art at home, butterfly nail stencils are your best tool. They steady the hand and give clean lines.
What butterfly nail stencils are
Butterfly nail stencils are pre-cut shapes you place on your nail. They mask part of the nail, so you paint inside the wings and get a crisp butterfly silhouette.
How to use them
– Prep your nails and push back the cuticles.
– Choose a stencil that fits your nail.
– Place the stencil on the nail and press flat.
– Paint with your color of choice.
– Lift while wet to reveal a sharp edge.
– Clean the stencil for reuse.
– Finish with a top coat.
Tips and style ideas
Here is why stencils shine: they’re fast and forgiving.
– Use a light base color for strong contrast.
– Try two colors to add wing tips or a gradient.
– For short nails, pick a small butterfly.
– Gel polish lasts longer; you can still use regular polish.
– Go slow and keep strokes thin for neat lines.
Reality check
Tiny details can be hard with stencils. Practice helps.
Here are next steps
Now you can plan a quick stencil session. Gather a few butterfly shapes, your favorite colors, and a top coat. Try a two-tone butterfly on one nail and a solid color on the rest. You’ll love the quick results.
7. 3D Butterfly Charm Nails

You want nails that turn heads and last. 3D butterfly charms can do that. They add a playful touch and a tactile feel. Keep the base simple so the butterflies stand out.
Choose your charms
Pick butterfly charms in colors that fit your plan. Small resin wings work well. Mix sizes for a natural look. This keeps your nails from looking crowded.
Pair with a simple background
Use a soft nude, blush, or pale pastel as your base. One accent nail shines when it carries the charm. The goal is contrast, not chaos.
How to apply
Apply a dot of clear nail glue or gel adhesive on the nail. Place the charm with tweezers. Press for 10 to 15 seconds. If you use gel, cure as directed. Finish with a clear top coat to seal.
Care and upkeep
Let the charm set before you flex your hands. Avoid rough tasks right away. A top coat every few days keeps it smooth and shiny.
Why this works
Here is why 3D elements add depth. A flat background lets the charm pop. Mixing flat and 3D designs catches the eye.
Best for occasions
This look shines at parties, weddings, or a night out. It makes your manicure feel special without overdoing it.
Next steps: Try a single butterfly on one nail first, then expand.
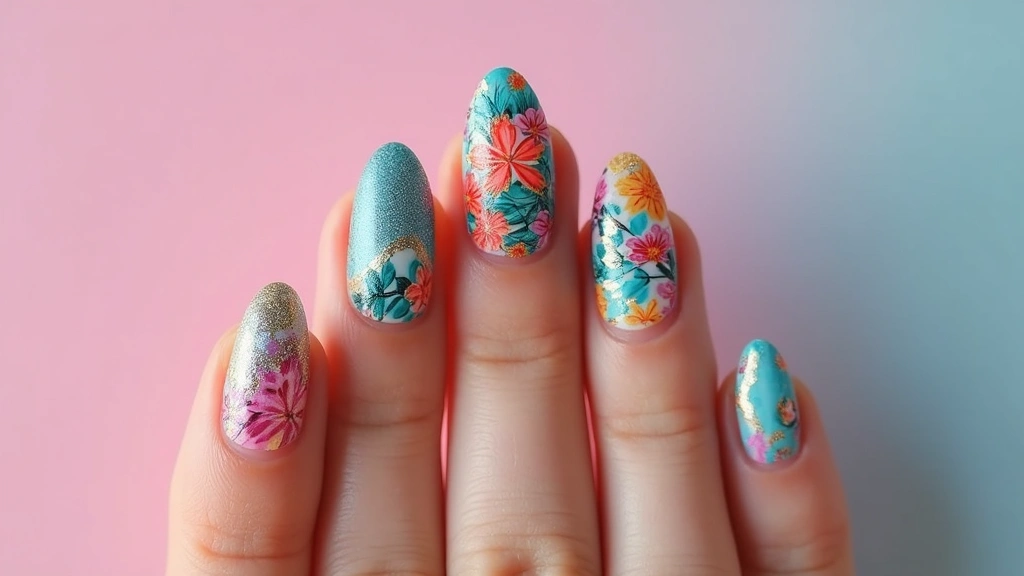
8. Butterfly Floral Combos

You want nails that feel fresh and feminine. Butterfly floral combos pair two natural ideas in one look—delicate flowers and a gentle butterfly. The result is a garden-like scene on your fingertips.
Color choice is key. Pick a base color that matches both blooms and wings. Soft pastels work best: pink, lavender, mint, or baby blue. A touch of white or nude keeps the design calm and easy to wear.
What you’ll need:
– A fine brush set or floral decals
– Stamper or stamping plates for tiny flowers
– Base coat and top coat
– Clear decals or nail glue if you use stickers
– Optional tiny rhinestones for sparkle
How to create it:
– Prep nails with a clean base and smooth surface.
– Paint the base color and let it dry completely.
– Add small flowers with a fine brush or apply decals.
– Place one butterfly on one nail as the main focus, or let a few flutter across two nails.
– Seal with a glossy top coat. If you prefer, swap flowers for decals.
Why it helps you: colors echo between petals and wings, making the look cohesive. It suits weddings, garden parties, or a sunny lunch with friends.
Care tips: reapply top coat every 3 days. Avoid harsh scrubbing and hydrate hands to protect the design.@media (max-width: 768px) { .internal-links-flex { flex-direction: column !important; } .internal-links-flex > div { flex: none !important; } }
You might also like

9. Ombre Butterfly Designs

If you want nails that feel soft and stylish, the ombre butterfly look could be your go-to. The idea is a gentle color fade with butterflies gliding across each nail. You decide the mood, subtle and sweet or bold and eye-catching.
Here is why it works. The gradient hides small mistakes and makes shorter nails look longer. Butterflies add a playful touch without clutter. This look works on natural nails and acrylics alike.
Color choices
– Pick soft pastels for a calm, blended effect on every nail.
– Or choose bold shades that create a sharp contrast and let the butterfly shapes pop.
Tips to nail it
– Tip: Use a makeup sponge to dab on color. It creates a smooth ombre transition.
– Unique touch: add a few tiny rhinestones to catch light and lift the fade.
Practical notes
– This style fits both everyday looks and dressier events. You can tweak it by adding decals or keeping it clean and simple.
– If your nails are short, the gradient still shows well and can make your fingertips look longer.
Next steps
– Start with a clear base coat, apply your light color, and dab the darker shade with the sponge.
– Apply butterfly decals or paint fine wings with a tiny brush, then seal with a top coat for lasting shine.
@media (max-width: 600px) {
.visual-quiz-iframe { min-height: 995px !important; height: 1100px !important; }
}
10. Vintage-Inspired Butterfly Nails

If you want a classic look, try vintage butterfly nails. They give a soft, timeless vibe that fits any summer day.
Here is why it works. Muted colors and tiny patterns recall old wallpaper or fabric. Choose shades like cream, taupe, sage, or dusty rose for a refined backdrop.
Let’s break it down into steps you can use today.
– Base color: pick a soft earth tone such as beige, taupe, or muted pink.
– Patterns: add delicate lines in a lighter cream or coffee color with a fine brush or a stencil.
– Butterfly accents: place a small butterfly on one or two nails, or use thin decals for a subtle touch.
– Lace touch: pair a lace-inspired tip or a lace decal on a single nail for extra charm.
– Top coat: seal with a thin top coat and let it dry fully.
– Tip: For extra depth, add a tiny amount of sheer glitter along the lace edge.
Next steps: keep nails short and neat so the art reads clearly. This style works well for high tea, garden parties, or any day you want a quiet, elegant mood.
Unique insight: vintage nails pair nicely with floral outfits and soft jewelry. This look stays chic all season.
11. Bold Black and White Butterflies

Bold Black and White Butterflies
Here is why this look fits you. The sharp black wings on a clean white base catch the eye. It feels neat, confident, and a touch edgy. It works with simple outfits and adds drama without shouting. This monochrome butterfly nails design stays timeless.
Next steps: what you need and how to do it.
– White base polish
– Black polish or acrylic paint
– Fine nail art brush or striping brush
– Dotting tool
– Base coat and top coat
How to do it:
1) Prep with base coat. Let it dry.
2) Paint your chosen base color. White makes the butterflies pop.
3) Use the fine brush to draw two delicate butterfly shapes on a couple of nails. Start with thin black outlines, then fill tiny wings with white on some nails for contrast.
4) Clean up edges and let it dry. Seal with top coat.
Placement ideas:
– Put big butterflies on the middle nails and smaller ones on the sides.
– Turn one nail into an accent with full wings.
Here is a small tip: try a matte topcoat for a modern vibe. A glossy finish shines in bright light; matte looks chic in everyday wear.
Next steps: practice steady lines, start with a simple shape, then add details. These nails stay bold from day to night.
12. Pastel Dream Butterflies

Pastel Dream Butterflies
You want a soft look that still attracts compliments. This pastel butterfly style gives you calm colors and a playful twist. It feels sunny and sweet.
– Colors that glow:
Soft pink, baby blue, and lilac tones
Keep shades airy to avoid crowding the nail
– What it looks like:
Tiny butterfly shapes flutter across a smooth, glossy base
A touch of white or a slightly darker outline helps the wings pop
– How to apply:
Start with a clear base coat, then paint one or two nails with a sheer pastel
Use a fine brush or dotting tool to draw delicate butterfly wings
Add a tiny body and antennae with a thin line tool
– Finish tricks:
Seal with a glossy topcoat to make the colors shine
Try a mix of matte and gloss on different nails for texture
– Wear ideas:
Perfect for garden parties, brunches, or a sunny day out
Pair with soft florals or simple outfits
Soft pastels and tiny butterflies can turn your nails into a canvas of calm and joy. Embrace the magic of butterfly nail manicures this season, and get ready for compliments that flutter in!
13. Textured Butterfly Art

You want nails that stand out, but you also want them to stay wearable. Textured butterfly art gives depth and a subtle drama you can see and feel. It helps butterflies pop against a smooth background. Here is how to nail the look without a long wait.
– Base setup: Start with clean, filed nails. Apply a thin base coat, then a solid color you love. A soft pink, nude, or pastel works well as a backdrop.
– Texture methods: Use sponging to dab on a second color for a feathered backdrop. Try stamping for crisp butterfly silhouettes. Add foil for a touch of shine and contrast.
– Butterfly accents: Choose tiny butterfly stamps or decals. Place them where you want the eye to land. Leave some space between the wings for texture to show.
– Layering for wow: Layer textures by putting a matte top coat over a glossy butterfly, or mix matte with a little glitter. The contrast makes the design feel richer.
– The near 3D look: Texture and layering create depth that makes the butterflies seem to rise from the nail. It’s a subtle lift, not a flat print.
– Finishing touch: Seal everything with a durable top coat. Let it cure fully if you use gel, or dry completely if you use regular polish.
– Quick tips: Let each step dry before the next. Clean edges with a small brush for a neat finish.
– Common questions: This works well with acrylics or gels too. You can switch techniques to fit your skills and time.
Tip: Start with a simple butterfly shape, then add texture in stages. Start small and build up if you’re new to textured nail art.
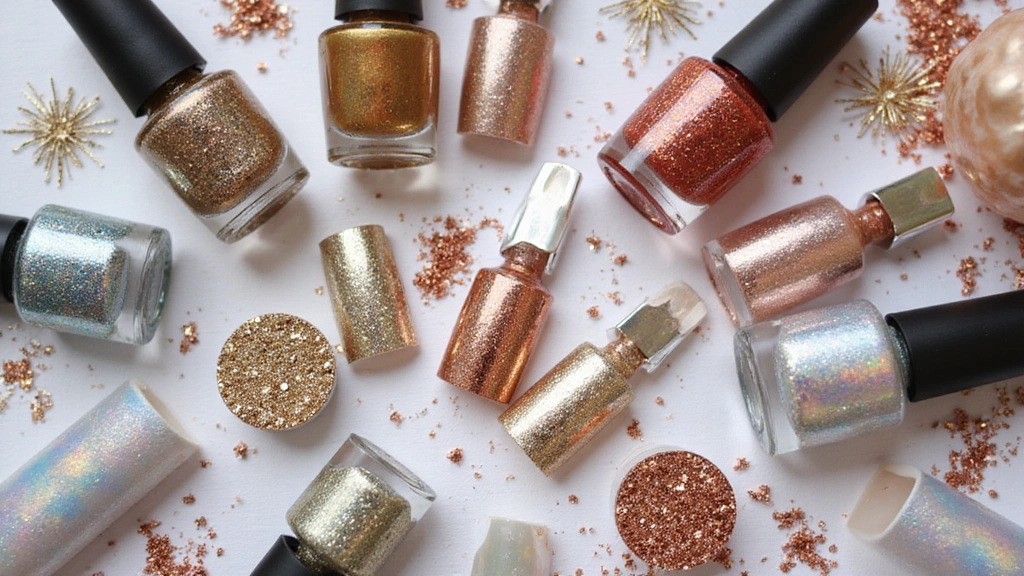
14. Metallic Butterfly Manicures

Why metallic butterfly nails work
You want a look that catches eyes in person and in photos. Metallic butterfly nails give you that punch of shine. Shimmering gold, silver, or chrome reflects light from many angles. A black base makes the butterfly wings pop.
This style fits bold personalities and special occasions. It invites compliments without looking fussy.
How to create them at home
Here is why this setup shines: the metallic finish is bright and long lasting when sealed properly.
Let’s break it down into simple steps:
– Prep nails: smooth the surface, shape, and push back cuticles.
– Paint a black base and let it dry completely.
– Add the butterfly designs with metallic polish, decals, or stamping.
– Mix colors for depth. Try gold with silver, or chrome with rose gold.
– Seal with a fast-dry top coat and let it cure.
Care and tips
Next steps and care:
– Reapply a thin top coat every few days to keep the shine.
– For a subtler look, place a few small decals on a clear or dark gradient base.
– Keep cleanup simple with acetone on a cotton swab.
– Round out the look with matching jewelry and a strong top coat.
– This look is flashy but easy to scale up or down depending on how many wings you add.
Dare to shine! Metallic butterfly manicures are not just a trend; they’re a statement. With the right base, your nails can reflect your bold personality and invite all the compliments this season!
@media (max-width: 768px) { .internal-links-flex { flex-direction: column !important; } .internal-links-flex > div { flex: none !important; } }
You Might Also Like
15. Butterfly Nail Wraps

Want a nail look that shines fast? Butterfly wrap designs give you style without a long paint session. They are thin vinyl sheets with sticky backs. You place them on clean nails, press, and trim away the excess. Here is why this works for busy days.
– Quick to apply
– Many butterfly patterns and colors
– Wear longer than plain polish with proper care
– Glossy or matte finishes for different vibes
Here is how to use them in five simple steps.
1) Prep nails. Wash, dry well, and push back cuticles. A light buff helps the wrap grip.
2) Size and trim. Choose a wrap that fits each nail, trim if needed.
3) Apply. Peel the backing, place the wrap near the cuticle, and smooth toward the tip.
4) Edge and shape. Press firmly and file off the excess with gentle downward strokes.
5) Finish. Seal with a clear top coat and let it set before you expose hands to water.
Care and wear.
Keep them dry for the first few hours. Skip soaking and wear gloves for chores. Moisturize cuticles to keep edges from lifting. Don’t peel at edges; if needed, press and reseal.
Durability and removal.
With good prep and a top coat, wraps last longer than plain polish. If you notice lifting, press again and reseal.
Next steps.
Choose a butterfly wrap set you love, prep your nails, and try this look this week.
16. Bohemian Butterfly Nails

You want a nail look that fits summer’s free spirit. Bohemian butterfly nails blend earthy colors with delicate wings. The result feels personal and laid back at the same time.
Here is why this style works. Earthy tones stay chic. Butterflies add a light, playful touch. You can add dreamcatchers, beads, or tiny feathers for a full boho vibe. The nails tell a story you choose to share.
Materials
– Base coat and top coat
– Nude or soft sheer polish as your base
– Earthy colors: sage, terracotta, sand, cream
– Thin nail brush and a dotting tool
– Butterfly decals or fine liner brushes for freehand art
– Small beads or charm pieces for texture
– Matte top coat for a relaxed finish
Steps
– Prep your nails: file smooth, push back cuticles, clean surface
– Paint a soft base color and let it dry
– Draw or apply butterfly shapes in your chosen tones
– Add boho accents: a tiny dreamcatcher line, a bead, or a hanging feather detail
– Finish with a matte top coat if you want a muted look; use a glossy top coat for a brighter effect
Tips
– Keep lines thin so the art stays clean
– Test decals on one nail first
– Use tweezers to place beads; seal them with a thin layer of top coat
– If you wear them long, avoid heavy beads on tips to prevent snagging
Next steps: try this style for a festival, beach trip, or a sunny weekend. It’s bold enough to get compliments but easy enough to do at home with some patience. You can swap colors to fit your mood.
17. Elegant French Butterfly Manicure

You want a French manicure that stays classy while adding a playful wink. This butterfly twist does that. Here is why it works: wings peek from tips or slide along the sides for sparkle.
– Placement options: small butterflies at tips for a clean line, or along the sides to shape a gentle curve.
– Design feel: keep wings tiny and soft, not crowded.
Let’s break it down. Next, how to do it.
– Base and tips: start with a pale nude or soft pink. Keep a crisp white tip for the French look, and it lasts.
– Butterfly accents: apply tiny decals or paint mini butterflies with a fine brush. Pick one feature nail or spread a few across nails.
– Color palette: pastel blues, pinks, lavender, or mint keep it refined.
– Tools you’ll need: a small dotting tool, a fine liner brush, tweezers, and a fast-dry top coat.
Next steps. This style shines at weddings and formal events and suits bridesmaids who want something special yet clean.
– Care tips: seal with a glossy top coat, avoid rough work day one, and reapply every 3 to 4 days.
If you’re ready, grab pastel decals and add a butterfly twist.
It stays classy in photos.
Elevate your style with an elegant French butterfly manicure! A playful twist at your tips adds just the right amount of sparkle while keeping it classy. Why not flutter into your next nail appointment?
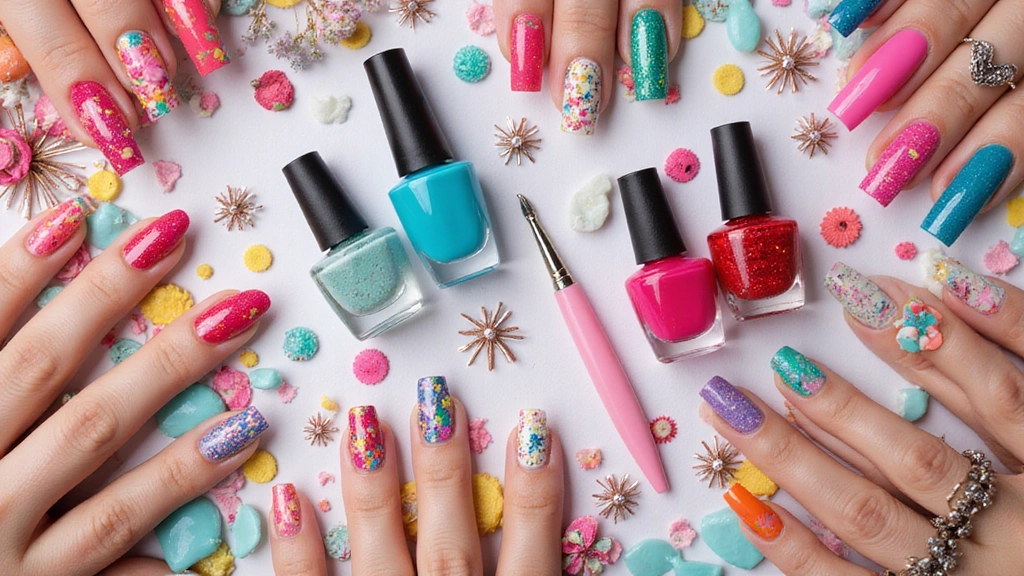
18. Sparkling Butterfly Combos

If you want butterfly nail art that really sparkles, this combo is for you. You mix pretty butterfly designs with bright glitter and shiny stones. The result stays eye catching from close up and far away.
– What you need:
– Butterfly decals or a clean freehand design
– Glitter in tiny and medium sizes
– Rhinestones in different sizes
– Iridescent powder or a holo top coat
– Clear gel or strong top coat
– Nail glue, a small brush, and tweezers
– How to make it happen:
– Prep your nails. Shape them and push back cuticles.
– Put on a light base color. Let it dry fully.
– Add the butterfly design. You can stamp, decal, or paint it freehand.
– Place rhinestones along the wing edges for rhythm and glow.
– Dust a touch of iridescent powder on the wings or brush a glitter layer over the design.
– Seal the look with a clear top coat or gel. Cure if you use gel.
– Tips to level it up:
– Use different rhinestone sizes for texture.
– Keep the butterfly center clear so the sparkles pop.
– Try a matte base with shiny stones, or a glassy base with a matte butterfly.
– When to wear it:
– Glam nights, parties, or photos that need a bright finish.
– It works with bold outfits or simple looks that you want to lift.
Here is why it helps your style: the butterflies stay the focal point while the glitter and stones add dynamic light. Next steps, practice placement until you love how the wings curve with your nails.
Sparkle and shine with butterfly nail manicures! Combining dazzling glitter and shimmering stones, you can create eye-catching designs that will surely earn you compliments from every angle.
Conclusion

Butterfly nail manicures are not just a passing trend; they’re a fabulous way to express your personality and creativity. With styles ranging from subtle to bold, there’s something for everyone. As you try out these 18 stunning designs, don’t forget to have fun and let your nails reflect your summer spirit!
Which butterfly manicure caught your eye? Share your thoughts or your own butterfly nail designs in the comments below!
Frequently Asked Questions
What Are Butterfly Nail Manicures?
Butterfly nail manicures are playful and artistic nail designs featuring butterfly motifs. They can range from simple silhouettes to intricate 3D charms, allowing you to express your personality and creativity in a vibrant way.
Whether you prefer a minimalist look or a bold statement, there’s a butterfly nail style that fits every mood and occasion!
How Do I Create Butterfly Nail Art at Home?
Creating butterfly nail art at home is easier than you think! Start with a solid base coat, then use butterfly stencils or freehand your designs with nail polish. You can also use nail wraps for quicker results.
Experiment with different techniques like ombre, glitter accents, or even 3D charms to make your butterflies pop. Don’t forget to seal your masterpiece with a top coat for lasting shine!
What Are the Most Trendy Butterfly Nail Styles This Season?
This season, trendy butterfly nail styles include colorful gradient butterflies, minimalistic tips, and bold black-and-white designs. You can also try glittery accents, 3D charms, or even metallic finishes for a striking look.
Choose a style that resonates with your personality, and get ready to receive compliments on your fabulous butterfly nails!
Are Butterfly Nail Manicures Suitable for All Occasions?
Absolutely! Butterfly nail manicures are versatile and can be tailored for any occasion. From casual outings to elegant events, you can opt for subtle designs or bold statements.
For formal events, consider vintage-inspired or pastel dream butterflies, while for parties, neon or glittery styles can add a fun twist. The key is to find a design that matches the vibe of your event!
How Can I Make My Butterfly Nail Manicure Last Longer?
To make your butterfly nail manicure last longer, start with a high-quality base coat to protect your nails. After applying your design, finish with a top coat to seal everything in and add extra shine.
Avoid exposing your nails to harsh chemicals and always wear gloves when doing chores. Regular touch-ups can also help maintain the look, ensuring your butterfly nails stay fabulous for weeks!
Related Topics
butterfly nail manicures
trendy nails
summer styles
nail art techniques
minimalist design
glitter nails
3D nail art
pastel colors
neon designs
easy nail art
bohemian style
vintage nails
I absolutely love butterfly nails! They remind me of a summer picnic I had where I accidentally spilled lemonade all over my hands. What colors do you think work best for these designs?
Did you know that butterflies taste with their feet? Just like how I taste my food with my eyes when I see awesome nail art! These designs are definitely making me hungry for creativity!
That’s such a fascinating fact about butterflies, Ava! And I love how you connected it to appreciating nail art-truly a feast for the eyes that sparks creativity! Glad these designs inspired you!