

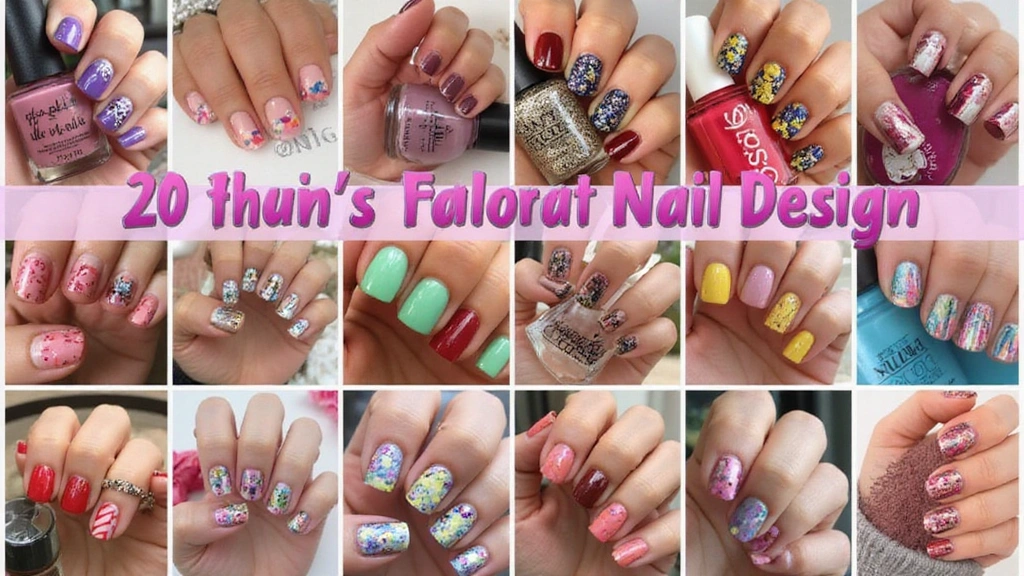
I put this together because you want nails that stand out without a long trip to the salon. The looks online can feel fancy, but you deserve ideas you can actually pull off at home. So I pulled together 15 nail designs that are easy to recreate with basic tools, simple color combos, and room to make them your own.
Who it’s for: If you love nail art or you just want a quick way to show your style, this post is for you. Busy students, workers, or anyone who wants a design that fits real life will find ideas they can try tonight. The designs work with short or long nails, and they look cool in photos or in person.
What you’ll get: A practical guide to 15 styles that you can copy or tweak. Each design comes with easy steps, color ideas, and real tips you can use right away. Here is why it works: these ideas use simple shapes and color blocking that you can copy. You will learn where to place shapes, how to mix tones, and how to finish with a streak of shine or a matte finish.
This is the part you might not expect. And yes, you won’t believe what design number 8 looks like. It uses a bold split of two tones with a tiny accent dot that makes the whole look pop. It’s simple enough to pull off with tape and a small brush.
How to use this guide: Start with a base color you love. Then pick one or two designs to try this week. Use tape for clean lines, a dotting tool for spots, and a small sponge for soft gradients. Finish with a clear top coat to seal the look.
Next steps: Pick a design and gather your supplies. You can swap colors to fit what you already own. Try one on a weekend or before a night out and snap a pic to compare your progress. These ideas aim to be practical, so you can get a stylish result without extra steps.
1. Color Block Madness

Want nails that grab attention without long prep? Color block nails give you clean, graphic lines. They use blocks of color with crisp edges. You can wear this look to a party, to work, or on a casual day out. It’s easy to learn, and the result shows fast.
Color blocking means you place two or three colors side by side on each nail. The result looks bold and modern.
Tips for Color Block Madness:
– Apply a base coat to protect your nails and help colors grip evenly.
– Choose two or three colors that either match softly or jump apart for contrast.
– Use nail tape to mark the color blocks and press the edges down firmly for clean lines.
– Paint each block with its color and let the first layer dry before adding the next.
– Carefully lift the tape while the paint is still a touch wet to keep edges sharp.
– Finish with a glossy top coat and allow full drying time for a long lasting look.
Next steps: Try a two-nail test run with a different color combo to see what you like.
Color block nails are the canvas of your creativity! With just two or three colors, you can achieve a bold, graphic look that’s perfect for any occasion. Get ready to let your nails do the talking!
2. Swirling Rainbow Delight

If you want a playful look that really catches the eye, swirl rainbow nails could be your go-to. Colors blend in a gentle circle, creating a moving pattern that shines from every angle.
This design uses several shades on one nail. You can get the effect with a simple nail art brush or a toothpick.
Here is why this look works. The mix of colors creates depth and interest. The swirl adds motion without making the nail look busy.
Let’s break it down with a quick how-to.
– Clean and shape your nails.
– Push back cuticles.
– Apply a base coat.
– Paint a white or pale base to help the colors pop.
– Choose 3 to 4 colors that look good together.
– Dot small amounts of color on the nail.
– Swirl the colors in a circular motion to blend them.
– Clean the edges with a small brush or cotton swab.
– Finish with a clear top coat to seal the design.
Execution Tips:
– Start with a white or light base to let the colors shine.
– Use a light hand to blend the colors for a smooth transition.
– Seal it with a topcoat to protect your art.
Next steps: try this on one accent nail first, then bring it to all nails if you love how it looks.
3. Geometric Glam

Geometric nails give a clean, modern look that stays chic. You can mix triangles, squares, and stripes to form lines that draw the eye. A bold color paired with a soft shade keeps the look balanced.
Choose your palette carefully. You can use one strong color as your base and a softer shade for contrast. Add white for crisp edges, then keep some nails plain while others show the shapes. This keeps the look fresh and flexible.
Start with clean nails and a solid base coat. Plan your shapes, using light pencil guides or tape. Place striping tape to mark sharp lines, then paint the areas. Peel the tape while polish is damp for clean edges. Let it dry, then top it off with shine or choose a matte finish.
Pro Tips:
– Use striping tape to create clean lines.
– Experiment with matte and glossy finishes for added depth.
– Don’t be afraid to mix shapes for a unique effect.
This design adapts on long or short nails and works across skin tones, so you can wear it anywhere. It also looks great with simple bases.
Next steps: try a mini set on five nails to test the look, then go all in if you love it. Ready to try this on now? Start with one hand.
4. Dotted Fantasia

You want nails that pop with a simple, friendly look. Dotted Fantasia uses tiny dots to add life to your mani. It works on short nails and long nails alike. It shines with soft pastels or bold hues. It’s a great choice for sunny days and casual hangouts.
Here is why this approach helps you nail fashion with ease. You can switch colors fast. You can keep the dots small for a subtle vibe or make them big for a bold moment.
What you need
– Base color and a clear top coat
– A dotting tool or a thin substitute like a toothpick
– A couple of dot colors
– A small brush for cleanup
How to Achieve Dotted Fantasia:
– Pick a base color and let it dry.
– Dip the tool and place dots in two colors.
– Vary dot sizes by using different tools or tips.
– Try rows, curves, or a light scatter.
– Build dots slowly. Wait a moment between layers.
Finish and care
– Seal with a fast top coat.
– Clean the edge with a tiny brush.
– Let it dry completely.
Next steps
– Pair with light outfits for a fresh vibe.
– Try white on navy or pastel mixes for a playful look.
5. Splatter Art

Here is why splatter art nails might be your go-to. You want a look that feels creative without a long setup. It gives you a canvas vibe, yet it is easy to manage.
With this style, you get a unique print on each nail. A quick flick of color creates tiny bursts that look hand painted. No two nails will be the same, and that helps your nails stand out.
What you’ll need
– A dark base color for strong contrast
– 2–4 nail polish colors for the splatters
– A thin brush or an old toothbrush
– A paper plate for practice
– A quick-dry top coat to seal the design
Steps to Create Splatter Art:
– Start with clean nails. Apply a base coat, then your base color. Let it dry completely.
– Place your hand over a protected surface. Dip the brush in a color and flick small droplets onto each nail. Keep your wrist loose.
– If you want bigger splatters, practice on the paper plate first.
– Finish with a quick-dry top coat to lock the look in and add shine.
Next steps
– Try different color combos. Dark base plus bright spots often works best
– Use tape or a wipe around the nail to keep skin clean
– Practice a few times, then switch to a slower or faster flick to change the look
– If you want a simpler version, stick to two colors and a smaller splatter
6. Marble Magic

You want nails that look stylish without a lot of work. Marble nail art can do that. It gives a fancy feel with a soft color twist. You control the shades and the veins. The result is polished and unique to you.
Marble designs mimic real stone, but you create the look. Pick two or three colors you love. Light and dark tones mix to form delicate lines. You can wear this on any nail, but it shines on a shorter shape and clean tip.
Creating Marble Magic:
– Start with a clear base coat. Let it dry completely so colors don’t stain your nails.
– Place small drops of two colors on the base. Don’t flood the nail. A little goes a long way.
– Swirl with a toothpick or a thin brush. Move in curved, irregular lines. Let veins form naturally.
– If the pattern gets too bold, twist the toothpick gently to soften the lines. Keep some white space for a lighter look.
– Finish with a top coat to seal the design and add shine. Allow it to dry fully.
This technique works for a formal event or an easy day look. You can experiment with shades like white and gray, navy and silver, or blush and taupe. Each nail will be a tiny, unique piece of marble art.
Next steps: choose a palette, practice on a nail wheel first, then apply to your nails. With practice, you’ll master the swirls and get a true marble effect.
7. Brush Stroke Beauty

Want nails that feel artsy but still easy to wear? Brush stroke nails give you a painter’s look with simple steps. You blend broad color lines across each nail to create waves of color. It looks relaxed yet polished and gives your style a fresh feel.
Here is why it works: large swipes add movement without tiny details. You can use a fan brush for soft lines or a regular brush for bold swipes. Start with a light base so colors pop.
How to do it:
– Start with a light base so colors pop.
– Load your brush with paint, then sweep across in slow, loose strokes.
– Try a fan brush for airy lines or a regular brush for stronger swipes.
– Work one nail at a time and let each layer dry before the next.
Tips for Brush Stroke Beauty:
– Choose two or three colors that blend well or contrast nicely.
– Drag the brush in one direction to form a wave; layer for depth.
– Wipe the brush between colors to keep lines clean.
– Finish with a matte topcoat for a soft, artsy look.
This design suits art lovers who want a one-of-a-kind vibe. Try it on a weekend and tweak the strokes to fit your nails.@media (max-width: 768px) { .internal-links-flex { flex-direction: column !important; } .internal-links-flex > div { flex: none !important; } }
You might also like
8. You Won’t Believe This One!

Here is why this design can be your next go-to. It uses big color clashes and free shapes to grab attention. You can pair bright orange with cool blue, or purple with lime green for a bold, modern look.
Let’s break it down
– Pick two or three colors that contrast. Too many shades can melt together, so keep it simple.
– Create abstract shapes by dabbing with a damp sponge. Tap and twist the sponge to build random yet cool patterns.
– Use easy tools. A small makeup sponge, a fine brush, and a cotton swab help you shape edges and clean up near the cuticle.
– Let each layer dry before you add more. This keeps colors true and avoids muddy tones.
– Finish with a clear top coat. Add tiny white dots or specks for a starry touch if you like.
Tips to stay neat
– Work nail by nail to stay focused.
– Leave small gaps for negative space; it makes the art pop.
– If you want more drama, apply three layers on one nail and keep others simpler for balance.
Next steps: practice on a nail wheel or swatches, then test the look on one nail. Adjust spacing and color balance as you go. With a few tries, you’ll have a go-to abstract style that turns heads. You’ll nail it.
9. Gradient Dreams

Looking for nail art that blends color smoothly? Gradient nails give a soft, seamless fade and a touch of art to your look. You can go dark to light in the same color, or mix two colors for a bold contrast. This design works with many color families and fits any nail length.
Materials you need
– Base coat
– Two to three polish colors in the same family or complementary hues
– A small makeup sponge
– Topcoat for shine and lasting wear
– A small brush or cotton swab for cleanup
Here is why gradients work
The fade flatters every skin tone and hides tiny ridges on the nail. It also looks great in daylight and under lamps. The result stays neat without looking loud.
Steps to Create Gradient Dreams:
– Paint a clear base coat to protect the nail.
– On the sponge, dab the two colors side by side so they touch.
– Press the sponge gently onto the nail, then roll it from edge to center to blur the line.
– Repeat the dab if you want a smoother transition.
– Clean the edges with a brush dipped in remover.
– Finish with a thin topcoat to seal the look.
This style is versatile for work, weekends, or nights out. With a soft blend, you can pair it with many outfits and photos.
Give it a try this week and snap photos to see the fade. You’ll love how soft it looks.
Next steps.
10. Floral Abstract

You want nail art that stands out without being hard to do. Floral abstract nails mix nature with art. You see bright flower shapes blended with free, irregular lines. The look is playful and polished.
Here is why it works. It fits short or long nails. It adapts to many color options. It gives you an artful touch without heavy detail.
What you need is simple. A few nail paints in at least three colors. A base coat and a top coat. A fine brush for lines. A small dotting tool helps with dots. A clean-up brush and some remover for mistakes.
Tips for Floral Abstract Designs:
– Start with a base that lets your flower colors pop.
– Use a thin brush for delicate petals and thin abstract lines.
– Layer colors slowly; let areas dry a bit to keep edges clean.
– Try different flower styles so your design feels unique.
– Add a splash of white or black to make shapes stand out.
This design invites your personal touch. Sketch light petals, then sweep in bold swirls. If a shape looks off, simply repaint that nail. Practice helps, but you can succeed on the first try with patience. Finish with a strong top coat to seal color.
11. Glitter Explosion

Want nails that grab attention? Glitter explosion nails do. They pair bold color with chunky glitter for a party-ready look. You can wear them all over or save the glitter for an accent.
Creating Glitter Explosion
– Start with a base coat in a color you love. This shields your nails and helps the glitter pop.
– While the polish is still wet, sprinkle glitter over the nail or use a glitter polish for quick coverage. Press larger pieces gently into place so they lay flat.
– Finish with a thick topcoat to seal the glitter and smooth the surface.
This style works for celebrations, weekends, or any time you want your hands to shine.
If you want options, try these tweaks:
– Full glitter nail for a bold statement, or keep one accent nail with glitter while the rest stay solid.
– Mix fine and chunky glitter to add depth. A touch of holo glitter catches the light.
Next steps: choose your base color, pick your glitter mix, and practice a clean cleanup edge.
Remind readers: Glitter can be hard to remove; use a foil method or soak fingertips.
Keep a small cleanup brush handy for tidy edges. If you’re short on time, try a glitter topcoat over a single color for a quick, eye-catching look.
Dare to dazzle! Glitter explosion nails are your ticket to an eye-catching look that says, “I’m here to shine!” Let your creativity take flight with bold colors and sparkly accents!
12. Confetti Fun

If you want a nail look that feels like a party, try confetti nails. Tiny color pieces sit on a pale base to create a fresh, upbeat vibe. It’s easy to do and shows off your personal style. Here is why this style works: the light backdrop makes every speck pop as you move. The pieces catch light and add a little sparkle with every flick of your hand.
What you’ll need
– A light base color (pale pink, soft beige, or baby blue)
– Tiny confetti pieces or chopped bits of striping polish
– Tweezers or a toothpick for placement
– A clear topcoat for sealing
Steps to Achieve Confetti Fun:
– Start with clean nails and apply one coat of your base color. Let it dry completely and feel smooth to the touch.
– Add small dabs of colored polish where you want the confetti to land. Keep the spots uneven and random for a playful look.
– If you use real confetti, place each piece with tweezers and press gently so it sits flat.
– Seal with a fast-drying topcoat. Apply a second coat for extra durability and a glassy shine.
Next steps: try different color mixes and sizes. Mix mostly tiny pieces with a few larger bits on a couple of nails for contrast. With practice, you’ll have a party-ready manicure that photographs well in daylight or under lamp light.@media (max-width: 768px) { .internal-links-flex { flex-direction: column !important; } .internal-links-flex > div { flex: none !important; } }
You Might Also Like

@media (max-width: 600px) {
.normal-quiz-iframe { min-height: 570px !important; height: 570px !important; }
}
13. Lattice Love

You want nails that feel polished and unique. Lattice nail art gives you a clean, modern look that stands out without shouting. The pattern is a simple crisscross that makes tiny squares in two colors. Start with a dark base and add a lighter lattice to make the lines pop.
Tips to Create Lattice Love:
– Use striping tape for crisp, even lines.
– Try different color pairings to keep the look fresh.
– Finish with a gloss or matte topcoat to seal the design.
Here is why lattice nails work: the contrast makes the grid easy to see, and the pattern stays classy on many outfits. Let’s break it down into actionable steps.
Next steps:
– Prep nails and apply a base coat.
– Paint a dark base color and let it fully dry.
– Place thin striping tape to form a light grid across each nail.
– Brush a lighter lattice color over the grid. Apply in light coats.
– Peel the tape away while the lattice color is still a touch wet for clean edges.
– Top with a glossy finish or a soft matte finish.
Lattice nails suit most nail lengths and skin tones. They pair well with simple outfits and bold accents alike. With careful application, you get a refined look that draws attention in a quiet, confident way.
Want a faster version? Do two crossing lines instead of a full grid. Use a thin brush to draw them after the base dries for a quick, chic effect.
Color ideas: navy base with ivory lattice; charcoal base with pale blue lattice; wine base with pink lattice.
This style is easy to adapt for beginners and still looks polished.
Nail art isn’t just decoration; it’s a canvas for your creativity! Embrace the modern elegance of lattice designs and let your style shine through colorful abstract nail art.
14. Abstract Waves

You want nails that grab attention without shouting. Abstract waves give motion and calm in one look. You blend colors in soft curves, letting lighter and darker shades weave a flowing scene.
Here is how to create this look.
Creating Abstract Waves:
– Prep your nails with a clean base coat and tidy the edges. A smooth foundation helps the colors sit true.
– Use a small brush to paint the wave lines. Make loose S shapes and gentle arcs that feel fluid.
– Layer colors in a few passes. Let some areas blend where two shades meet for natural depth.
– Finish with a glossy topcoat to seal the design and add shine.
This design adapts from day to night easily. It stays classy in the office and pops for a night out.
Tips and simple twists
– Stay in the same color family. Try a pale blue base with navy or teal waves for a cool ocean vibe.
– For extra texture, add a tiny touch of glitter at the tips or along the wave edges.
– If you prefer a softer look, start with a light base and fade in the darker hues toward the center of each nail.
– Keep the edges neat with a fine liner brush and a quick clean with a cotton swab dipped in remover.
Common questions you might have
– Do I need special tools? A small detailing brush and a steady hand work well.
– How long does it last? A good base and topcoat help it hold up for days.
– Can I reuse the idea with other colors? Yes, switch to pinks and purples or warm tones for a fresh feel.
15. Colorful Cartoonish Vibes

Want nails that grab attention in photos or at a casual hangout? Cartoonish nail art uses bold colors and playful shapes to give your look a fun, carefree vibe. Think bright reds, sunny yellows, and electric blues paired with simple doodles.
What this look uses:
– A white base so colors pop.
– A small set of bright colors you enjoy.
– Fun shapes like stars, hearts, circles, or quick doodles.
– A glossy topcoat for shine and durability.
Step-by-step plan:
– Prep nails with a thin base coat.
– Paint two coats of white or a pale pink as the base.
– Use a fine brush or dotter to draw shapes with bright colors.
– Mix shapes on each nail or keep one nail as a bold doodle.
– Finish with a glossy topcoat. If you use a lamp, cure as directed.
Tips for success:
– Practice on a nail swatch before your hands.
– Clean up edges with a small brush dipped in remover.
– Let each layer dry fully to avoid smudges.
– Seal with topcoat for long wear.
This look fits casual days, photo moments, and fun outings with friends. It’s easy to switch colors for different moods and stays comfy while you type, text, or snack.
Next steps: choose your color kit, prep your nails, and try this cartoon nail art look on your next free afternoon.
Embrace your playful side! Colorful cartoonish nails are the perfect way to express joy and creativity – each doodle a little piece of you. Get ready to turn heads and spark smiles!
@media (max-width: 600px) {
.visual-quiz-iframe { min-height: 995px !important; height: 1100px !important; }
}
Conclusion

With these 15 vibrant abstract nail designs, your nails can truly reflect your personality and style. Whether you opt for geometric glamour or swirling rainbow delight, there’s a design here for every mood and occasion. Express yourself boldly through your nails and let your creativity shine!
Which design are you excited to try first? Don’t forget to share your nail art journey with friends and inspire them to get creative too!
Frequently Asked Questions
What Supplies Do I Need to Create Vibrant Abstract Nail Designs at Home?
Getting started with vibrant abstract nail designs is easier than you think! You’ll need a few essential supplies: nail polish in various colors (the brighter, the better!), nail art tools like brushes and dotting tools, and a base coat and top coat to protect your designs. Don’t forget some nail polish remover for any touch-ups!
How Do I Choose the Right Color Combinations for My Abstract Nail Designs?
Choosing the right color combinations is key to making your abstract nails stand out! Think about contrasting colors for a bold look or complementary hues for something more harmonious. Experiment with color blocking or swirling designs to see what feels right for your personality. Trust your instincts—if you love it, wear it!
Can I Use Regular Nail Polish for Abstract Designs, or Do I Need Special Products?
You can absolutely use regular nail polish for your abstract designs! However, if you want to get extra creative, consider trying nail art polishes that are designed for detailing. These can offer finer brushes and unique finishes that enhance your designs. Remember, the key is to have fun and experiment with what works best for you!
How Long Do Vibrant Abstract Nail Designs Typically Last?
The longevity of your vibrant abstract nail designs can vary depending on a few factors. With a good base coat and top coat, your designs can last anywhere from a week to two weeks! To keep them looking fresh, try avoiding harsh chemicals and wear gloves when doing chores. Regular touch-ups can also help maintain that beautiful finish.
Are There Any Tips for Beginners Trying Abstract Nail Designs for the First Time?
Absolutely! If you’re new to abstract nail designs, start simple. Choose one or two techniques, like dotted patterns or color blocking, and practice them. Don’t be afraid to make mistakes—every nail is a canvas! Watching tutorials can also provide inspiration and guidance. Most importantly, have fun and let your creativity shine!
Related Topics
abstract nail design
vibrant colors
nail inspiration
easy nail art
color block nails
geometric nails
beginner friendly
creative nail designs
trendy nail art
short nail ideas
DIY nail art
playful nail styles
I absolutely love all the nail designs you shared! I tried a swirly pattern once, but it ended up looking more like a melted ice cream cone than art! What’s your favorite design from the list?