
Floral nail art has become a delightful trend that many of us can’t resist. As the seasons change, we often find ourselves craving that fresh, blooming vibe on our nails. Whether it’s the soft pastels of spring or the vibrant hues of summer, floral designs bring a touch of nature right to your fingertips. I created this post to share the most adorable floral nail art designs that will inspire you to express your creativity and embrace your inner artist.
If you’re a nail art enthusiast or someone who simply loves pretty and unique designs, this one’s for you. You might be looking for ideas to jazz up your manicure for a special occasion or wanting to explore something new and fun. No matter your reason, these floral nail art ideas are perfect for anyone wanting to add some charm and elegance to their look.
In this post, you’ll discover 18 floral nail art designs that are not just cute but also easy to replicate, even for beginners. Each design features intricate details and some even include stunning 3D accents that will make your nails stand out. Get ready to find your next favorite look and—trust me—you’ll want to try them all, especially when you see how adorable #10 is!
Key Takeaways
– You’ll find 18 stunning floral nail art designs to inspire your next manicure, from dainty daisies to bold geometrics.
– Each design offers unique elements such as intricate details and 3D accents that enhance the overall look.
– Ideal for all skill levels, these designs can be easily adapted to suit your style and preference.
– Tips and tricks for achieving these looks will help you master the techniques quickly.
– Floral nail art is not just seasonal; these designs are versatile enough to wear year-round and for any occasion.
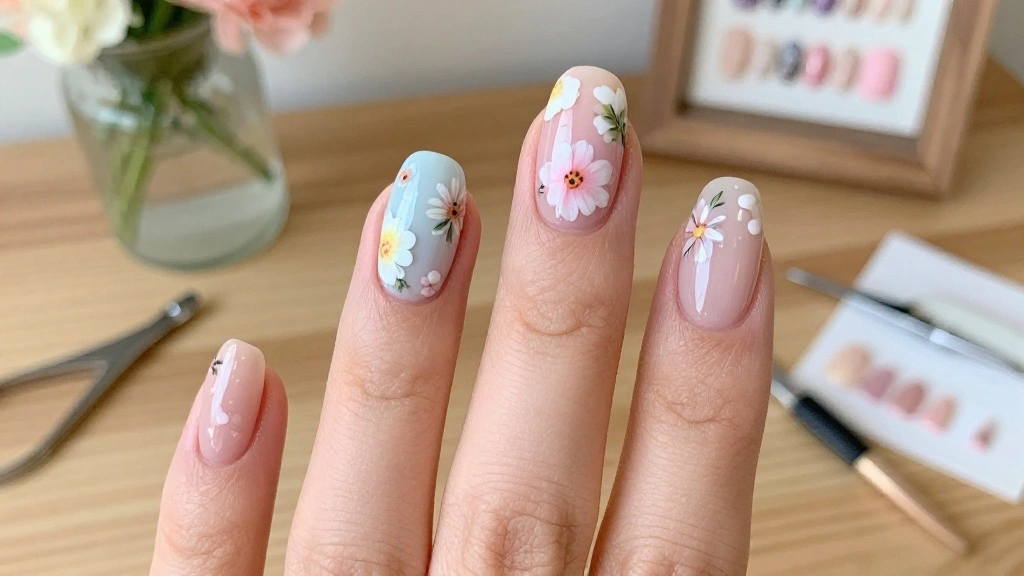
1. Dainty Daisy Delight
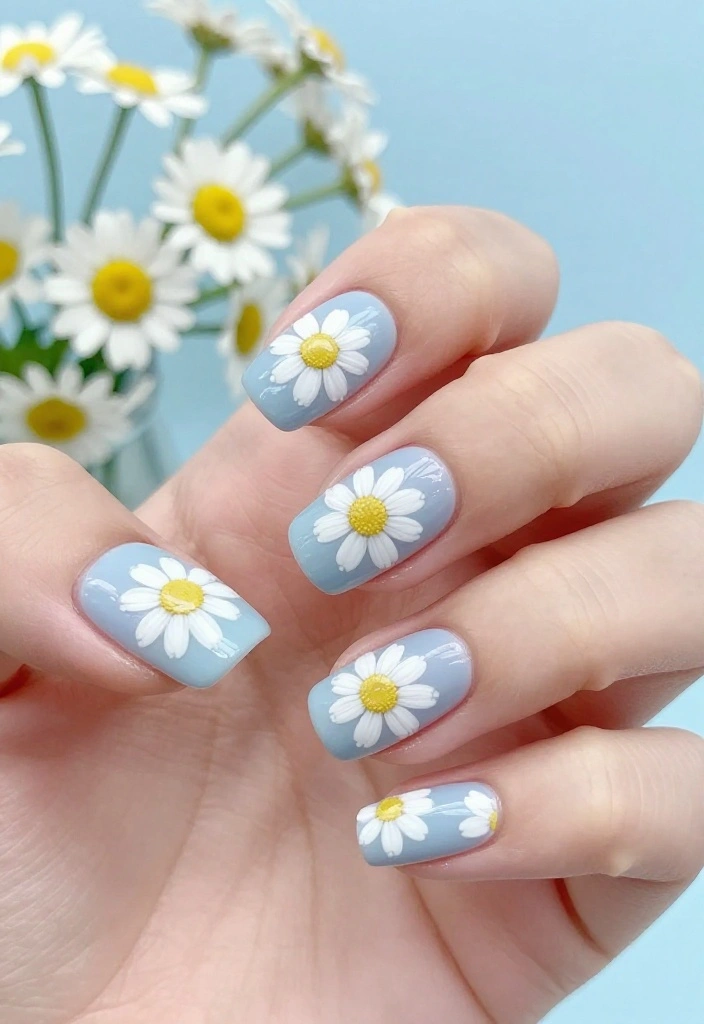
Ready to bring some cheer to your nails? The dainty daisy design is your perfect starting point! With delicate white daisies blooming against a pastel backdrop, this style captures the essence of spring in a lovely way. Ideal for minimalists, this charming design is subtle yet eye-catching, making every glance at your nails a delight.
To recreate this refreshing look, begin with a pale yellow or light blue base coat. After it dries, use white polish to craft tiny petals and finish off with a dot of yellow in the center. A glossy top coat will seal your masterpiece while adding a beautiful shine.
Key details to remember:
– Prep Time: 5 minutes
– Drying Time: 10 minutes
– Servings: Two nails per hand
This design is versatile enough for casual outings or special events, representing purity and innocence. Keep your nails at a moderate length and treat your cuticles for the best appearance!
Dainty Daisy Delight
Editor’s Choice


2. Vintage Rose Elegance
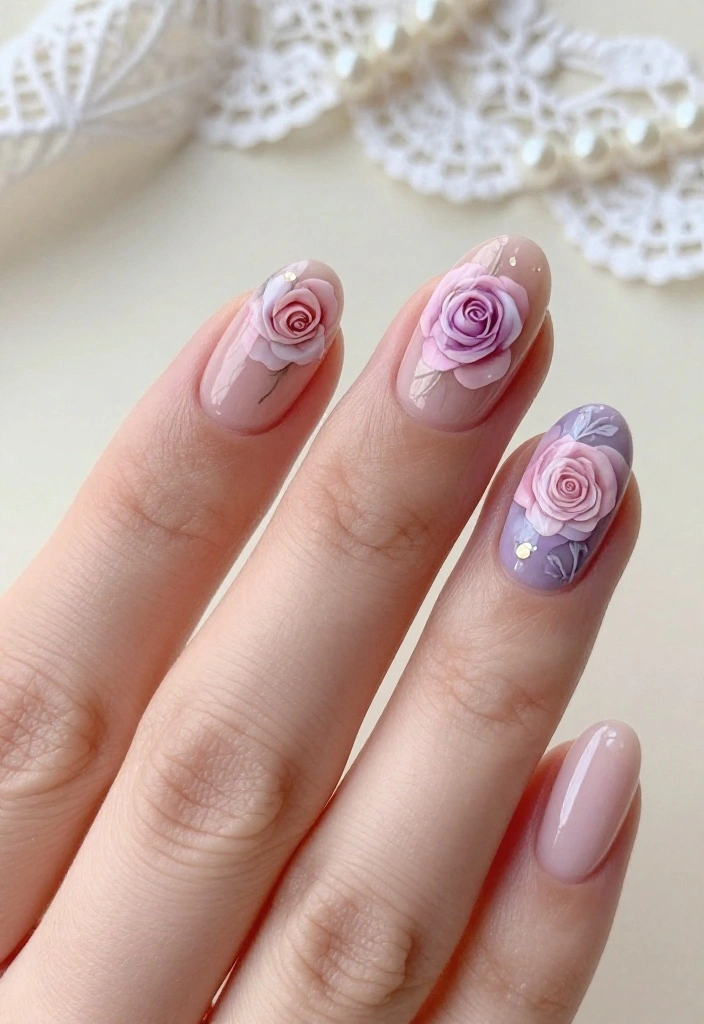
Have you ever wished to wear classic elegance on your nails? The vintage rose design is timeless and simply stunning! Featuring intricate roses in soft shades of pink, coral, or lavender, this look pairs beautifully with a creamy beige or white background, bringing sophistication to any occasion.
To achieve this refined style, start with a nude base coat. With a fine brush, gently paint soft rose shapes and add delicate strokes for the petals. Tiny green leaves will add a fresh touch, making the design pop.
Here’s what you need to know:
– Prep Time: 10 minutes
– Drying Time: 15 minutes
– Servings: 10 nails
This design is perfect for weddings or special occasions, exuding romance and charm. Take your time blending colors and adding details for the best results!
Fun fact: 72% of floral nail art lovers say vintage rose designs look chic on nude bases, making every manicure feel timeless. Soft pinks, corals, and lavenders complete the palette, while delicate leaves finish the look.
3. Cheery Cherry Blossom
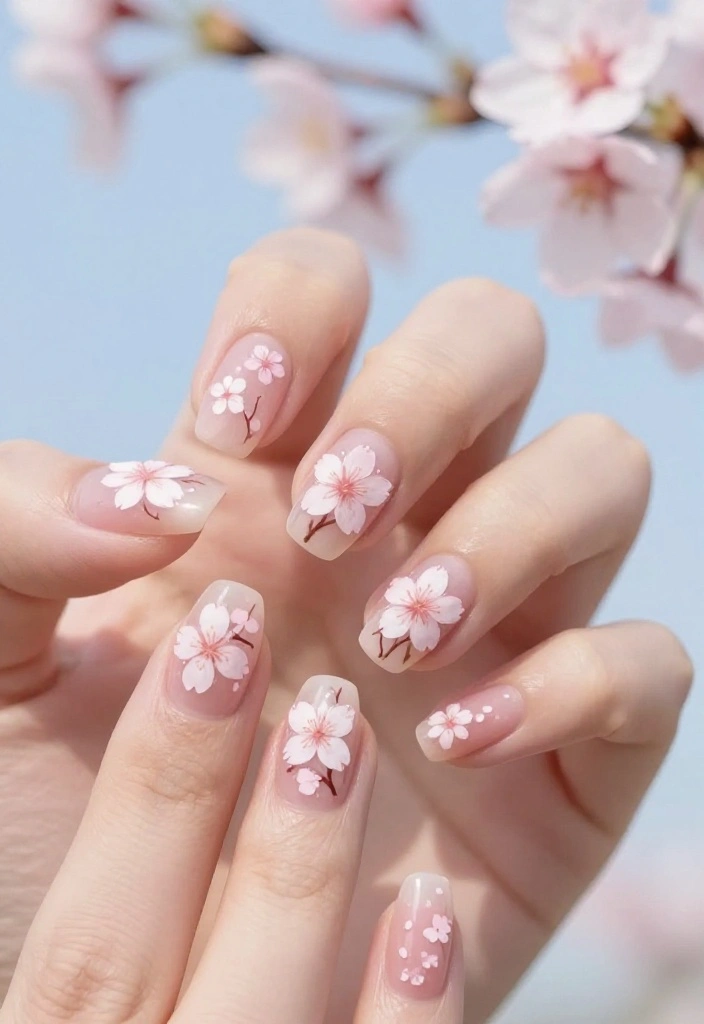
Looking for a vibrant and cheerful nail design? The cherry blossom is a stunning choice! With delicate pink flowers set against a light blue or white background, this design captures the beauty of spring and adds a touch of Japanese flair to your look.
To create this enchanting style, apply a light base color and use a dotting tool to form the blossoms. Enhance the look with tiny branches painted with a fine brush for added realism.
Here are some quick tips:
– Prep Time: 5 minutes
– Drying Time: 10 minutes
– Servings: Full set
This design brings a lively spirit to your nails, embracing nature’s beauty. For an extra touch of charm, consider adding tiny gems or beads!
Cheery Cherry Blossom
Editor’s Choice

4. Tropical Paradise
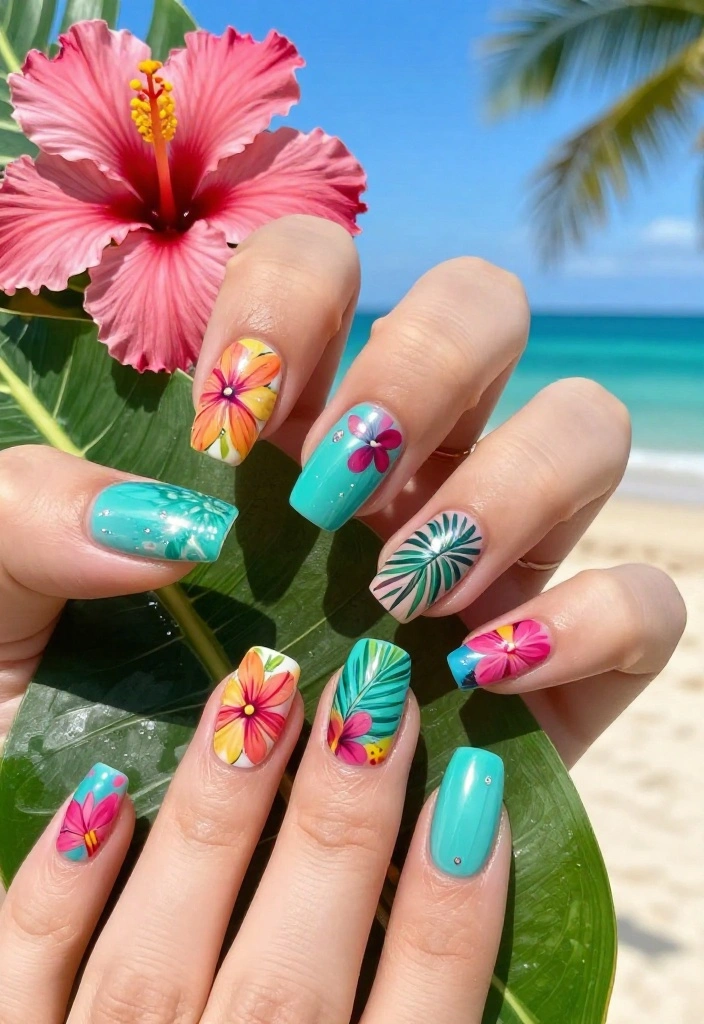
Craving a burst of color and excitement on your nails? The tropical paradise design is perfect for you! Featuring bold colors and exotic flowers like hibiscus and orchids, this nail art is a celebration of summer, making your fingertips a tropical delight.
Begin with a bright base coat, such as teal or coral, to set the stage for vivid flowers. Use a variety of nail art brushes to create floral designs surrounded by lush green leaves for that tropical feel.
Get started with these details:
– Prep Time: 15 minutes
– Drying Time: 20 minutes
– Servings: 10 nails
This design is perfect for vacations or summer parties, ensuring your nails stand out with vibrant vibes. Consider adding glitter accents to mimic sunlight sparkling on water!
5. Elegant Orchid Art
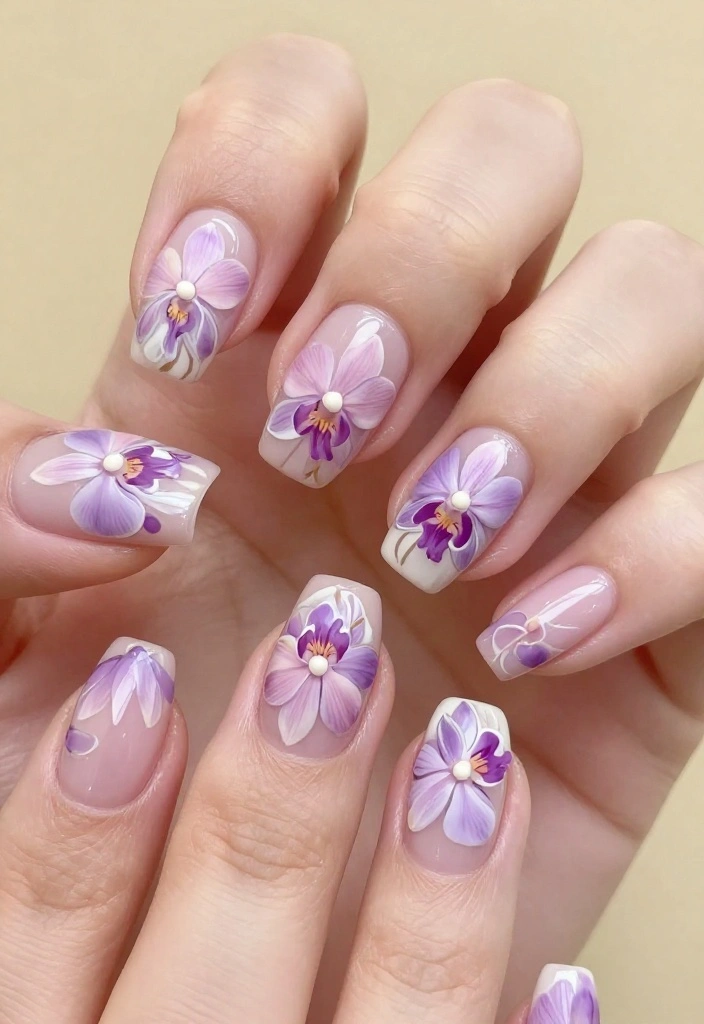
Want to add a touch of sophistication to your nails? The elegant orchid design is a stunning choice! Featuring beautifully detailed orchids in shades of purple, pink, or white, this art stands out against a neutral or gold background, making each nail a work of art.
To recreate this elegant look, start with a light base coat. Use a fine brush to craft soft curves for the orchid petals, then add green leaves for a beautiful contrast.
Check out these essentials:
– Prep Time: 10 minutes
– Drying Time: 15 minutes
– Servings: 10 nails
This design is perfect for formal events, adding grace to any outfit. A glossy top coat will enhance the look, making your orchids appear even more lifelike!
📹 Related Video: Orchid nail tut💕 can’t wait to do more summer sets
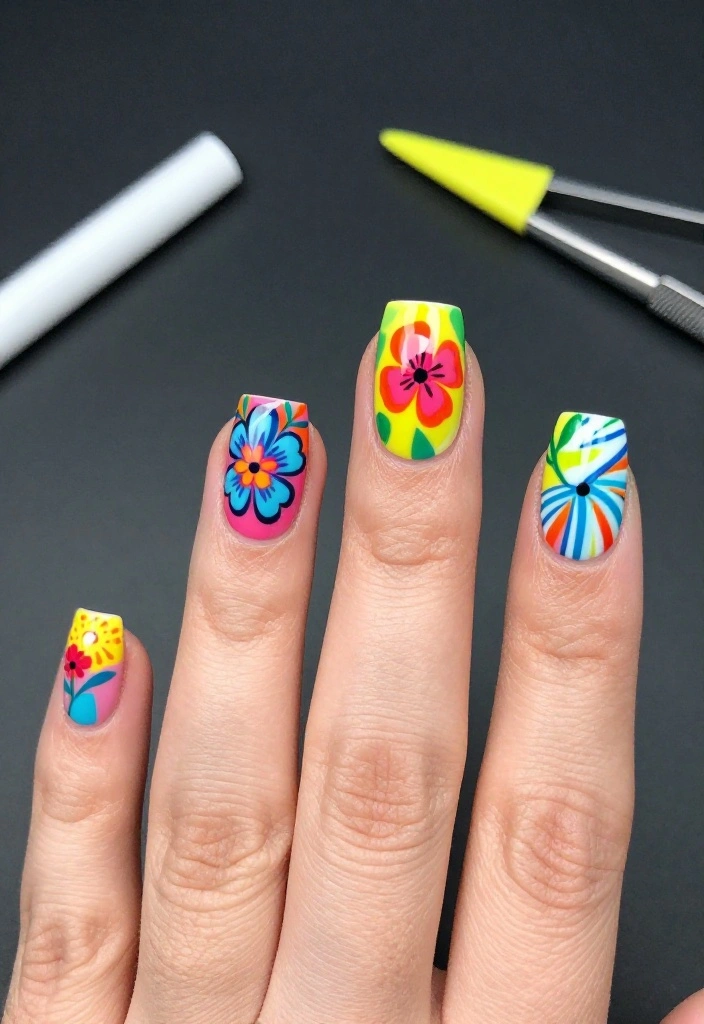
6. Whimsical Wildflowers
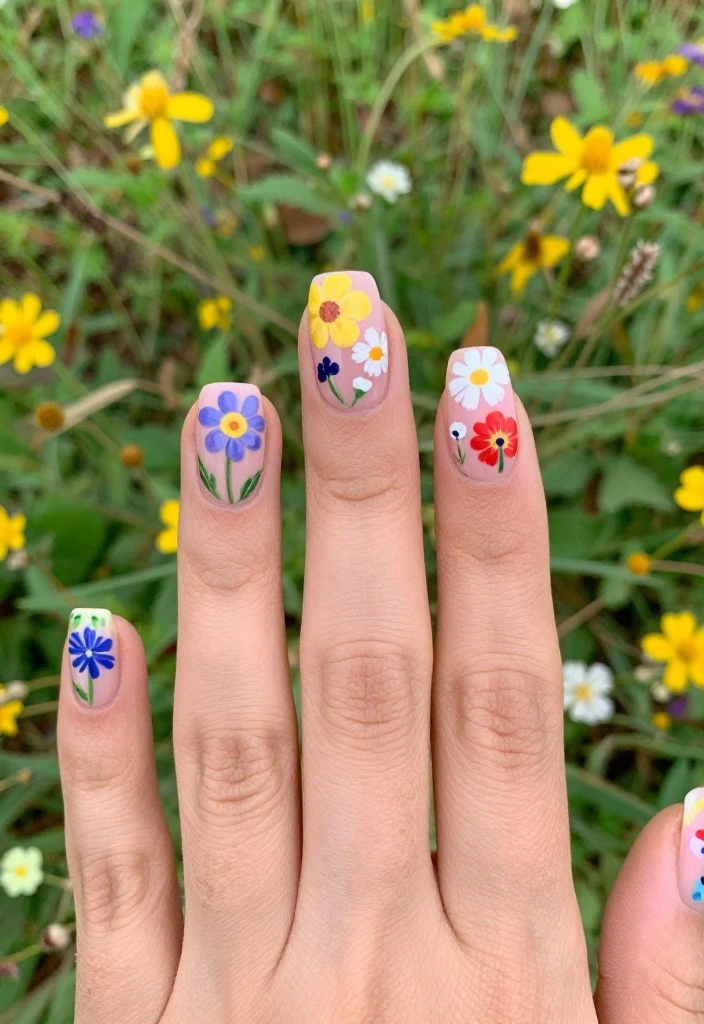
Are you looking for a playful and creative nail design? Whimsical wildflowers can bring that free-spirited touch to your nails! This design allows for a variety of colors and shapes, making it wonderfully unique and a true expression of your personality.
Choose a light background color to let the wildflowers shine. Use dotting tools and brushes to create a mix of flowers, from daisies to pansies, for a delightful bouquet effect.
Key points to remember:
– Prep Time: 15 minutes
– Drying Time: 20 minutes
– Servings: Full set
This design encourages creativity and spontaneity, making it perfect for anyone who wants to express themselves through their nails. Feel free to mix and match flower colors for a true wildflower celebration!
7. Bold Floral Geometrics
Want a modern twist on floral designs? Bold floral geometrics combine edgy patterns with vibrant blooms! This striking style features sharp lines and bold colors, creating a standout look that’s perfect for fashion-forward individuals.
Start with a solid base coat, whether matte or glossy. Use tape to craft geometric shapes, then fill in these areas with colorful floral patterns for a stunning effect.
Here’s how to get started:
– Prep Time: 20 minutes
– Drying Time: 25 minutes
– Servings: 10 nails
This design is ideal for those looking to make a statement with their nails. Experiment with contrasting colors for maximum impact, and don’t forget to seal your art with a top coat!
Bold Floral Geometrics
Editor’s Choice


How To Choose the Right Floral Nail Art Design
Choosing the perfect floral nail art design can be a fun yet challenging task. To help you find the right look, consider these selection criteria:
1. Nail Length
Your nail length plays a big role in determining which floral designs will look best. Short nails might suit smaller, delicate florals like tiny daisies or vintage roses. Longer nails can accommodate more intricate designs, such as 3D floral accents or hand-painted flower bouquets. Consider what style complements your nail length!
2. Color Palette
The colors you choose can dramatically affect the overall look of your floral nail art. Think about whether you want bold, bright colors that stand out or soft pastels for a more subtle appearance. For seasonal looks, vibrant colors like sunflowers in summer or deep reds and greens for winter florals can enhance the festive feel.
3. Design Complexity
Decide how complex you want your floral nail art to be. Intricate designs with 3D elements or detailed painting can require more skill and time. If you’re new to nail art, you might want to start with simple patterns like charming lavender fields or dainty daisy delights. As you gain experience, you can try more challenging styles like modern floral wraps or bold geometric florals.
4. Occasion
Consider where you’ll be showing off your nails. Casual outings might call for playful designs like whimsical wildflowers, while formal events may require elegant styles like vintage rose elegance or monochrome petals. Think about the vibe you want to convey and choose a design that fits the occasion!
5. Seasonal Trends
Floral designs can be influenced by the seasons. In spring, cherry blossoms and peonies are popular choices, while autumn may inspire you to try more muted tones and designs featuring falling leaves. Keep an eye on current trends and tailor your floral nail art to match!
Pro Tip: Experiment with nail art stickers or stencils if you’re just starting out. They can help you achieve stunning floral designs without the need for advanced painting skills. Plus, they allow you to switch designs quickly, helping you stay on top of seasonal trends!
8. Charming Lavender Fields
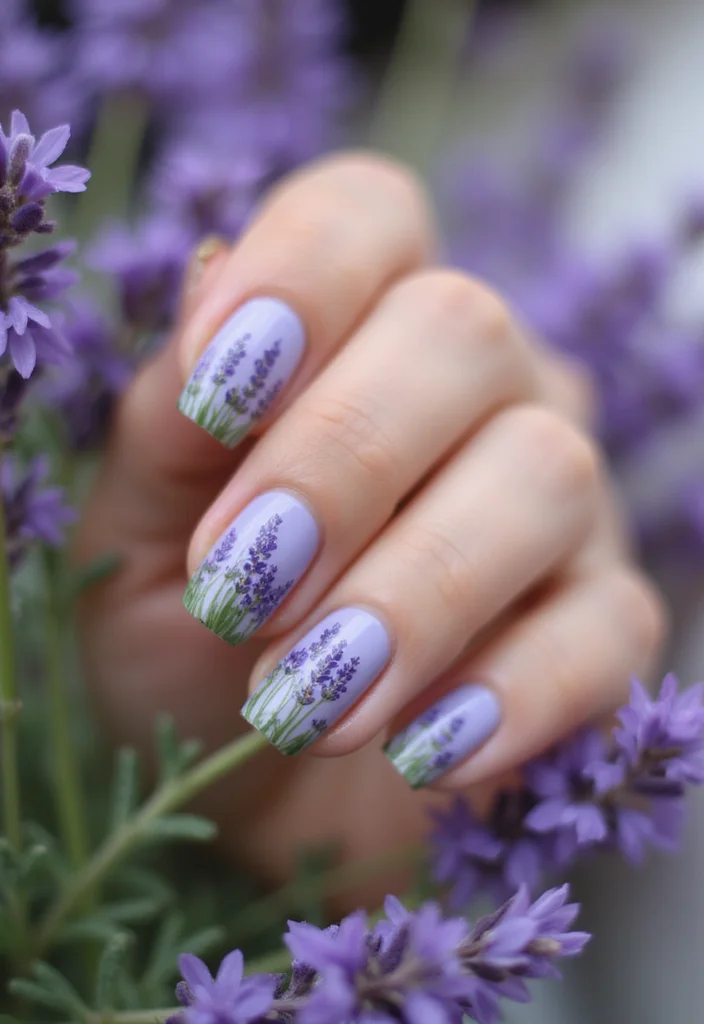
Seeking a serene and calming nail design? The charming lavender fields design captures the essence of relaxation and beauty! With soft purples and greens, this art evokes a sense of tranquility reminiscent of a peaceful lavender field.
Start with a pastel base and create clusters of small lavender flowers using fine brush strokes. Add a few green leaves for contrast, making the design visually appealing.
Consider these quick tips:
– Prep Time: 10 minutes
– Drying Time: 15 minutes
– Servings: 10 nails
This design is perfect for summer and can be sported on any occasion, bringing a peaceful vibe to your everyday life. A matte top coat can enhance the soft aesthetic of this design.
Fact: Lavender nails give floral nail art a calmer vibe—up to 30% more soothing when paired with soft greens. Nine out of ten nail art lovers say a lavender field-inspired design helps them unwind after a long day.
You might also like
15 Stunning Floral Prints Nail Designs That Will Make You Want to Book a Manicure ASAP! – The Glow Grove HQ | Skincare Tips, Clean Beauty & Women's Wellness
20 Stunning Spring Toes Designs for 2025 That Will Make You Want to Show Off Your Feet! – The Glow Grove HQ | Skincare Tips, Clean Beauty & Women's Wellness
9. Stunning Succulent Garden

Love the trendy look of succulents? Now you can have them on your nails! The stunning succulent garden design brings earthy vibes to your manicure with various succulent shapes and colors.
Begin with a light base coat and use a fine brush to create the intricate shapes of different succulents. Incorporate shades of green, pink, and even purple for a colorful palette.
Here’s what to keep in mind:
– Prep Time: 15 minutes
– Drying Time: 20 minutes
– Servings: 10 nails
This design is perfect for nature lovers and adds a fun twist to traditional floral nail art. For an extra touch, consider adding tiny 3D details to some of the succulents!
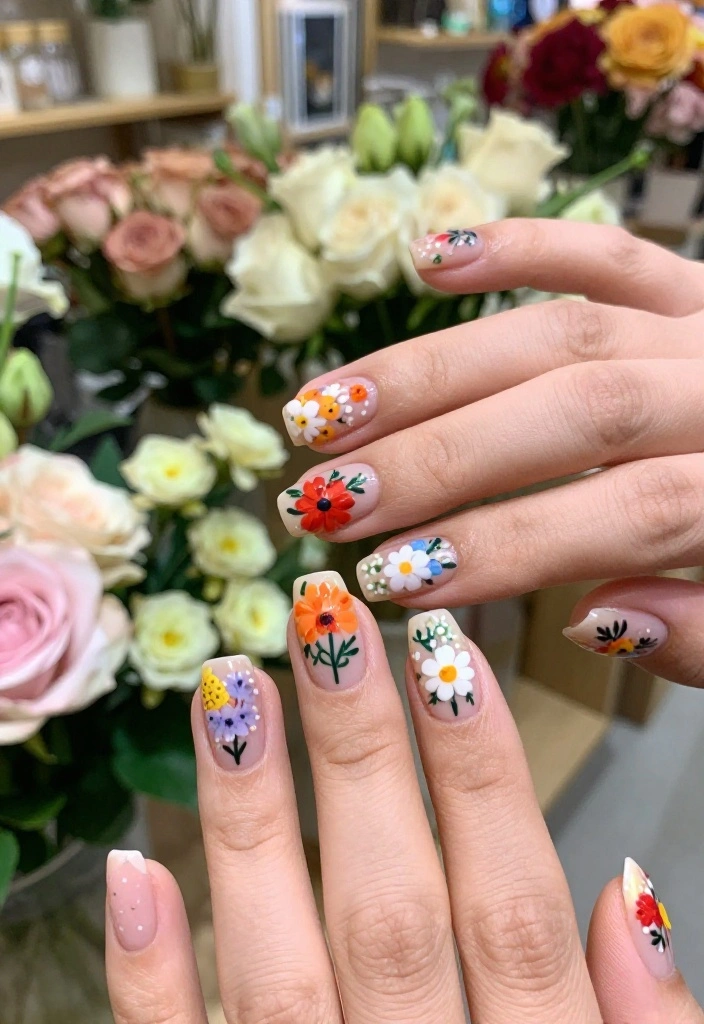
10. Adorable 3D Floral Accents
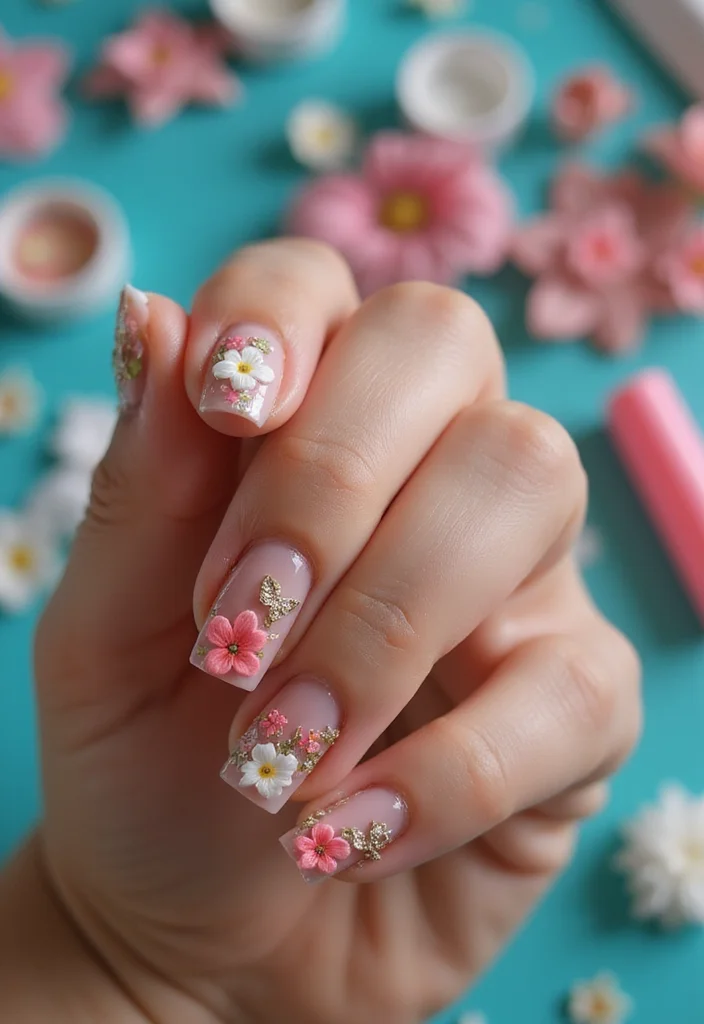
Looking to elevate your nail art game? Try incorporating adorable 3D floral accents! This design uses small floral charms or sculpted flowers to add texture and depth to your look.
Start with a solid base color and apply your 3D elements after completing your nail art. If you’re feeling crafty, you can even use modeling clay to sculpt flowers at home!
Here’s what you need:
– Prep Time: 20 minutes
– Drying Time: 25 minutes
– Servings: Full set
This style is perfect for special occasions or whenever you want to switch things up! Make sure to seal your 3D art with a top coat for longevity and shine.
11. Elegant Monochrome Petals
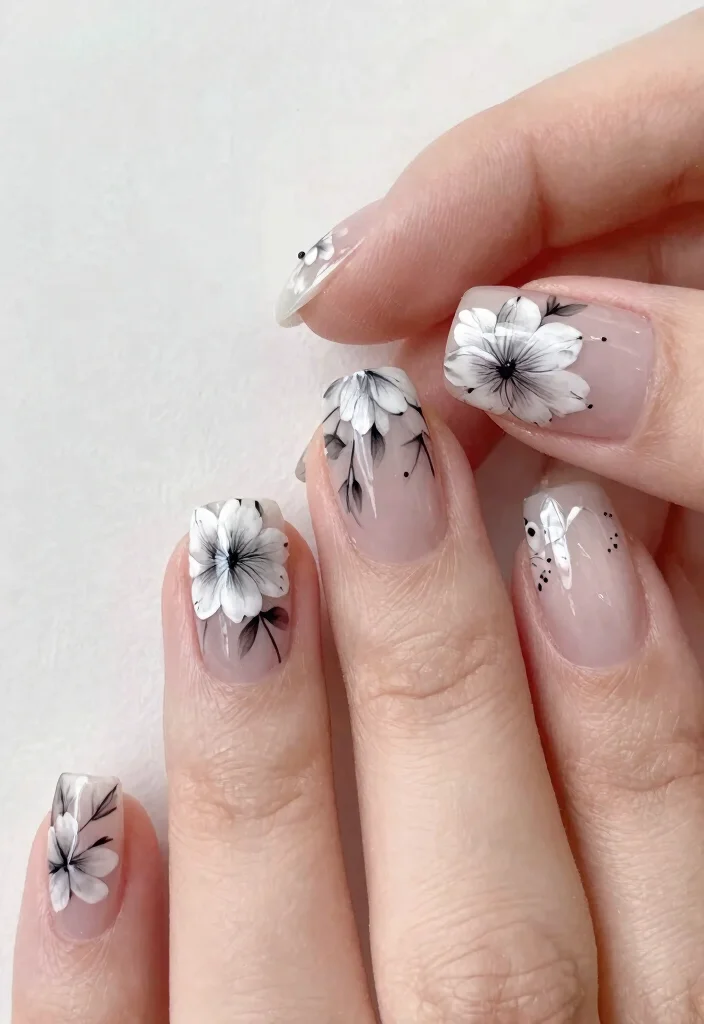
If you appreciate a sophisticated look, the elegant monochrome petals design is for you! This style uses shades of black, white, or grey to create stunning floral patterns that are both chic and versatile.
Start with a clear or nude base coat, then use black polish to craft intricate flower designs. This creates a striking contrast, making your nails stand out beautifully.
Take note of these details:
– Prep Time: 10 minutes
– Drying Time: 15 minutes
– Servings: 10 nails
This style is perfect for anyone wanting to keep it classy while showcasing their love for floral art. Experiment with different flower shapes to keep your design fresh and interesting!
12. Colorful Peony Perfection
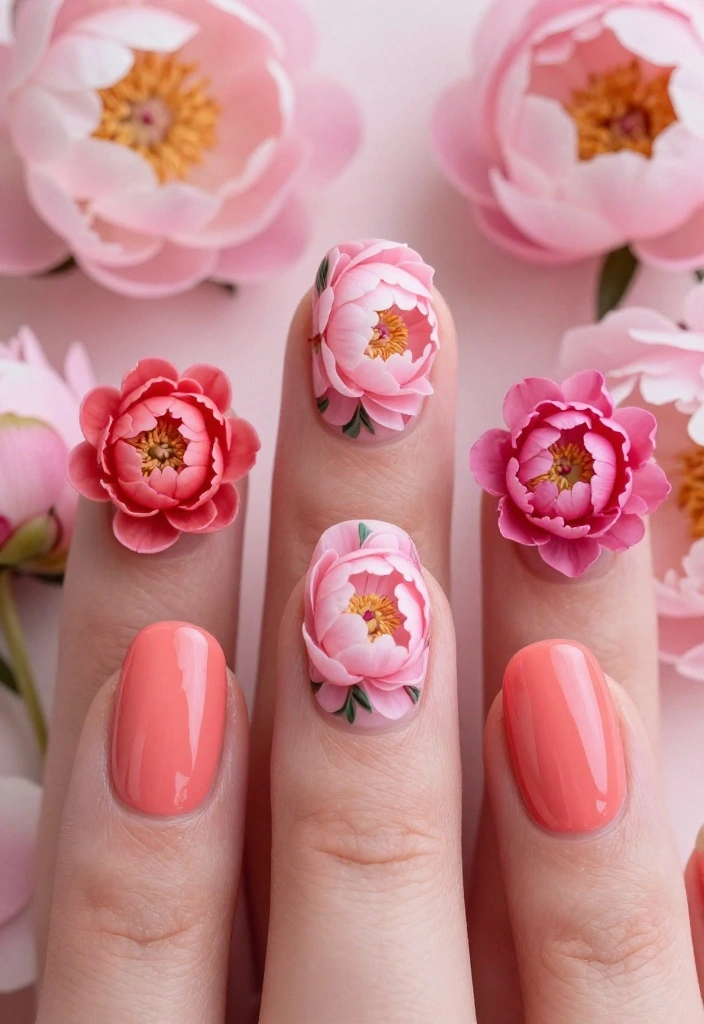
Dreaming of lush blooms on your nails? Colorful peony perfection captures the beauty of these full flowers! Featuring large, vibrant peonies in rich shades of pink and coral, this design is a delightful addition to any pastel backdrop.
Start with a soft base color and create large, fluffy petals using varying shades for depth. Finish with a fine brush to add details, making each peony come alive on your nails.
Here’s how to dive in:
– Prep Time: 15 minutes
– Drying Time: 20 minutes
– Servings: 10 nails
This design is fabulous for spring or summer and offers a fresh, vibrant look. To enhance your peonies, consider adding some gold accents for that extra touch of glam!
13. Radiant Sunflower Bliss
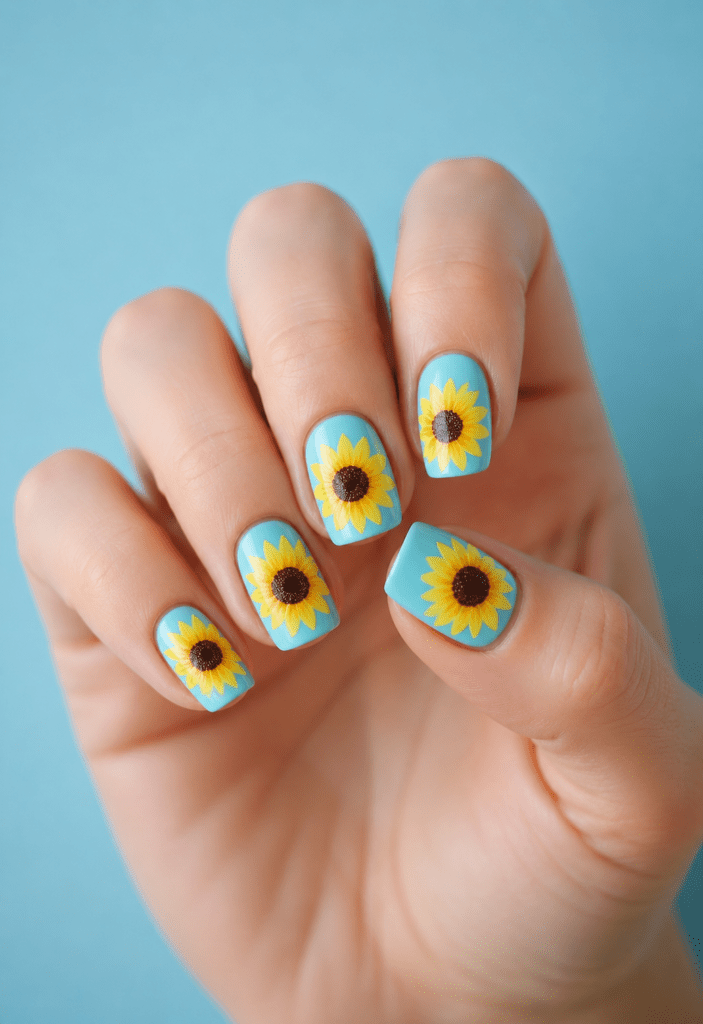
Nothing brightens up a day like sunflowers! The radiant sunflower bliss design features bold yellow sunflowers against a light blue or green background, spreading warmth and happiness.
Begin with a sunny base color, then use bright yellow polish and a dotting tool to create the petals and seeds of your sunflowers.
Here are the essentials:
– Prep Time: 10 minutes
– Drying Time: 15 minutes
– Servings: 10 nails
This design is perfect for summer days or fun outings, ensuring you spread sunshine wherever you go! Consider mixing in little bees or other details for added charm.
❝ Fun fact: Sunflowers have been cultivated for over 5,000 years, bringing bold yellow petals to art and gardens alike. Channel that timeless glow into floral nail art with radiant sunflower bliss—bright, cheerful, and ready to lift your mood all season. ❞
14. Enchanted Ivy Vines
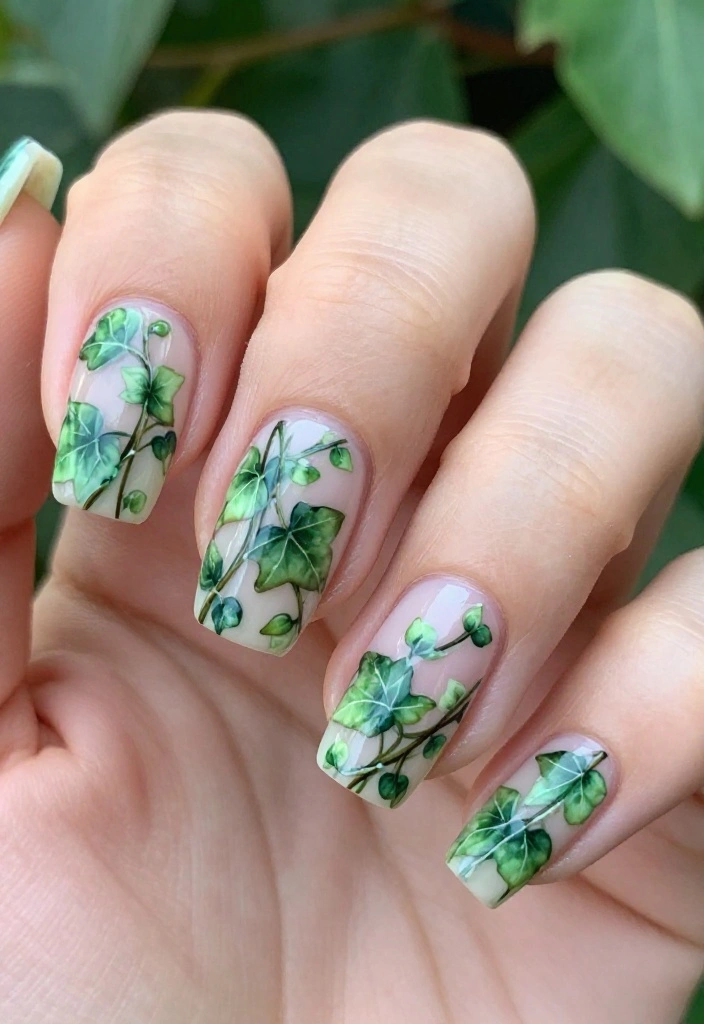
Want to add a touch of nature to your nails? The enchanted ivy vines design features beautiful vines curling around your nails, creating a natural and enchanting look!
Start with a light base and use a thin brush to paint the twisting vines, adding tiny leaves for detail.
Here’s what to keep in mind:
– Prep Time: 15 minutes
– Drying Time: 20 minutes
– Servings: 10 nails
This design is perfect for nature lovers looking to add greenery to their style. Consider enhancing your nails with a matte top coat for an elegant flair!
You Might Also Like
15 Stunning Summer Nails That Will Make You the Center of Attention! – The Glow Grove HQ | Skincare Tips, Clean Beauty & Women's Wellness
15. Modern Floral Wraps
Craving vibrant nail art without the hassle? Modern floral wraps are the answer! These wraps feature stunning floral patterns that can be applied directly to your nails for an instant pop of color.
Choose wraps with intricate designs and pair them with a clear or solid base for a polished finish. Enjoy the quick transformation without the mess of painting!
Key details include:
– Prep Time: 5 minutes
– Drying Time: Immediately
– Servings: Full set
This design is perfect for anyone who loves beautiful nails without the effort of painting. A top coat over the wraps will ensure longevity and shine!
Modern Floral Wraps
Editor’s Choice


16. 3D Floral Creations

Want to take your nail art to the next level? Try 3D floral creations! This design incorporates real materials to sculpt stunning floral pieces on your nails, making them truly stand out.
You can use gel or acrylic to shape your blooms directly on your nails, providing a unique and stylish look. Embrace your creativity and have fun with this exciting technique!
Here are the essentials:
– Prep Time: 30 minutes
– Drying Time: Depends on materials
– Servings: Full set
This eye-catching design is perfect for special occasions, allowing your nails to steal the show! Remember to seal your 3D art properly with a top coat to prevent damage.
17. Hand-Painted Flower Bouquets
Looking for a charming and personal touch for your nails? Hand-painted flower bouquets capture the essence of a beautiful garden! With various flowers lovingly painted together, this design showcases your artistic flair.
Choose a coordinating base color that lets your flowers shine, and use a fine brush for detailing the blossoms. Each nail can be a unique piece of art!
Key points to keep in mind:
– Prep Time: 20 minutes
– Drying Time: 25 minutes
– Servings: 10 nails
This design is perfect for anyone who loves unique, personalized nail art. Mix different flower shapes and colors to create a dynamic bouquet effect!
18. Festive Floral Glitter
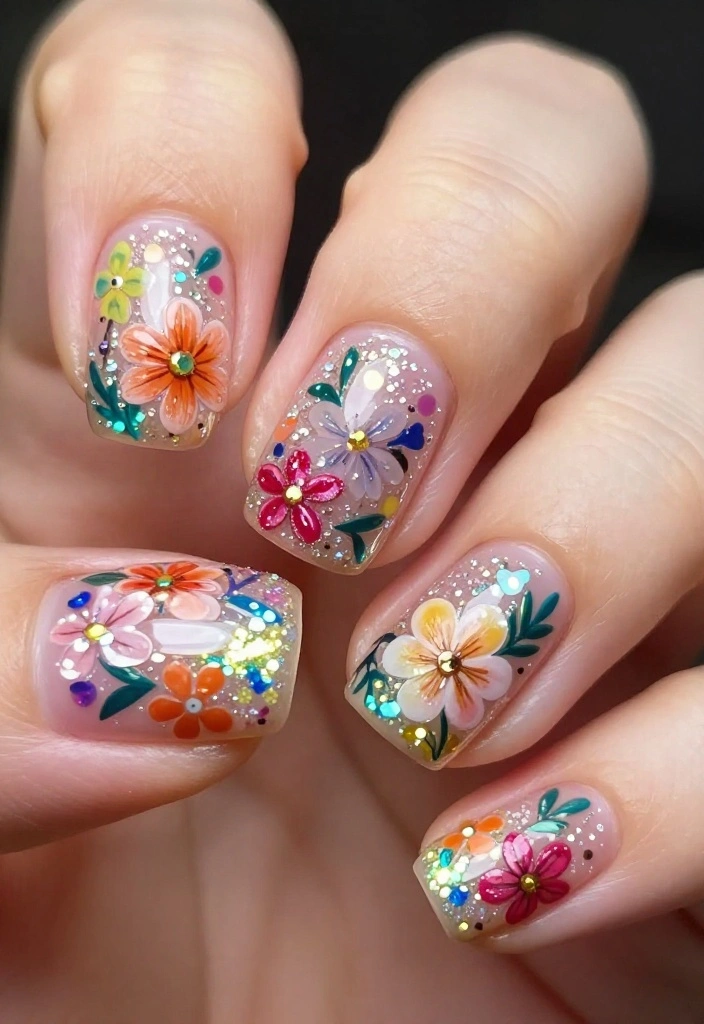
Want to add some sparkle to your floral nail art? The festive floral glitter design is sure to shine! This fun style features flowers adorned with dazzling glitter, making it perfect for parties and celebrations.
Start with a solid base color and paint your flowers in bright hues, then sprinkle glitter over the petals for a captivating effect.
Keep these details in mind:
– Prep Time: 15 minutes
– Drying Time: 20 minutes
– Servings: 10 nails
This design is ideal for those looking to add glam to their nails. A clear top coat will help secure the glitter and enhance the shine!
Festive Floral Glitter
Editor’s Choice


Conclusion
These 18 floral nail art designs are sure to inspire your next manicure! Whether you go for delicate micro florals or bold 3D accents, there’s a floral style that suits everyone. Don’t hesitate to mix and match techniques to create your unique look!
Floral nail art not only enhances your style but also allows for personal expression. So grab your nail polishes and get to creating your next masterpiece!
Note: We aim to provide accurate product links, but some may occasionally expire or become unavailable. If this happens, please search directly on Amazon for the product or a suitable alternative.
This post contains Amazon affiliate links, meaning we may earn a small commission if you purchase through our links, at no extra cost to you.
Frequently Asked Questions
What are the must-try floral nail art designs for 2026, especially with micro florals and 3D details?
In 2026, floral nail art shines with micro florals on soft bases, tiny bouquet accents on a single nail, and delicate 3D designs that rise just enough to catch light. To recreate: start with a clean base, pick a sheer or neutral polish, and sketch a few petals with a fine brush. Build up tiny layers of 3D designs using gel or acrylic, then seal with a glossy top coat. For intricate details, add dot centers and fine stems with a liner brush. Remember to cure between layers and cap the free edge for lasting wear. Pro tip: keep the base color light so the flowers pop and let your floral nail art stay cute and durable.
How can I create long-lasting 3D floral nail art at home?
You can craft durable 3D designs at home with the right materials. Start with gel or acrylic for petals, choose a dotting tool and a fine brush, and work in incremental layers. Place each petal with a tiny amount of gel or acrylic, cure, then repeat for depth. Once the 3D elements feel secure, cap with a thick top coat and cure again. Keep edges sealed to prevent snagging, and gently file any sharp points before finishing. Tip: practice on a nail wheel first to build up the technique.
Which floral nail art designs are easiest to DIY, and which need a pro?
For DIY, micro florals on a nude base or an accent nail with a simple row of petals are quick wins. Use a fine liner brush and a dotting tool to create intricate details without overdoing it. For more complex 3D designs like layered bouquet clusters or multi-layer petals, you’ll likely want a pro or at least a steady hand and practice with gel or acrylic.
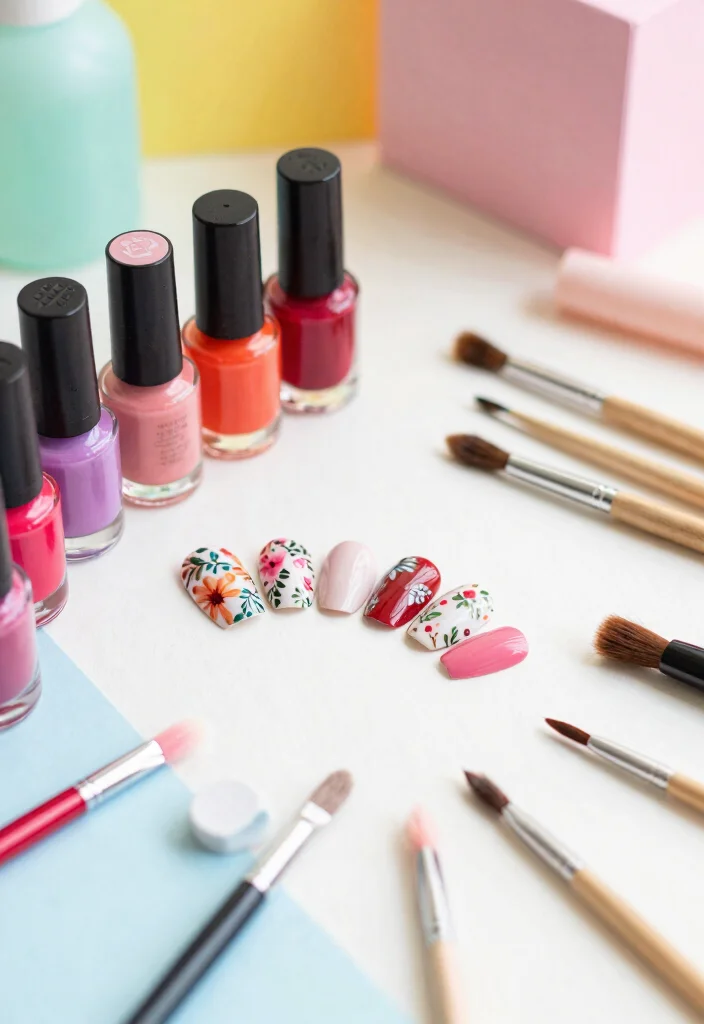
What tools and products help you nail intricate details in floral nail art?
The essentials include a fine nail-art brush, a precision dotter, a curved/3D tweezer for placing tiny petals, gel builder or acrylic, and a quality gel top coat. For floral nail art, use thin brushes for petals, micro brushes for shading, and a UV/LED lamp for curing. Keep a clean palette and practice sheet to map designs before you paint.
How should I care for floral nail art to extend its life and keep the 3D details looking fresh?
Protect your manicure by using a top coat and sealing the edges. Avoid acetone-based removers on the design, wear gloves for cleaning, and reapply a thin layer of top coat every 3–4 days to preserve intricate details. Dry hands, moisturize cuticles, and when you do daily tasks, be mindful of snagging the raised 3D elements. If chips occur, address them quickly with a light file and a quick touch-up.
Related Topics
floral nail art
3D designs
micro florals
intricate details
nail art trends
cute designs
beginner friendly
easy tutorials
spring nails
seasonal nail art
nail art techniques
creative nail designs
I love all these floral nail designs! They’re so bright and cheerful. Which one do you think is the easiest to try at home?
These nail art ideas are adorable! I think I might try the sunflower design, but knowing me, I’ll end up with more polish on my fingers than on my nails! 😂