
Looking to spice up your nail game? If so, you’re in the right place! Silver and red almond nails are becoming a go-to choice for those wanting a striking manicure that stands out. This post was created because I noticed a growing fascination with this bold color combination and the elegant almond shape. The blend of silver and red offers a perfect balance of glamour and sophistication, making it ideal for any occasion. Whether you’re gearing up for a night out, a special event, or just want to feel fabulous every day, these designs will surely inspire your next mani!
If your heart skips a beat at the thought of creative nail art, then you’ll love what I’ve curated here. This is for anyone who wants to elevate their nail style with unique ideas that reflect their personality. You’ll find 19 stunning designs that blend silver and red beautifully. Each idea is not only creative but also practical, allowing you to achieve that salon-worthy look at home or inspire your next trip to the nail salon. Prepare to take notes because you’re about to discover your next favorite nail design!
Now, let’s dive into the fabulous world of silver and red almond nails! From classic ombre styles to chic geometric patterns, there’s something for everyone. Get ready to transform your nails into a canvas of creativity that will leave you and everyone around you in awe!
Key Takeaways
– Discover a range of stunning silver and red almond nail designs that combine elegance with creativity.
– Explore unique ideas, like classic ombre and geometric patterns, that perfectly blend these bold colors.
– Learn how to achieve a salon-worthy look at home or inspire your next nail salon visit.
– Find nail art inspiration suitable for any occasion from casual outings to formal events.
– Get tips on how to customize these designs to express your unique style and personality.
1. Classic Red and Silver Ombre

You can’t go wrong with the classic ombre design! This style blends a rich crimson red at the base, fading into a sparkling silver at the tips. It’s a captivating look that radiates elegance, making it suitable for anything from casual outings to formal events.
Achieving this stunning effect is simple and can be done at home. Just grab a sponge or a gradient brush and follow these steps:
– Start with a protective base coat for your nails.
– Apply a deep red polish and let it dry completely.
– Use a makeup sponge to dab silver polish gently at the tips, blending it into the red.
– Seal the design with a glossy topcoat for a stunning finish!
This ombre design is a beautiful choice for anyone who loves a subtle yet eye-catching nail art idea.
2. Silver Glitter Tips with Red Base
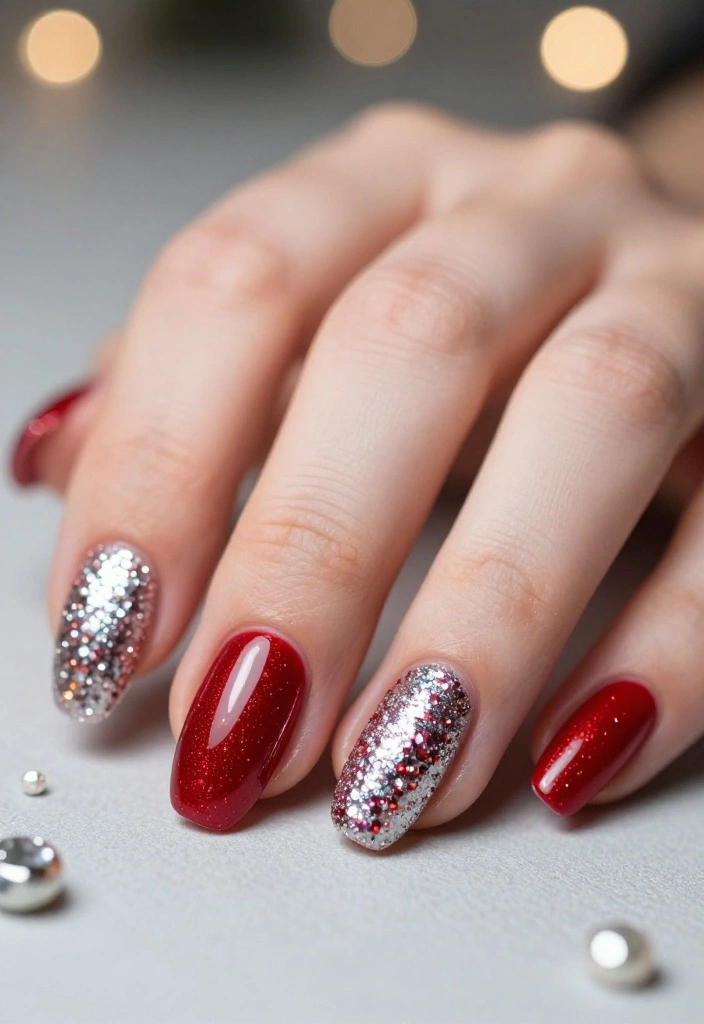
Looking for a fun and festive nail design? This one features a vibrant red base adorned with sparkling silver glitter tips, making it perfect for celebrations! You’ll love how the glitter catches the light, adding a playful touch to your nails.
To create this eye-catching look, follow these steps:
– Start with a bright red polish base and allow it to dry.
– Use a fine brush or nail art tape to add silver glitter solely on the tips.
– Finish with a topcoat to ensure your dazzling design lasts.
This style merges fun with classic elements, showcasing your personality in a vibrant way.
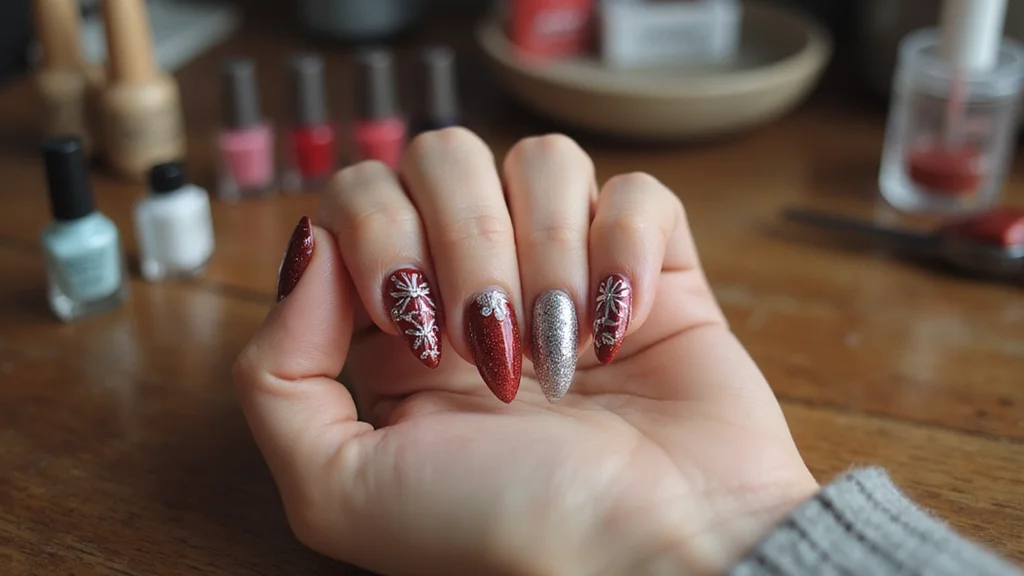
3. Elegant Floral Accents

Bring a touch of romance to your nails with this elegant design featuring silver and red floral accents. Imagine delicate white flowers beautifully painted on a glossy red background, enhanced with thin silver lines for a chic finish.
This stunning style is perfect for special occasions like weddings or romantic dinners. Here’s how to recreate it:
– Begin with a solid red polish base.
– Once dry, use a fine brush to paint intricate white floral designs.
– Add silver accents to the flowers for added sparkle.
– Seal it all with a topcoat for long-lasting beauty.
This nail art idea captures the essence of blooming elegance for every flower lover.
How To Choose the Right Silver and Red Almond Nails
To create stunning silver and red almond nails, you need to make careful choices regarding design and materials. Here’s how to pick the perfect set for your next manicure.
1. Design Inspiration
Start by exploring different design ideas. Look at nail art images online or in magazines. Consider what catches your eye—whether it’s a sleek ombre, bold geometric patterns, or delicate floral accents. Follow trending styles to help narrow down your choices.
2. Quality of Products
Select high-quality nail polishes and tools. Look for brands known for their long-lasting formulas and vibrant colors. Check reviews to ensure that the products you choose won’t chip easily. This makes a big difference in the longevity of your silver and red almond nails.
3. Color Intensity
Think about the shades of red and silver you want. Do you prefer a bright cherry red or a deep burgundy? For silver, consider glittery or metallic options. Test swatches on your nails to see how they complement your skin tone. The right color combination can elevate your overall look.
4. Nail Shape and Length
Decide on the almond shape and length that suits you best. Almond nails can range from short to long, and the length can affect how the colors appear. Consider your lifestyle—if you’re active, shorter nails might be more practical. Choose a length that allows you to express yourself while being manageable.
5. Nail Art Techniques
Think about the techniques you want to use. Do you want to try nail stamping, freehand painting, or applying decals? Each technique can create a different effect. If you are new to nail art, start with simpler designs like glitter tips or solid base colors, and then build up to more intricate looks as you gain confidence.
6. Maintenance and Care
Consider how much time you are willing to spend on nail maintenance. Some designs require more upkeep than others. For example, nail art with rhinestones or intricate details may need touch-ups after a few days. Choose designs that fit your lifestyle and how often you can commit to nail care.
Pro Tip: If you’re unsure about color combinations, use a color wheel to visualize how silver and red will look together. This can help you find the perfect balance and inspire your nail art creativity!
With these tips, you’ll be better equipped to select the silver and red almond nails that truly express your style and personality! Whether you’re aiming for a classic look or something more creative and unique, taking the time to choose wisely will make all the difference in your manicure.
4. Geometric Patterns
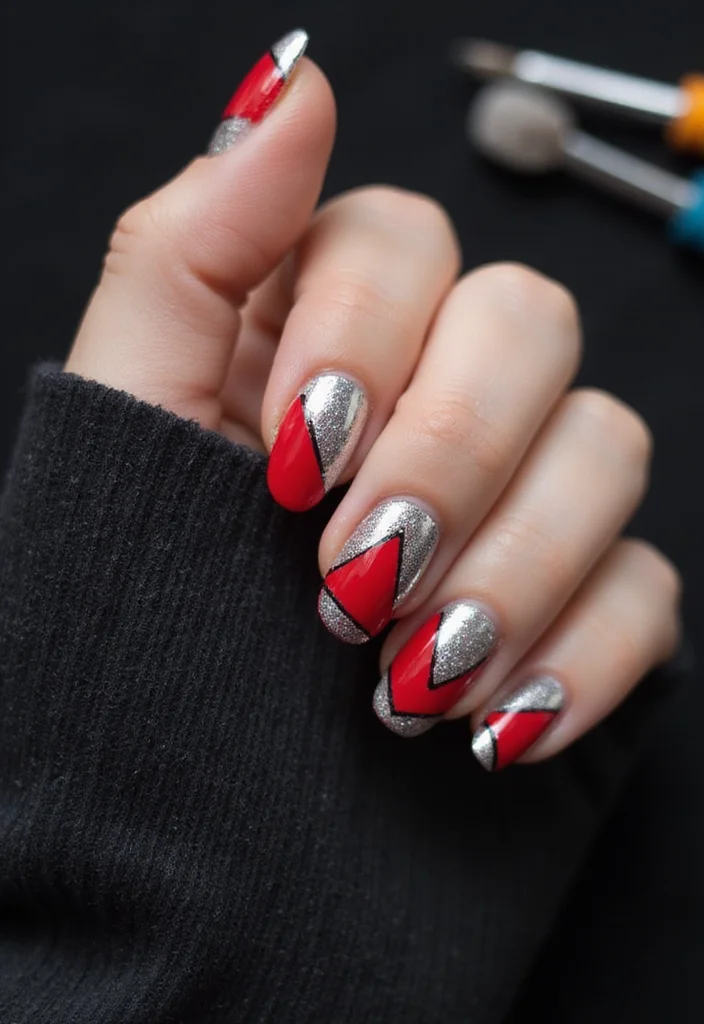
If you love modern designs, geometric patterns in red and silver will surely catch your eye! This style features bold lines and striking shapes that create a mesmerizing visual effect.
Experimenting with these colors allows you to express your personality while maintaining a stylish look. Follow these steps to nail this design:
– Apply a base layer of red polish and let it dry completely.
– Use nail tape to create various geometric shapes on your nails.
– Fill in the shapes with silver polish, carefully peeling away the tape afterward.
– Finish with a topcoat for a sleek appearance.
This trendy style is perfect for anyone who wants to showcase their artistic flair.
5. Silver Foil Accents

Elevate your manicure with chic silver foil accents on a bold red base! The foil adds a luxurious texture and unique finish that makes your nails look professionally done.
This design beautifully blends elegance with a touch of glam. Here’s how to master this look:
– Start with a vibrant red polish for your base.
– Once dry, apply topcoat where you want to place the foil.
– Gently press pieces of silver foil onto the nail and seal with another layer of topcoat.
This eye-catching design is perfect for special occasions or whenever you’re feeling fabulous.
6. Striped Delight
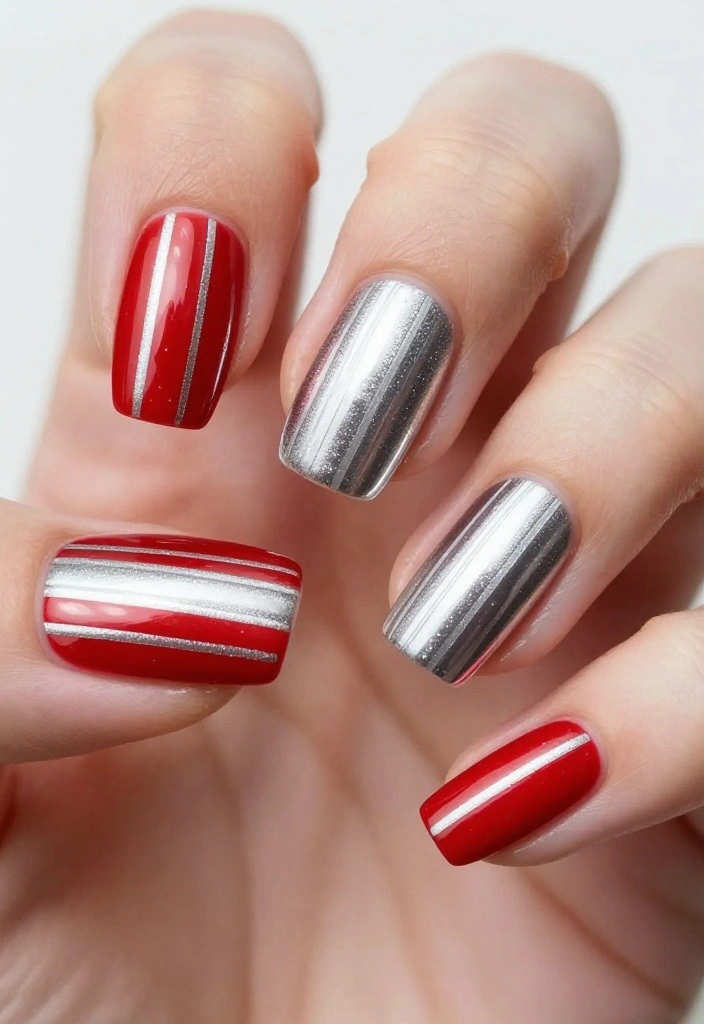
Time to stripe it up! Alternating stripes of silver and red create a playful yet sophisticated nail art look. This design is versatile and can be adapted for any season or occasion.
Follow these steps to achieve those striking stripes:
– Start with a red base coat.
– Once dry, add thin stripes of silver polish using a striping brush or tape.
– Experiment with different widths for various visual effects.
– Finish with a glossy topcoat for that sleek look.
This design encourages creativity and can easily be customized with different colors or patterns!
7. Red Base with Silver Studs

Add dimension to your nails with silver studs on a vibrant red base! This design combines a bold color choice with playful embellishments, perfect for those looking to add some edge to their style.
Here’s how to recreate this chic look:
– Apply a vibrant red polish for the base and let it dry thoroughly.
– Use nail glue or topcoat to adhere silver studs or gems onto your nails.
– Space them evenly or create a unique pattern!
– Seal everything with a topcoat for a lasting finish.
This design is fabulous for a night out or when you want to make a bold statement!
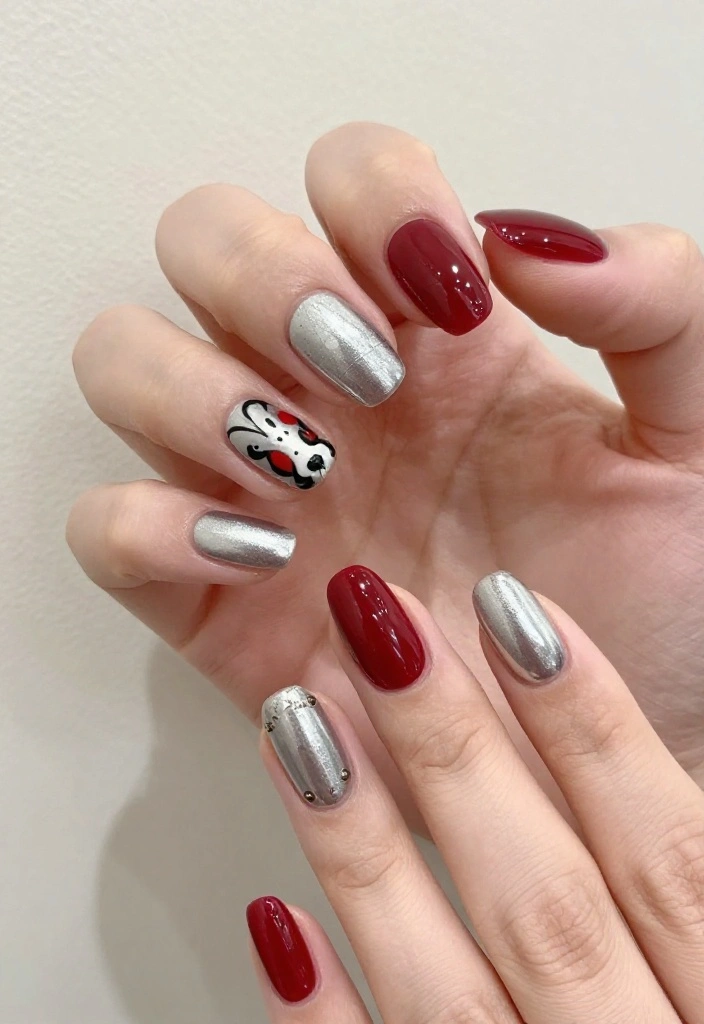
8. Mixed Media Look
Combine different textures and techniques for a fabulous mixed media look! Use matte red polish, glossy silver accents, and even some nail art stickers for an eclectic style that stands out.
Here’s how to achieve this unique design:
– Start with a matte red base for a soft finish.
– Choose glossy silver polish for a few nails and incorporate nail stickers for added interest.
– Mix and match designs like stripes, dots, or abstract shapes.
– Finish with a clear topcoat on the glossy parts to seal the look.
This design showcases your creativity and is bound to capture everyone’s attention!
9. Watercolor Effect

Create a dreamy atmosphere with a watercolor effect using silver and red tones! This style gives off a soft, artistic vibe that’s perfect for a relaxed day.
Here’s how to achieve this lovely look:
– Start with a white polish base.
– Use a makeup sponge to dab on red and silver polishes, blending them together for a watercolor effect.
– Seal it all with a matte or glossy topcoat for a polished finish.
This design encourages creativity and can be adapted with various colors to suit your mood!
Fun fact: A watercolor look can be achieved with just 3 polishes—white base, red, and silver—and a makeup sponge, delivering soft blends. Seal with a matte or glossy topcoat to keep your silver and red almond nails chic all day.
10. Bold Half-Moon Design

The half-moon design gets a modern twist with a bold red and silver combination! This chic style adds an elegant touch, making it perfect for both office wear and night outings.
To achieve this trendy look, follow these steps:
– Start with a red base coat on your nails.
– Once dry, use a round hole reinforcement sticker to cover the base of your nail, leaving the moon at the bottom.
– Apply silver polish to the exposed area, carefully peeling off the sticker afterward.
– Seal everything with a clear topcoat for shine.
This design brings a sophisticated flair to your everyday nails!
11. Celestial Themed Design

Get starry-eyed with a celestial-themed nail design featuring silver stars on a red base! This whimsical look is perfect for those who embrace their inner dreamer and love a bit of fantasy.
Here’s how you can achieve this enchanting style:
– Apply a rich red polish across all nails.
– Once dry, use a small brush or stamping tool to add silver stars and moons.
– Experiment with different sizes for a playful effect!
– Finish with a clear topcoat to keep everything intact.
This design adds a magical touch to your nails!
12. Artistic Splashes

Unleash your inner artist with splashes of red and silver! This spontaneous design allows for creativity and expression, making each nail a mini masterpiece.
To achieve this unique look:
– Start with a solid red base coat.
– Use a fine brush to splash silver polish in varied patterns across your nails.
– Experiment with different brush techniques for diverse effects.
– Seal with a glossy topcoat for a polished finish.
This design is perfect for anyone wanting to showcase their individuality through their nails!
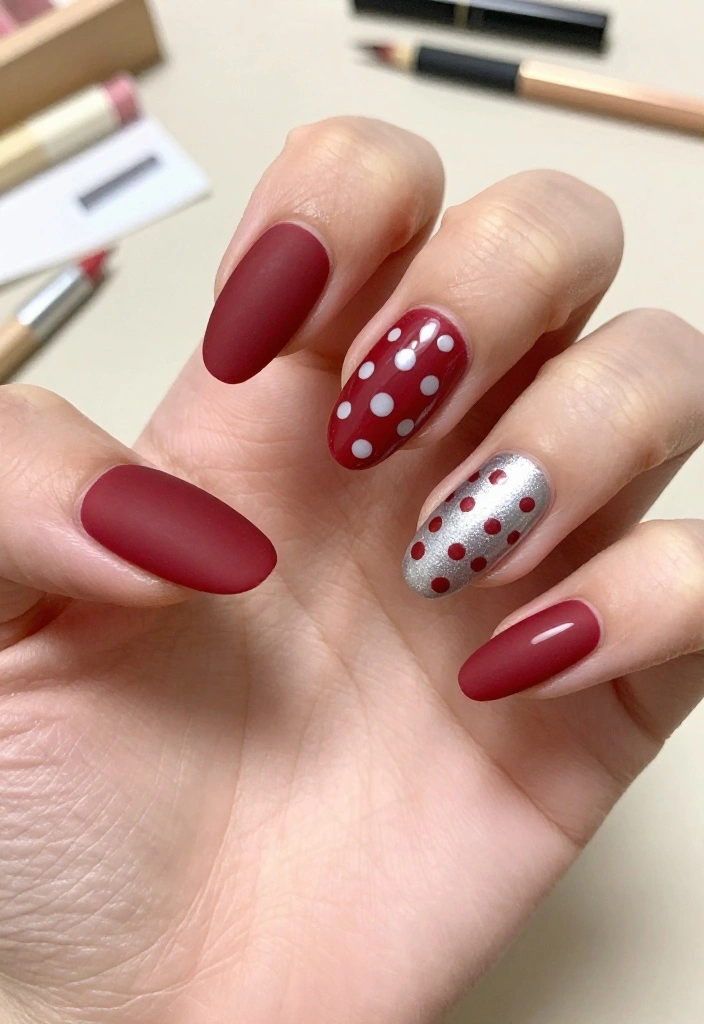
13. Elegant Minimalist

For a refined and chic appearance, try an elegant minimalist design with just a hint of silver on a red base. This style exudes sophistication, perfect for those who appreciate understated beauty.
To create this look:
– Paint your nails with a solid red base.
– Use a dotting tool to create tiny silver dots at the base or tips of the nails.
– Keep it simple for that modern aesthetic.
– Seal everything with a topcoat for durability and shine.
This design emphasizes elegance and is ideal for anyone who values simplicity in their nail art!
Fun fact: when you add just two tiny silver dots to a red almond nail, your silver and red almond nails look instantly more polished in photos. Minimalism shines with simple accents, and you’ll love the sophisticated vibe.
14. Layered Rhinestones
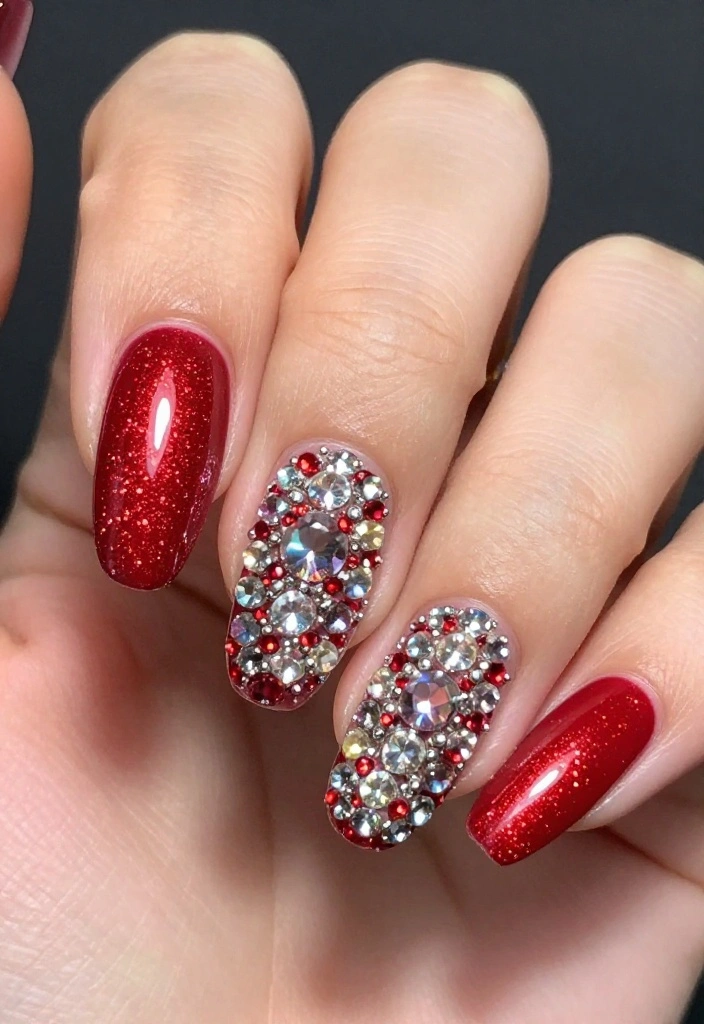
Add glamour to your red almond nails with layered rhinestones! This bold design is perfect for those who love to shine and stand out.
Here’s how to achieve this stunning look:
– Start with a solid red polish base.
– Apply a topcoat and place rhinestones in clusters along the cuticle or tips.
– Layer different sizes for a dynamic effect.
– Seal with a clear topcoat to secure the jewels.
This design is perfect for special occasions where you want all eyes on you!
15. Artistic Nail Art Dots
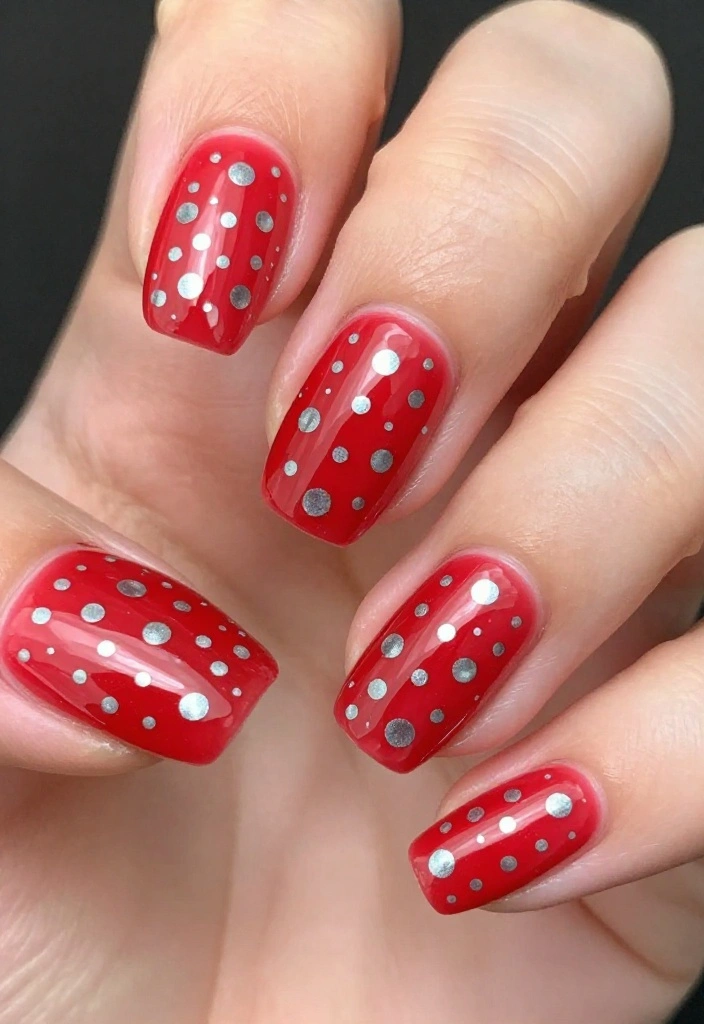
Bring some fun to your nails with artistic dot designs using silver and red! This playful approach is great for a cheerful, youthful look.
To create this design:
– Start with a red base coat.
– Use a dotting tool to create clusters of silver dots on select nails.
– Vary the sizes of the dots for a fun effect!
– Seal it all with a topcoat for longevity.
This design is easy to customize and adds a whimsical touch to your style!
16. Retro Checkerboard
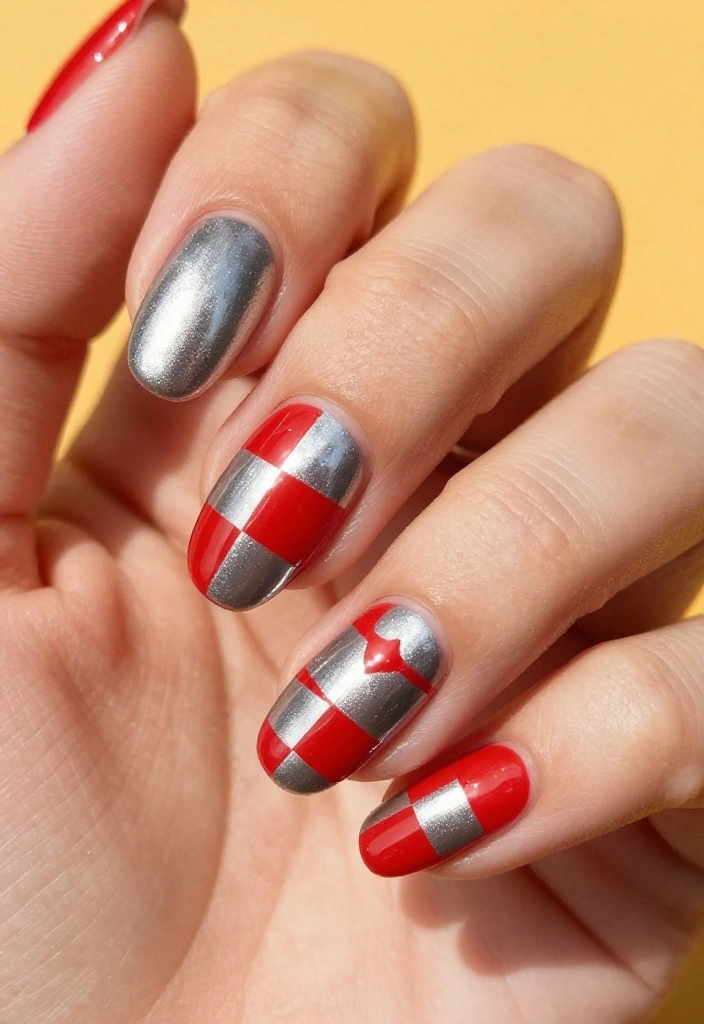
Channel retro vibes with a checkerboard pattern in red and silver! This bold design is eye-catching and a fantastic way to express your unique personality.
To achieve this look:
– Start with a solid red base.
– Use tape to create a checkerboard pattern, leaving some spaces open for silver polish.
– Apply silver to the open squares and carefully remove the tape.
– Seal everything with a topcoat for a long-lasting finish.
This design is perfect for anyone wanting to stand out and have fun with their nail art!
17. Sparkling Galaxy

For an out-of-this-world look, try a sparkling galaxy design using silver and red! This fun and whimsical style is perfect for those who love to express their creativity.
To achieve this dreamy look:
– Start with a deep red base coat.
– Use a sponge to dab on silver polish for a starry effect.
– Add some glitter to enhance the galaxy feel.
– Finish with a glossy topcoat to seal everything in.
This design embodies a sense of wonder and imagination!
18. Metallic Marble Effect
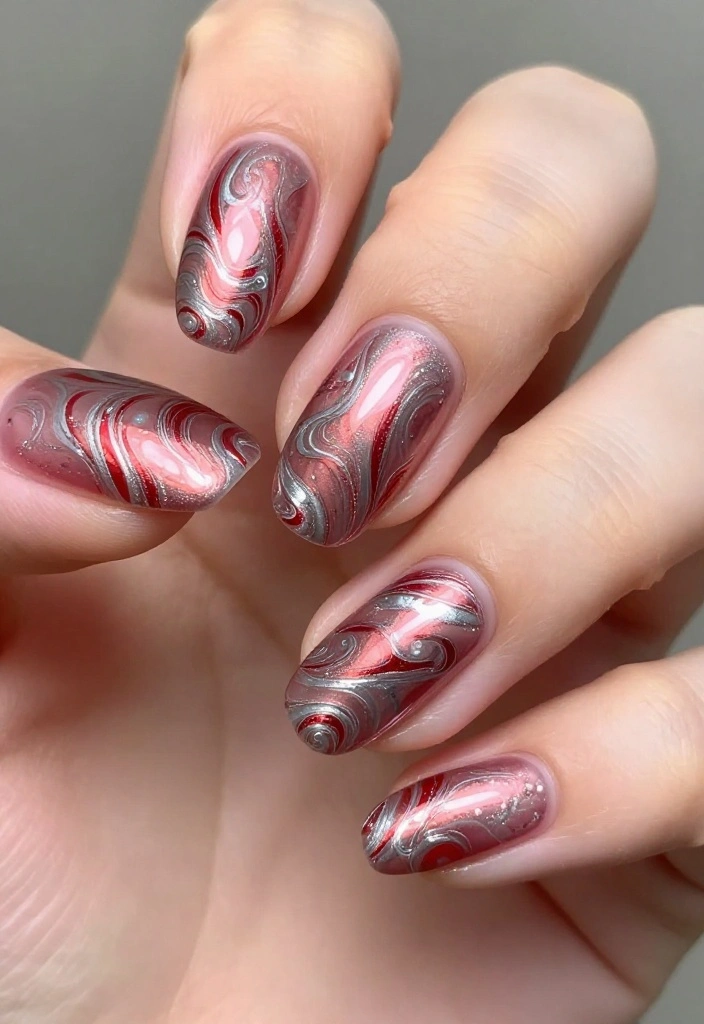
Marble nails are always in style, and adding a metallic twist makes them even more fabulous! This design combines red and silver for an edgy, stylish look.
To create this eye-catching design:
– Start with a base of white polish.
– Use a thin brush to swirl silver and red polishes together, creating a marble effect.
– Work quickly for the best results and seal with a topcoat to enhance the shine.
This design is all about creativity and allows for endless variations!
Metallic marble nails give silver and red almond nails a bold edge. Start with a white base, swiftly swirl silver and red to create the marble, then seal with a topcoat for lasting shine—your mani will look upscale and endlessly customizable.
19. Neon Accents

Turn heads with a trendy neon twist! Use neon shades of red alongside silver for a vibrant look that’s totally on-trend.
Here’s how to achieve this bold design:
– Start with a neon red polish as your base.
– Use silver polish for accents on a few nails or create fun patterns.
– Seal everything with a topcoat for durability.
This design is bright, bold, and full of personality, perfect for anyone who loves to stand out!
Conclusion
Silver and red almond nails are a brilliant way to express your style and creativity. With so many designs to choose from, you can easily mix and match to find the perfect look for every occasion. Whether you’re drawn to bold patterns or elegant accents, there’s something here for everyone to love.
So what are you waiting for? Grab your nail polishes and get creative!
Note: We aim to provide accurate product links, but some may occasionally expire or become unavailable. If this happens, please search directly on Amazon for the product or a suitable alternative.
This post contains Amazon affiliate links, meaning we may earn a small commission if you purchase through our links, at no extra cost to you.
Frequently Asked Questions
What makes silver and red almond nails stand out compared to other nail designs?
Silver and red almond nails stand out for their bold contrast and elegant almond shape. The silver and red almond nails combo elongates fingers and adapts from sophisticated to playful depending on the finish. Silver adds a reflective pop, while red anchors the look with drama. For at-home recreations, shape nails into a classic almond, apply a red base, and add metallic accents like foil, chrome powder, or tiny studs for instant sparkle. If you want a subtler take, try a red base with a thin silver tip for a modern twist.
Which nail art ideas work best with silver and red almond nails?
Here are creative ideas that pair beautifully with silver and red almond nails:
1) A red almond nail with a slim silver foil accent along the cuticle for a chic, creative touch;
2) A red base with chrome or silver powder on one or two nails for a unique accent;
3) Matte red nails with glossy silver geometric lines for contrast;
4) Negative-space almond tips filled with silver glitter to keep the look light;
5) Red nails with a row of tiny rhinestones in silver along the edge for a subtle sparkle.
What tools and products do I need to recreate silver and red almond nails at home?
To nail the look at home, gather a few essentials:
• A base coat and top coat for lasting shine
• A true red nail polish (or gel) and a silver foil or chrome powder
• Nail file and buffer to shape almond nails perfectly
• Striping tape or a fine brush for clean lines
• Fine rhinestones or studs for accent details, plus nail glue
• Acetone and a cleanup brush for neat edges
• A UV/LED lamp if you’re using gel products
Pro tip: prep nails, push back cuticles, gently buff, then apply thin layers and seal with a glossy finish for durability.
How can I choose the right shade of red and silver for my skin tone when aiming for almond nails?
Choosing the right shades makes the look sing. For silver and red almond nails, cooler complexions often shine with blue-based reds and bright silvers, while warmer skin tones glow with warmer reds (crimson or brick) and slightly warmer silvers. Try swatching on a nail wheel or the tip of your finger to compare side by side, and consider your jewelry and wardrobe to keep the look cohesive. If you’re unsure, pick a classic mid-tone red and a versatile silver that contrasts without washing you out.
How durable are silver and red almond nails, and how can I extend wear?
Durability depends on your technique. Regular polish on almond nails can chip in a few days, while gel polish or acrylic builds with a hard silver topcoat can last 2-3 weeks with proper care. To maximize wear: prep nails well, apply a solid base coat, cap the free edge, use two to three thin coats of red, add the silver accents, and finish with a durable top coat. Reapply the top coat every 2-3 days, wear gloves for chores, and avoid harsh solvents. When it’s time to remove, do so gently to protect the natural nails and preserve the almond shape.
Related Topics
silver and red nails
almond shape
creative nail art
nail color combinations
unique nail designs
trendy nail styles
easy nail techniques
manicure inspiration
seasonal nail art
beginner friendly nails
festive nail designs
nail care tips
These silver and red almond nails are so stunning! I’ve been trying to decide on my next manicure, and I think you’ve just solved my dilemma! Which design do you think is the easiest to do at home?
I love how creative these designs are! Just thinking about trying to do nail art makes me feel like I need a special skill set. And then I remember the time I tried to paint my nails and ended up with more polish on my hands than on the nails – classic me!
Wow, I never knew silver and red could look so classy together! Did you know that almond-shaped nails were actually popular in ancient Egypt? They believed it made their fingers look longer and more elegant!
These designs are giving me major nail envy! I once tried to recreate a similar look for a party, but I ended up with a total mess. My friends still tease me about it, but it made for a funny story!